JustAuth 简介
🏆Gitee 最有价值开源项目 🚀💯 小而全而美的第三方登录开源组件。目前已支持 Github、Gitee、微博、钉钉、百度、Coding、腾讯云开发者平台、OSChina、支付宝、QQ、微信、淘宝、Google、Facebook、抖音、领英、小米、微软、今日头条、Teambition、StackOverflow、Pinterest、人人、华为、企业微信、酷家乐、Gitlab、美团、饿了么、推特、飞书、京东、阿里云、喜马拉雅、Amazon、Slack 和 Line 等第三方平台的授权登录。 Login, so easy!justauth/JustAuth
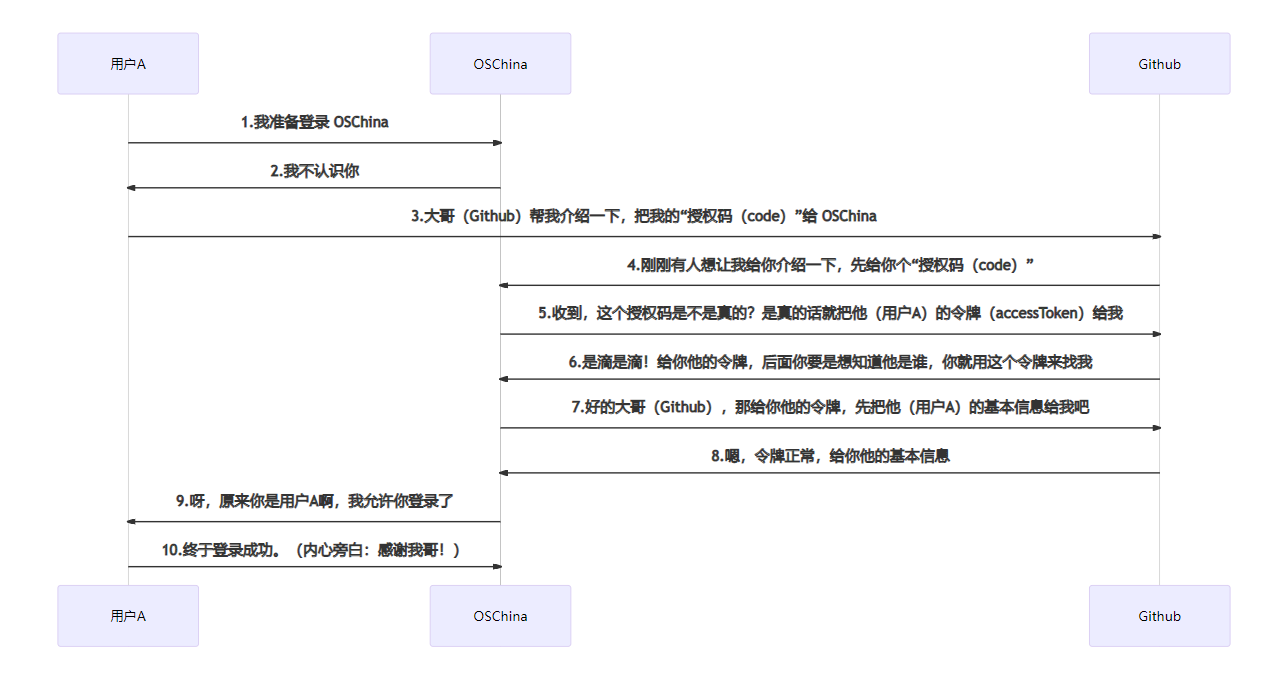
1
2
3
4
5
6
7
8
9
10
11
12
13
14
15
16
17
18
19
20
21
22
23
24
25
26
27
28
29
30
31
32
33
34
35
36
37
38
39
40
41
42
43
44
45
46
47
48
49
50
51
52
53
54
55
56
57
58
59
60
61
62
63
64
65
66
67
68
69
70
71
72
73
74
75
76
77
78
79
80
81
82
83
1.1. Roles OAuth defines four roles: resource owner An entity capable of granting access to a protected resource. When the resource owner is a person, it is referred to as an end-user. resource server The server hosting the protected resources, capable of accepting and responding to protected resource requests using access tokens. client An application making protected resource requests on behalf of the resource owner and with its authorization. The term "client" does not imply any particular implementation characteristics (e.g., whether the application executes on a server, a desktop, or other devices). authorization server The server issuing access tokens to the client after successfully authenticating the resource owner and obtaining authorization. The interaction between the authorization server and resource server is beyond the scope of this specification. The authorization server may be the same server as the resource server or a separate entity. A single authorization server may issue access tokens accepted by multiple resource servers. 1.2. Protocol Flow +--------+ +---------------+ | |--(A)- Authorization Request -> | Resource | | | | Owner | | |<-(B)-- Authorization Grant --- | | | | +---------------+ | | | | +---------------+ | |--(C)-- Authorization Grant --> | Authorization | | Client | | Server | | |<-(D)----- Access Token ------- | | | | +---------------+ | | | | +---------------+ | |--(E)----- Access Token ------> | Resource | | | | Server | | |<-(F)--- Protected Resource --- | | +--------+ +---------------+ Figure 1: Abstract Protocol Flow The abstract OAuth 2.0 flow illustrated in Figure 1 describes the interaction between the four roles and includes the following steps: (A) The client requests authorization from the resource owner. The authorization request can be made directly to the resource owner (as shown), or preferably indirectly via the authorization server as an intermediary. 用户打开客户端以后,客户端要求用户给予授权。 (B) The client receives an authorization grant, which is a credential representing the resource owner's authorization, expressed using one of four grant types defined in this specification or using an extension grant type. The authorization grant type depends on the method used by the client to request authorization and the types supported by the authorization server. 用户同意给予客户端授权。 (C) The client requests an access token by authenticating with the authorization server and presenting the authorization grant. 客户端使用上一步获得的授权,向认证服务器申请令牌。 (D) The authorization server authenticates the client and validates the authorization grant, and if valid, issues an access token. 认证服务器对客户端进行认证以后,确认无误,同意发放令牌 (E) The client requests the protected resource from the resource server and authenticates by presenting the access token. 客户端使用令牌,向资源服务器申请获取资源。 (F) The resource server validates the access token, and if valid, serves the request. 资源服务器确认令牌无误,同意向客户端开放资源。 https://datatracker.ietf.org/doc/html/rfc6749
从以下几个问题来看代码 Q: 如何集成多家的? 这一块,主要是工厂模式和模板模式的应用。
工厂模式
1 AuthRequestFactory# get (String source )
模板模式
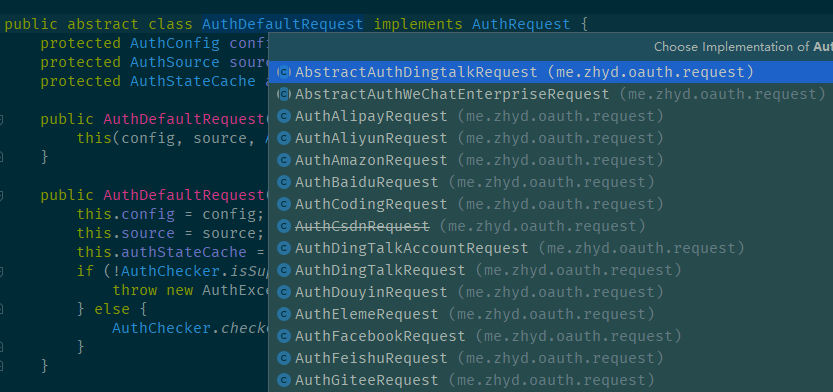
1
2
3
4
5
6
7
public abstract class AuthDefaultRequest implements AuthRequest { protected abstract AuthToken getAccessToken (AuthCallback var1) ; protected abstract AuthUser getUserInfo (AuthToken var1) ; }
针对授权、获取用户信息等操作,由具体的 source 类来实现
1
2
3
4
5
6
7
8
9
10
11
12
13
14
15
16
17
18
19
20
21
22
23
24
25
26
27
28
29
30
31
32
33
34
35
36
37
38
39
40
41
42
43
44
45
46
47
48
49
50
51
52
public interface AuthSource { String authorize () ; String accessToken () ; String userInfo () ; default String revoke () { throw new AuthException (AuthResponseStatus.UNSUPPORTED); } default String refresh () { throw new AuthException (AuthResponseStatus.UNSUPPORTED); } default String getName () { return this instanceof Enum ? String.valueOf(this ) : this .getClass().getSimpleName(); } } public enum AuthDefaultSource implements AuthSource { GITHUB { public String authorize () { return "https://github.com/login/oauth/authorize" ; } public String accessToken () { return "https://github.com/login/oauth/access_token" ; } public String userInfo () { return "https://api.github.com/user" ; } }, WEIBO { public String authorize () { return "https://api.weibo.com/oauth2/authorize" ; } public String accessToken () { return "https://api.weibo.com/oauth2/access_token" ; } public String userInfo () { return "https://api.weibo.com/2/users/show.json" ; } public String revoke () { return "https://api.weibo.com/oauth2/revokeoauth2" ; } } }
多家配置
1
2
3
4
5
6
7
8
9
10
11
12
justauth: enabled: true type: QQ: client-id: 10 **********6 client-secret: 1f7d08**********5b7**********29e redirect-uri: http://x.lyloou.com/oauth/qq/callback union-id: false WEIBO: client-id: 10 **********6 client-secret: 1f7d08**********5b7**********29e redirect-uri: http://x.lyloou.com/oauth/weibo/callback
Q: State 缓存如何实现? state 是 用来保持授权会话流程完整性,防止 CSRF 攻击的安全的随机的参数,由开发者生成
自动配置
1 2 3 4 5 6 7 8 9 10 11 12 13 14 15 16 17 18 19 20 @ConditionalOnMissingBean({AuthStateCache.class}) @ConditionalOnProperty( name = {"justauth.cache.type"}, havingValue = "default", matchIfMissing = true // 默认 ) static class Default { Default() { } @Bean public AuthStateCache authStateCache () { return AuthDefaultStateCache.INSTANCE; } static { JustAuthStateCacheConfiguration.log.debug("JustAuth 使用 默认缓存存储 state 数据" ); } }
配置
1
2
3
4
5
6
7
8
9
10
11
12
13
14
15
16
17
18
19
20
21
22
23
24
25
26
27
28
29
30
31
32
33
34
35
36
37
38
39
40
41
42
43
44
justauth: cache: type: default ``` **实现** **清理** 通过 ScheduledThreadPoolExecutor 每隔 AuthCacheConfig.timeout 来定时清理 CacheState ```java public void schedulePrune(long delay) { AuthCacheScheduler.INSTANCE.schedule(this::pruneCache , delay); } public enum AuthCacheScheduler { INSTANCE; private AtomicInteger cacheTaskNumber = new AtomicInteger(1); private ScheduledExecutorService scheduler; private AuthCacheScheduler() { this.create(); } private void create() { this.shutdown(); this.scheduler = new ScheduledThreadPoolExecutor(10 , (r) -> { return new Thread(r , String.format("JustAuth-Task-%s" , this.cacheTaskNumber.getAndIncrement())); }); } public void shutdown() { if (null != this.scheduler) { this.scheduler.shutdown(); } } public void schedule(Runnable task , long delay) { this.scheduler.scheduleAtFixedRate(task , delay , delay , TimeUnit.MILLISECONDS); } }
Q: 如何做到适配自有的 OAuth 服务? 和上面其他平台的一样,可以自定义来适配新的平台。
继承 AuthSource,加入 authorize、accessToken、userInfo 地址
实现 AuthDefaultRequest,重写几个基本的 oauth 服务接口:getAccessToken、getUserInfo、authorize。
测试
1
2
3
4
5
AuthRequest authRequest = new AuthMyGitlabRequest (AuthConfig.builder() .clientId("63398e403231d4aa7e856cf5413620d536a876cb94e8d10ced0d3191b5d1d246" ) .clientSecret("65b0eba68fff019e682e6755882a24dfdbf0a61be55de119cb8970320186c8eb" ) .redirectUri("http://127.0.0.1:8443/oauth/callback/mygitlab" ) .build())
Q: 如何支持自定义 Scope? 自定义-scope-接入-google-平台
scope 简单来说,就是申请得到某个(某些)范围的资源,超过此范围的资源限制访问。
Scope is a mechanism in OAuth 2.0 to limit an application’s access to a user’s account. An application can request one or more scopes, this information is then presented to the user in the consent screen, and the access token issued to the application will be limited to the scopes granted.
—— 以上内容节选自oauth.net (opens new window)
提供 AuthScope 统一接口
1 2 3 4 5 6 7 8 9 10 11 12 13 14 15 16 17 18 19 20 21 22 23 public interface AuthScope { String getScope () ; boolean isDefault () ; }
各个平台实现此接口,如 google
1 2 3 4 5 6 7 8 9 10 11 12 13 14 15 16 17 18 19 20 21 22 23 24 25 26 @Getter @AllArgsConstructor public enum AuthGoogleScope implements AuthScope { USER_OPENID("openid" , "Associate you with your personal info on Google" , true ), USER_EMAIL("email" , "View your email address" , true ), USER_PROFILE("profile" , "View your basic profile info" , true ), USER_PHONENUMBERS_READ("https://www.googleapis.com/auth/user.phonenumbers.read" , "View your phone numbers" , false ), USER_ORGANIZATION_READ("https://www.googleapis.com/auth/user.organization.read" , "See your education, work history and org info" , false ), USER_GENDER_READ("https://www.googleapis.com/auth/user.gender.read" , "See your gender" , false ), USER_EMAILS_READ("https://www.googleapis.com/auth/user.emails.read" , "View your email addresses" , false ), USER_BIRTHDAY_READ("https://www.googleapis.com/auth/user.birthday.read" , "View your complete date of birth" , false ) }
结合流程图来说,(A)这里需要将 scope 带过去,进入授权页面。
1
2
3
4
5
6
7
8
9
10
11
12
13
14
15
16
17
+--------+ +---------------+ | |--(A)- Authorization Request -> | Resource | | | | Owner | | |<-(B)-- Authorization Grant --- | | | | +---------------+ || | +---------------+ |--(C)-- Authorization Grant --> | Authorization || Client | | Server | | |<-(D)----- Access Token ------- | | | | +---------------+ || | +---------------+ |--(E)----- Access Token ------> | Resource || | | Server | | |<-(F)--- Protected Resource --- | | +--------+
1 https:// accounts.google.com/o/ oauth2/v2/ auth?response_type=code&client_id=553817080137 -d1pe3asc115tfgo74l8me92dhg4ro9k1.apps.googleusercontent.com&redirect_uri=http:// x.lyloou.com/oauth/g oogle/callback&state=e829a5725ce69cf1ed7918337caba839&access_type=offline&scope=openid email profile&prompt=select_account
授权页面的链接是通过 AuthDefaultRequest.authorize 来拼接得到的。
1 2 3 4 5 6 7 8 9 10 11 12 13 14 15 16 17 18 19 20 21 22 23 24 25 26 27 28 29 30 31 32 33 34 35 36 37 38 39 40 @Override public String authorize (String state) { return UrlBuilder.fromBaseUrl(super .authorize(state)) .queryParam("access_type" , "offline" ) .queryParam("scope" , this .getScopes(" " , false , AuthScopeUtils.getDefaultScopes(AuthGoogleScope.values()))) .queryParam("prompt" ,"select_account" ) .build(); } protected String getScopes (String separator, boolean encode, List<String> defaultScopes) { List<String> scopes = config.getScopes(); if (null == scopes || scopes.isEmpty()) { if (null == defaultScopes || defaultScopes.isEmpty()) { return "" ; } scopes = defaultScopes; } if (null == separator) { separator = " " ; } String scopeStr = String.join(separator, scopes); return encode ? UrlUtil.urlEncode(scopeStr) : scopeStr; }
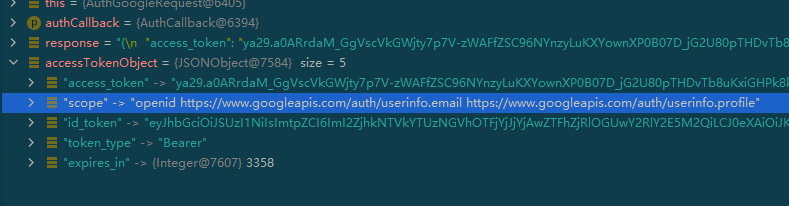
getScopes 这里的逻辑是,如果没有传入 scope 参数,那么就使用默认的 scope 参数,即openid email profile:
1 2 3 USER_OPENID("openid" , "Associate you with your personal info on Google" , true ), USER_EMAIL("email" , "View your email address" , true ), USER_PROFILE("profile" , "View your basic profile info" , true ),
插曲:如果你把 email 和 profile 取消掉,获取到用户信息时会发现少了 email,profile 这些信息
1 2 3 4 5 6 7 8 9 10 11 12 13 14 15 16 17 18 19 20 21 22 23 24 25 26 27 28 29 30 31 32 33 34 35 36 37 38 39 40 41 42 43 { "code" : 2000 , "msg" : null , "data" : { "uuid" : "113911973270419053931" , "username" : null , "nickname" : null , "avatar" : "https://lh3.googleusercontent.com/a-/AOh14GgncI8eYK_uG119BDclub5LNGDn57G_GI4OLZeOBA=s96-c" , "blog" : null , "company" : null , "location" : null , "email" : null , "remark" : null , "gender" : "UNKNOWN" , "source" : "GOOGLE" , "token" : { "accessToken" : "ya29.a0ARrdaM-dddddd-MPjpVj6xJAJP0zZFb396tpmi6BkS_Uom1G7DGTvSaWdJwwOzCXC5Bus-xQjq9JdGfNKWylhl029LMtuyZVT7lKzquGvUFePmellmRoY2Or6RgjS-TwKHzSviQoqEFBcYlQ" , "expireIn" : 3592 , "refreshToken" : null , "refreshTokenExpireIn" : 0 , "uid" : null , "openId" : null , "accessCode" : null , "unionId" : null , "scope" : "openid" , "tokenType" : "Bearer" , "idToken" : "eyJhbGciOiJSUzI1NiIsImtpZCI6ImI2ZjhkNTVkYTUzNGVhOTFjYjJjYjAwZTFhZjRlOGUwY2RlY2E5M2QiLCJ0eXAiOiJKV1QifQ.dddddd.yYUcU9VMwrF3vGXfmR4bsJDeQSjl_msow9eCARiV8HYIyjWDyZUM0ihOqxQzunWUT0W3nRVWxFw4oeN9bhZxIU9jBpW600eJRyDZ6BgJs0QEmC4sjJ4rWPp_P6OFo6b4HEM9Cl5i4ix-cJV18-4BxWhM6WbuC09F3a5RVvp7YGzYhMDRK4fecDpy-7q5wFZws3oYOrjCK5rVu4lioLMTJHCV-THbWImZTrEiuiLxw6onvKwhDa2FfLGbO3tei0EoVTvxJJwi18K-5TzcNySb8yBA-NYTXmlLZ9iWb7NNa7IXqKI1qt0VYm7xUUY4r3G14tZKU6JKkuz07RVx-4zxMw" , "macAlgorithm" : null , "macKey" : null , "code" : null , "oauthToken" : null , "oauthTokenSecret" : null , "userId" : null , "screenName" : null , "oauthCallbackConfirmed" : null } , "rawUserInfo" : { "sub" : "ddd" , "picture" : "https://lh3.googleusercontent.com/a-/AOh14GgncI8eYK_uG119BDclub5LNGDn57G_GI4OLZeOBA=s96-c" } } }
1 2 3 4 5 6 7 8 9 10 11 12 13 14 15 16 17 18 19 20 21 22 23 24 25 26 27 28 29 30 31 32 33 34 35 36 37 38 39 40 41 42 43 44 45 46 47 48 { "code" : 2000 , "msg" : null , "data" : { "uuid" : "113911973270419053931" , "username" : "lyloou6@gmail.com" , "nickname" : "Lou" , "avatar" : "https://lh3.googleusercontent.com/a-/AOh14GgncI8eYK_uG119BDclub5LNGDn57G_GI4OLZeOBA=s96-c" , "blog" : null , "company" : null , "location" : "zh-CN" , "email" : "lyloou6@gmail.com" , "remark" : null , "gender" : "UNKNOWN" , "source" : "GOOGLE" , "token" : { "accessToken" : "ya29.dd-dddd-eplbTCCWb55DHRZeAGDqDvk5RADufWREONGgKhdtCLa3yWKp4TxTJsyPi2EXYhgmMqV4yVV-NX6swbc38hMXKKGzsTnW4UVaiSOklQ-C1B_af" , "expireIn" : 3599 , "refreshToken" : null , "refreshTokenExpireIn" : 0 , "uid" : null , "openId" : null , "accessCode" : null , "unionId" : null , "scope" : "openid https://www.googleapis.com/auth/userinfo.profile https://www.googleapis.com/auth/userinfo.email" , "tokenType" : "Bearer" , "idToken" : "dddddddddd" , "macAlgorithm" : null , "macKey" : null , "code" : null , "oauthToken" : null , "oauthTokenSecret" : null , "userId" : null , "screenName" : null , "oauthCallbackConfirmed" : null } , "rawUserInfo" : { "sub" : "113911973270419053931" , "email_verified" : true , "name" : "Lou" , "given_name" : "Lou" , "locale" : "zh-CN" , "picture" : "https://lh3.googleusercontent.com/a-/AOh14GgncI8eYK_uG119BDclub5LNGDn57G_GI4OLZeOBA=s96-c" , "email" : "lyloou6@gmail.com" } } }
Q: http 工具如何解耦,可以将选择权交给开发者? 作者引入了自己实现的 simple-http 工具包 xkcoding/simple-http: 抽取一个简单 HTTP 的通用接口,底层实现根据具体引入依赖指定。
从 AuthGithubRequest#getUserInfo 开始
1
2
3
4
5
6
7
8
protected AuthUser getUserInfo (AuthToken authToken) { HttpHeader header = new HttpHeader (); header.add("Authorization" , "token " + authToken.getAccessToken()); String response = (new HttpUtils (this .config.getHttpConfig())).get(UrlBuilder.fromBaseUrl(this .source.userInfo()).build(), (Map)null , header, false ); JSONObject object = JSONObject.parseObject(response); this .checkResponse(object.containsKey("error" ), object.getString("error_description" )); return AuthUser.builder().rawUserInfo(object).uuid(object.getString("id" )).username(object.getString("login" )).avatar(object.getString("avatar_url" )).blog(object.getString("blog" )).nickname(object.getString("name" )).company(object.getString("company" )).location(object.getString("location" )).email(object.getString("email" )).remark(object.getString("bio" )).gender(AuthUserGender.UNKNOWN).token(authToken).source(this .source.toString()).build(); }
这里实例化了一个 HttpUtils 工具类 new HttpUtils(this.config.getHttpConfig())
1
2
3
4
5
6
public class HttpUtils { public HttpUtils (HttpConfig config) { HttpUtil.setConfig(config); } }
1
2
3
4
5
6
7
8
9
10
11
12
13
14
15
public class HttpUtil { public void setConfig (HttpConfig httpConfig) { checkHttpNotNull(proxy); if (null == httpConfig) { httpConfig = HttpConfig.builder().timeout(Constants.DEFAULT_TIMEOUT).build(); } proxy.setHttpConfig(httpConfig); } private void checkHttpNotNull (Http proxy) { if (null == proxy) { selectHttpProxy(); } } }
可以看到 selectHttpProxy()这里是关键,通过 ClassUtil.isPresent的方式(即Class.forName)来确定 class 是否可以被加载,从上到下,如果可以被加载,就作为 http 的具体代理。(所以引入了相关的 http 依赖,HttpUtils 就可以直接拿来使用了)
1
2
3
4
5
6
7
8
9
10
11
12
13
14
15
16
17
18
19
20
21
22
23
24
25
26
27
28
29
30
public class HttpUtil { private static AbstractHttp proxy; private void selectHttpProxy () { AbstractHttp defaultProxy = null ; ClassLoader classLoader = HttpUtil.class.getClassLoader(); if (ClassUtil.isPresent("java.net.http.HttpClient" , classLoader)) { defaultProxy = getHttpProxy(com.xkcoding.http.support.java11.HttpClientImpl.class); } if (null == defaultProxy && ClassUtil.isPresent("okhttp3.OkHttpClient" , classLoader)) { defaultProxy = getHttpProxy(com.xkcoding.http.support.okhttp3.OkHttp3Impl.class); } if (null == defaultProxy && ClassUtil.isPresent("org.apache.http.impl.client.HttpClients" , classLoader)) { defaultProxy = getHttpProxy(com.xkcoding.http.support.httpclient.HttpClientImpl.class); } if (null == defaultProxy && ClassUtil.isPresent("cn.hutool.http.HttpRequest" , classLoader)) { defaultProxy = getHttpProxy(com.xkcoding.http.support.hutool.HutoolImpl.class); } if (defaultProxy == null ) { throw new SimpleHttpException ("Has no HttpImpl defined in environment!" ); } proxy = defaultProxy; } }
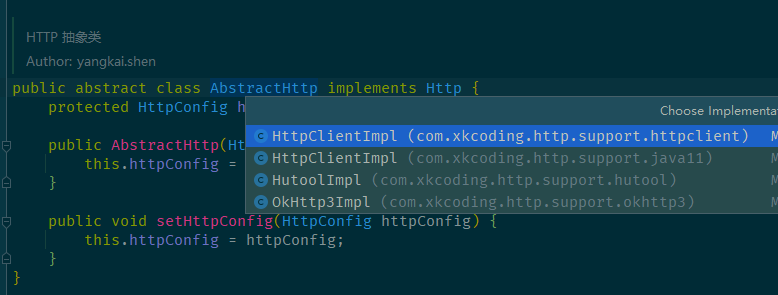
如下图,是 simpleHttp 默认支持的 Http 工具。
也可以自己继承 AbstractHttp,然后调用 HttpUtil#setHttp(AbstractHttp http) 方法来接入自己实现的 http 工具。
所有实现 AbstractHttp 和 Http 的类,需要自己实现 一系列的get、 post 方法(即封装)。运行时通过面向对象中的多态来决定具体的实现者。