Nginx

install nginx

1
sudo apt install nginx
1
2
3
4
5
# 启动Nginx
/etc/init.d/nginx start

# 如果nginx已经启动,我们修改配置之后,可以用
/etc/init.d/nginx reload

/etc/nginx/nginx.conf末尾有一句:include /etc/nginx/conf.d/*.conf;  推荐把用户自己的配置放到 conf.d/
下面把默认的 server 修改为一个简单的文件服务器,vi /etc/nginx/conf.d/default.conf,修改监听端口 listen 和文件目录

1
2
3
4
5
6
7
8
9
10
11
12
13
14
15
16
17
18
19
20
21
22
23
24
25
26
27
28
# /etc/nginx/conf.d/default.conf
autoindex on;# 显示目录
autoindex_exact_size on;# 显示文件大小
autoindex_localtime on;# 显示文件时间

server {
listen 8080 default_server;
listen [::]:8080 default_server;
server_name _;
#root /root/share/;
root /opt/share/;

# Load configuration files for the default server block.
include /etc/nginx/default.d/*.conf;

location / {
}

error_page 404 /404.html;
location = /40x.html {
}

error_page 500 502 503 504 /50x.html;
location = /50x.html {
}

}

1
2
3
4
# 修改/etc/nginx/nginx.conf
# 由于我们使用的是root用户进行的共享,需要修改nginx.conf的用户,否则会出现权限问题,导致访问的时候出现403 Forbidden的错误

user root;

nginx 配置(含 ssl)

取名为 bs.lyloou.com.conf,并放入文件夹: /etc/nginx/conf.d 中,因为 nginx.conf 中会加载此目录下的文件,可以可以得到注册。

1
2
3
4
5
6
7
8
9
10
11
12
13
14
15
16
17
18
19
20
21
22
23
24
25
26
27
28
29
30
31
32
33
34
35
36
37
38
39
40
41
server
{
listen 80;
listen 443 ssl http2;
server_name bs.lyloou.com;
#index index.php index.html index.htm default.php default.htm default.html;
#root /www/wwwroot/bs.lyloou.com;

include /etc/nginx/default.d/*.conf;

#SSL-START SSL相关配置,请勿删除或修改下一行带注释的404规则
#error_page 404/404.html;
#HTTP_TO_HTTPS_START
if ($server_port !~ 443){
rewrite ^(/.*)$ https://$host$1 permanent;
}
#HTTP_TO_HTTPS_END
ssl_certificate /root/c/nginx/33333_bs.lyloou.com.pem;
ssl_certificate_key /root/c/nginx/33333_bs.lyloou.com.key;
ssl_protocols TLSv1.1 TLSv1.2 TLSv1.3;
ssl_ciphers ECDHE-RSA-AES128-GCM-SHA256:HIGH:!aNULL:!MD5:!RC4:!DHE;
ssl_prefer_server_ciphers on;
ssl_session_cache shared:SSL:10m;
ssl_session_timeout 10m;
#error_page 497 https://$host$request_uri;

#SSL-END

location / {
proxy_pass http://127.0.0.1:8080;
}

error_page 404 /404.html;
location = /40x.html {
}

error_page 500 502 503 504 /50x.html;
location = /50x.html {
}
}

Nginx – proxy_pass 配置 - Bigberg - 博客园

在 proxy_pass 中的代理 url 后加上/,代理转发的 url 中就不会带上 location 中匹配路径;
nginx_2020-08-19-18-50-37
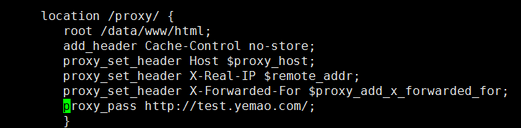
我们访问 http://my.yemao.com/proxy/index.html,其实是访问到了 http://test.yemao.com/index.html

在 proxy_pass 中的代理 url 后带 / (则不会加上 location 中的匹配路径)
在 proxy_pass 中的代理 url 中不带 / (则会加上 location 中的匹配路径)

upstream

Nginx 的 upstream 详解 - 简书

分配方式

Nginx 的 upstream 支持 5 种 分配方式,其中 轮询、权重、IP 散列这三种为 Nginx 原生支持的分配方式,fair 和 url_hash 为第三方支持的分配方式。

1,轮询

轮询是 upstream 的默认分配方式,即每个请求按照时间顺序轮流分配到不同的后端服务器,如果某个后端服务器 down 掉后,能自动剔除。

upstream zhang21(名称){

server 192.168.1.11:8888;

server 192.168.1.22:8888;

server 192.168.1.33:8888;

}

2,weight(权重)

轮询的加强版,既可以指定轮询比率,weight 和访问几率成正比,主要应用于后端服务器异质的场景下。

upstream zhang21 {

server 192.168.1.11 weight=1;

server 192.168.1.22 weight=2;

server 192.168.1.33 weight=3;

}

3,ip_hash

每个请求按照访问 Ip(即 Nginx 的前置服务器或客户端 IP)的 hash 结果分配,这样每个访客会固定访问一个后端服务器,可以解决 session 一致问题。

upstream zhang21 {

ip_hash;

server 192.168.1.11:7777;

server 192.168.1.22:8888;

server 192.168.1.33:9999;

}

4,fair

fair 顾名思义,公平地按照后端服务器的响应时间(rt)来分配请求,响应时间(rt)小的后端服务器优先分配请求。

upstream zhang21 {

server 192.168.1.11;

server 192.168.1.22;

server 192.168.1.33;

}

5,url_hash

与 ip_hash 类似,但是按照访问 url 的 hash 结果来分配请求,使得每个 url 定向到同一个后端服务器,主要应用于后端服务器为缓存的场景下。

upstream zhang21 {

server 192.168.1.11;

server 192.168.1.22;

server 192.168.1.33;

hash $request_uri;

hash_method crc32;

}

其中,hash_method 为使用的 hash 算法,需要注意,此时 server 语句中不能添加 weight 等参数。

作者:Zhang21
链接:https://www.jianshu.com/p/8671c40a5be8
来源:简书
著作权归作者所有。商业转载请联系作者获得授权,非商业转载请注明出处。

nginx 在一个服务器上配置两个项目,并通过两个不同的域名访问 - 半马 - 博客园

nginx 搭建文件服务器

1
2
3
4
5
6
7
8
9
10
11
12
server {
listen 80;
server_name file.lyloou.com; # 自己PC的ip或者服务器的域名 charset utf-8; # 避免中文乱码
root /home/xx/share; # 存放文件的目录
location / {
# download
autoindex on; # enable directory listing output
autoindex_exact_size off; # output file sizes rounded to kilobytes, megabytes, and gigabytes
autoindex_localtime on; # output local times in the directory
}
}

如何为 nginx 配置 https(免费证书) - 主啊~ - 博客园

注意

  • 如果用了 docker 要暴露 443 端口
  • 如果用了服务商服务器,要在安全组中配置 443 入方向

nginx 设置 websocket 连接

1
2
3
4
5
6
7
8
9
10
location /market {
index index.html;
client_max_body_size 5m;
proxy_pass http://172.21.90.214:6001;
proxy_set_header Host $host;
proxy_set_header X-Real-IP $remote_addr;
proxy_set_header Upgrade $http_upgrade;
proxy_set_header Connection "upgrade";
proxy_set_header X-Real-IP $remote_addr;
}

无法访问静态资源

1
2
3
4
5
6
7
8
9
10
11
12
13
14
15
server{
listen 80;
location / {
proxy_pass http://xd-project;

}
# 添加下面部分
location ~ .* {
proxy_pass http://xd-project;
proxy_set_header Host $http_host;
proxy_set_header X-Real-IP $remote_addr;
proxy_set_header X-Forwarded-For $proxy_add_x_forwarded_for;
}

}

或者使用下面部分:

1
2
3
location ~.*(js|css|png|gif|jpg|mp3|ogg)$ {
root /home/kzl/data/app/;
}

这个 location 说明如果你要访问 js,css,png…结尾的文件,你需要在你的访问路径前加上 root。
这个 root 实际上就是替换了网页上的 http:10.10.10.10:5000。如果加了这个 location,那么网页在访问 http:10.10.10.10:5000/static/css/morris.css.这个路径的时候,因为文件结尾是 css 匹配到了这个 location,然后网页就会访问

替代方案:Caddy

配置文本

一些 nginx 配置小技巧 | 石尧的博客

1
2
3
4
5
6
7
8
9
10
11
12
13
14
15
16
17
18
19
20
21
22
23
24
server {
listen 80;
server_name www.example.com;
access_log /var/log/nginx/www-example-com.log access;
root /etc/nginx/html;

......

# Aliyun ssl by txt
location = /.well-known/pki-validation/fileauth.txt
{
default_type text/plain;
return 200 '201708090000005cpmpl49g1psxj1r86w70mmpi27g61r4f7u2bthwedki0trwtx';
}

# robots.txt
location = /robots.txt {
default_type text/plain;
return 200 'User-agent: *\nDisallow: /\n';
}

......

}

生产环境之 Nginx 高可用方案 - 日落西风又在吹 - 博客园

keepalive+vip+双击主备来实现 nginx 高可用。

Keepalived 软件起初是专为 LVS 负载均衡软件设计的,用来管理并监控 LVS 集群系统中各个服务节点的状态,后来又加入了可以实现高可用的 VRRP 功能。因此,keepalived 除了能够管理 LVS 软件外,还可以作为其他服务的高可用解决方案软件。

keepalived 软件主要是通过 VRRP 协议实现高可用功能的。VRRP 是 Virtual  Router  Redundancy Protocol(虚拟路由冗余协议)的缩写,VRRP 出现的目的就是为了解决静态路由的单点故障问题的,它能保证当个别节点宕机时,整个网络可以不间断地运行。所以,keepalived 一方面具有配置管理 LVS 的功能,同时还具有对 LVS 下面节点进行健康检查的功能,另一方面也可以实现系统网络服务的高可用功能。

检测 nginx 是否存活:check_nginx_pid.sh

1
2
3
4
5
6
7
8
9
#!/bin/bash
#检测nginx是否启动了
A=`ps -C nginx --no-header |wc -l`
if [ $A -eq 0 ];then #如果nginx没有启动就启动nginx
systemctl start nginx #重启nginx
if [ `ps -C nginx --no-header |wc -l` -eq 0 ];then #nginx重启失败,则停掉keepalived服务,进行VIP转移
killall keepalived
fi
fi

Nginx+Keepalived 高可用集群_技术博客的技术博客_51CTO 博客_keepalived nginx

如何给集群设置 VIP(虚拟 IP)_沐瑾儿的博客-CSDN 博客_vip 地址 虚拟地址

使用 keepalived 设置虚拟 IP 环境_kongxx 的专栏-CSDN 博客_keepalived virtual_ipaddress

阿里云方案:
HaVip 结合 keepalived 实现主备双机高可用

科普一下公有云的网络 – 酷 壳 – CoolShell 3F

下载而不显示

当我们使用 Nginx 时,如果要让一些附件比如 txt,pdf,doc 等不直接在浏览器打开,而弹出另存为的对话框(也就是下载),则可以在 nginx 里添加如下配置:

1
2
3
4
5
6
location /
{
if ($request_filename ~* ^.*?\.(txt|doc|pdf|rar|gz|zip|docx|exe|xlsx|ppt|pptx)$){
add_header Content-Disposition: 'attachment;';
}
}

显示而不下载

1
2
3
4
5
6
7
//例如
location = /md/test.txt {
//匹配到这里,显示文件内容,而不是下载
root /home/wwwroot/default;
# 图片的显示不下载也可以用下面的方式
add_header Content-Type text/plain;
}

nginx 无权访问目录

nginx_20220528122340_2022-05-28-12-23-40

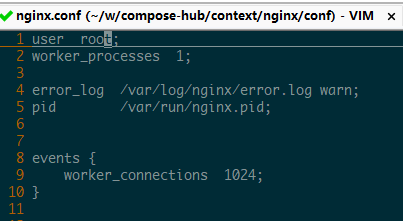
设置 nginx user 为 root;