JVM
查看堆栈信息
查看当前机器上运行的 java 进程
JVM–查看堆栈信息u013891584 的博客-CSDN 博客如何查看堆栈信息
jps -lvm
命令格式 jps [options][hostid]
注:如果不指定 hostid 就默认为当前主机或服务器。
命令行参数选项说明如下:
-q 不输出类名、Jar 名和传入 main 方法的参数
-m 输出传入 main 方法的参数
-l 输出 main 类或 Jar 的全限名
-v 输出传入 JVM 的参数
jstat -gc 21275
-gc 垃圾回收堆的行为统计,常用命令
C 即 Capacity 总容量,U 即 Used 已使用的容量
S0C : survivor0 区的总容量
S1C : survivor1 区的总容量
S0U : survivor0 区已使用的容量
S1C : survivor1 区已使用的容量
EC : Eden 区的总容量
EU : Eden 区已使用的容量
OC : Old 区的总容量
OU : Old 区已使用的容量
MC:方法区大小
MU:方法区使用大小
CCSC:压缩类空间大小
CCSU:压缩类空间使用大小
YGC : 新生代垃圾回收次数
YGCT : 新生代垃圾回收时间
FGC : 老年代垃圾回收次数
FGCT : 老年代垃圾回收时间
GCT : 垃圾回收总消耗时间
jstat -gc 1262 2000 20
这个命令意思就是每隔 2000ms 输出 1262 的 gc 情况,一共输出 20 次
JVM 堆、栈信息监测Think In JAVA—Max-CSDN 博客查看 jvm 堆栈信息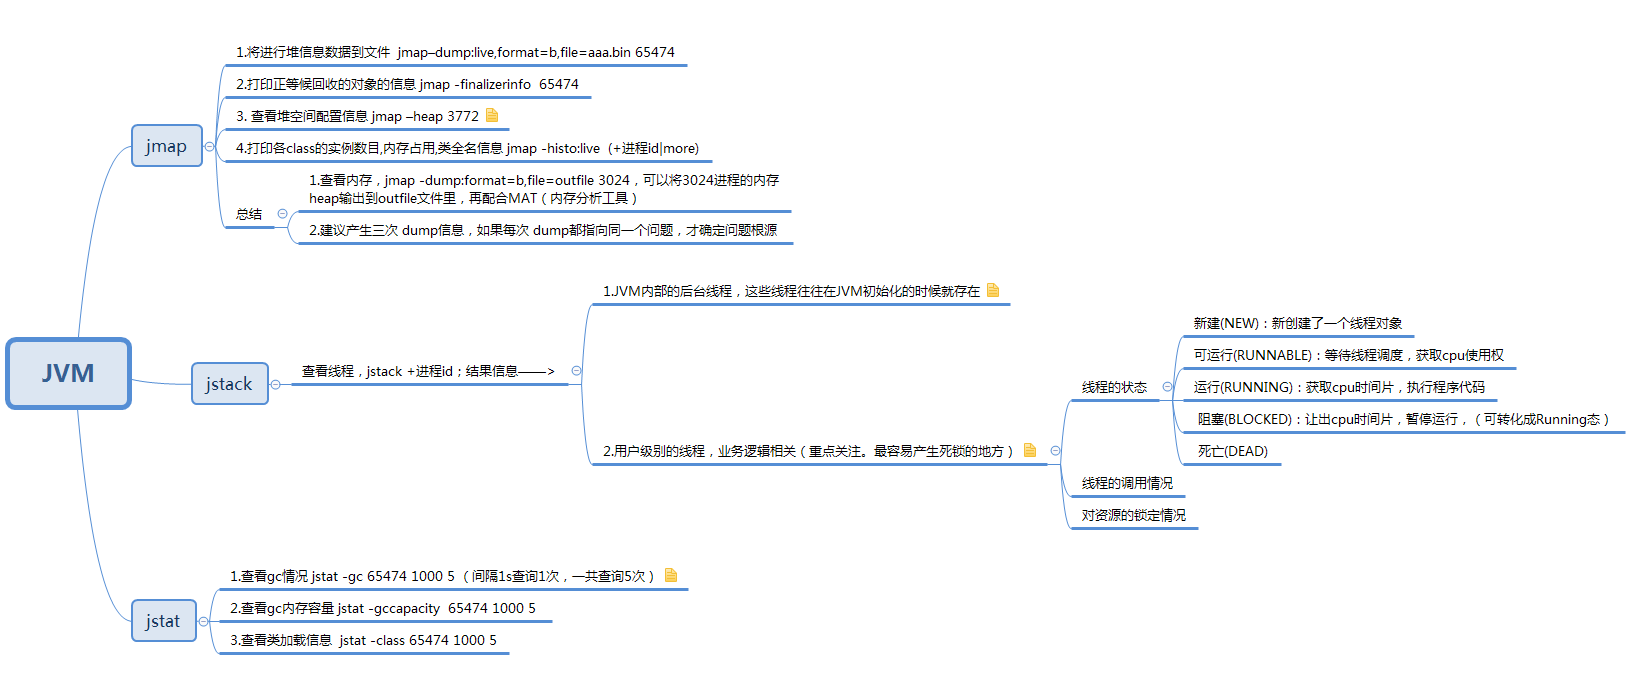
Class 文件字节码结构示意图

visualvm plugin
https://visualvm.github.io/pluginscenters.html
(注意如果是用 jvisualvm,要选择Java VisualVM的地址))
- What is Java JDK, JRE and JVM - In-depth Analysis - HowToDoInJava
- How the JIT compiler optimizes code
JVM 相关问题
1 | ; vi /etc/supervisord.conf |
JVM 垃圾回收 之 强引用、弱引用、软引用、虚引用_cyt-CSDN 博客
1 |
|
1 |
|
1 |
|
1 | public class Empty { |
IME输入法
输入法遮盖 EditText 问题
修复弹框不能被顶上去的问题: AndroidBug5497Workaround,
原代码在部分手机上会有底部导航栏被遮盖的问题,下面的代码可兼容华为、小米,三星等机型。
1 |
|
使用方式
1 | // ... |
参考资料
Hexo集成travis自动部署
自动化前 VS 后
没有 travis 的流程
每次写完文章后,要手动运行以下命令部署
1 | hexo clean --config source/_data/next.yml && |
基于 travis 的自动部署流程
有了 travis,写好文章后,只需推送代码到 GitHub 仓库。其他的部署操作都由 travis 自动完成:
- 提交并推送代码到 GitHub;
- Travis Ci 监听到 GitHub 仓库发生变化,开始依据
.travis.yml脚本构建项目; - Travis Ci 构建完成后将生成的最终文件推送到 GitHub;
可能遇到的问题
Permission denied
原因:脚本没有运行权限
1 | $ ./run_d.sh |
在 .travis.yml的 before_install:阶段添加x权限:
1 | - chmod +x ./run_d.sh |
Permission denied (publickey)
Q:
fatal: Could not read from remote repository.
Please make sure you have the correct access rights
A:
If you want to push via ssh then travis needs to have access to the private part of the ssh key you generated. What you want to do is use the travis cli gem to encrypt the private key, add it to your repo and during the deploy stage decrypt it again and use it. Here’s a step-by-step
为了能将 travis 构建后的文件推送到 github,需要:
1 | # 以下操作匀在客户端 |
上面的第 4 步,做了这几件事:
1 | - 加密ssh私钥, 生成一个hexo.enc。这个文档需要放到项目里,上面的输出已经提示了,千万别把原始的私钥放进去了~~ |
加密之后的hexo.enc文件,只有 travis 能解密使用。
因为在 login 的时候,将解密的密钥存放到Environment Variables中了,拿不到这个就无法解密还原了。
接着通过 ssh_agent 的方式配置ssh client:
1 | before_install: |
最终配置
1 | language: node_js |
其他
在 GitHub 的Readme.md中显示构建结果
1 | [build-info](https://travis-ci.org/userName/repoName.svg) |
QA
Q: travis-ci node-sass: Command failed.
A: https://github.com/travis-ci/travis-ci/issues/9561
参考资料
Java隐藏特性
双花括号初始化语法(DoubleBraceInitialization)
1 | // 这里解释下这两个括号: |
注意:此特性可能存在的问题;
- gson 不能正确解析双花括号语法(【Java】那些踩过的坑 | 比特楼)
- 永远不要使用双花括号初始化实例,否则就会 OOM! - SegmentFault 思否
(匿名内部类,可能会导致 OOM) - Caused by: com.esotericsoftware.kryo.KryoException: Class cannot be created (missing no-arg constructor): com.lyloou.jetcache.UserServiceImpl$1
This is an anonymous class, which is not serializable by default in Kryo. Possible solutions: 1. Remove uses of anonymous classes, including double brace initialization, from the containing class. This is the safest solution, as anonymous classes don’t have predictable names for serialization.
Java并发学习
completableFuture
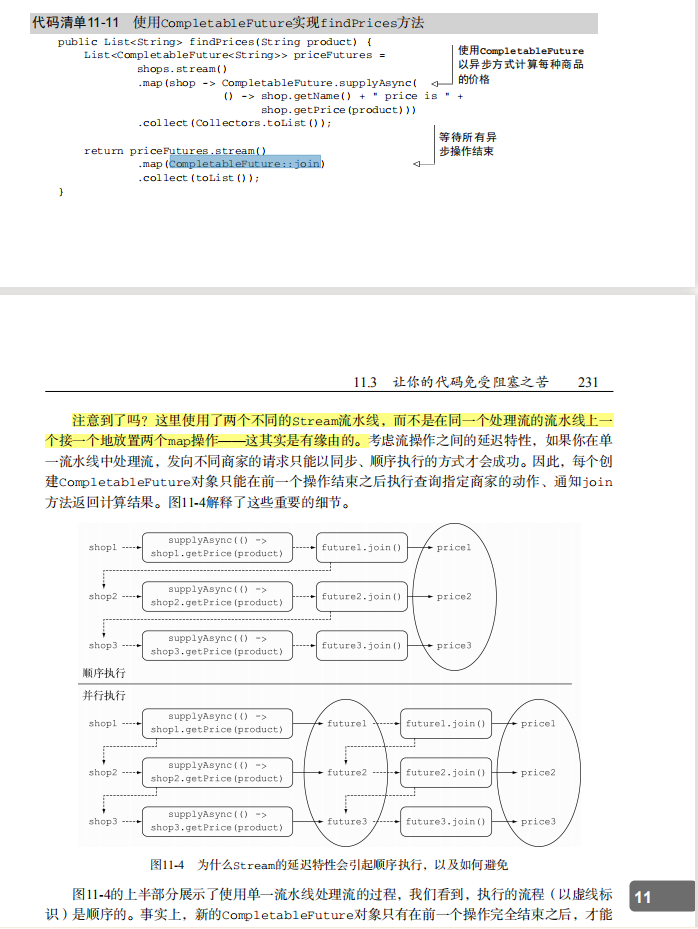
1 | final List<CompletableFuture<Void>> futureList = nameToContent.keySet().stream() |
线程池如何合理配置
CPU 密集型 和 IO 密集型 的区别,如何确定线程池大小? - 云+社区 - 腾讯云
配置线程池可以从以下几个方面来考虑。
- 任务是 CPU 密集型、IO 密集型或者混合型;
- 任务优先级,高中低;
- 任务时间执行长短;
- 任务依赖性:是否依赖其他系统资源。
- CPU 密集型可以配置可能小的线程,比如:N+1 线程。
- IO 密集型(网络、磁盘 IO)可以配置较多的线程,如 2n 个线程。
- 混合型可以拆成 IO 密集型任务和 CPU 密集型任务,计算如下:
最佳线程数目 = (线程等待时间与线程 CPU 时间之比 + 1)* CPU 数目
1 | 示例: |
通过Runtime.getRuntime().avaiableProcessors()来获取 cpu 个数。
窃取线程池
1 |
|
攻克目标
对象
Java技术
主流开发框架
Spring
Dubbo
Kafka
Redis
Canal
ElasticSearch
相关能力
分布式、高并发、高可用大型系统架构设计能力和相关经验;
极强的产品思维和业务理解能力,熟练掌握软件设计原则;
熟悉各类算法、分布式、中间件、服务化框架、负载均衡,相关高性能、高可用系统架构设计成功实践;
熟悉流程引擎、规则引擎相关技术的应用,有过多业务场景下的协同系统的开发实践经验;
有良好的沟通能力和自我驱动力,具备一定的项目管理能力,能规划中长期架构方向者。
层面:
学习阶段
- 这个技术出现的背景、初衷和要达到什么样的目标或是要解决什么样的问题?
- 这个技术的优势和劣势分别是什么?
- 这个技术的适用场景?
- 技术的组成部分和关键实现?
- 已有的实现和它之间的对比?
实战阶段
- 基本使用demo
- 练手项目
- 真项目
高质量的信息和第一手的知识
知识连成地图(通过问题来学习,有的放矢)
不断反思,与不同年龄的人讨论
举一反三,并实践,知识转换成技能。
学习是为了改变自己。
坚持是一件反人性的事,所以,它才难能可贵,也更有价值。
人不怕笨,怕的是懒,怕的是找到各种理由放弃。
坚持也不是要苦苦的坚持,有循环有成就感的坚持才是真正可以持续的。
所以一方面:要把你的坚持形成成果晒出来,让别人来给你点赞。
另一方面:还要把坚持变成一种习惯,就像吃饭喝水一样,你感觉不到太多的成本付出。