为什么要分层?

  • 各层互相独立。
    各层之间通过接口通信,接口不变,内部可以随意调整。降低了整个问题的复杂度。
  • 灵活。
    只要保证接口不变,技术革新不会引起其他层的变化。排除问题也需要只关注当前层。
  • 结构上可分开。各层都可以采用最合适的技术来实现。
    避免木桶效应,因为某一方面的技术不完善而影响 整体工作效率。
  • 易于实现和维护。
    将整个系统拆分成若干个相对独立的子系统。进行调试和维护时,可以对每一层单独调试,
    易于排查和解决问题。
  • 促进标准化工作。
    精确定位各层的功能和服务。标准化后,可以随意替换某几层,对于使用和科研十分方便。

参考:

分了哪几层?


那 TCP/IP 是如何运作的呢?我们就拿妳常常连上的 Yahoo 入口网站来做个说明好了,整个联机的状态可以这样看:

应用程序阶段:妳打开浏览器,在浏览器上面输入网址列,按下 [Enter]。此时网址列与相关数据会被浏览器包成一个数据, 并向下传给 TCP/IP 的应用层;
应用层:由应用层提供的 HTTP 通讯协议,将来自浏览器的数据报起来,并给予一个应用层表头,再向传送层丢去;
传送层:由于 HTTP 为可靠联机,因此将该数据丢入 TCP 封包内,并给予一个 TCP 封包的表头,向网络层丢去;
网络层:将 TCP 包裹包进 IP 封包内,再给予一个 IP 表头 (主要就是来源与目标的 IP 啰),向链结层丢去;
链结层:如果使用以太网络时,此时 IP 会依据 CSMA/CD 的标准,包裹到 MAC 讯框中,并给予 MAC 表头,再转成位串后, 利用传输媒体传送到远程主机上。
等到 Yahoo 收到你的包裹后,在依据相反方向拆解开来,然后交给对应的层级进行分析,最后就让 Yahoo 的 WWW 服务器软件得到你所想要的数据,该服务器软件再根据你的要求,取得正确的资料后,又依循上述的流程,一层一层的包装起来, 最后传送到你的手上!就是这样啰!

来源: http://cn.linux.vbird.org/linux_server/0110network_basic_1.php#ps4

TCP协议三次握手过程分析 - 一江水 - 博客园

TCP(Transmission Control Protocol)传输控制协议
TCP是主机对主机层的传输控制协议,提供可靠的连接服务,采用三次握手确认建立一个连接:

位码即tcp标志位,有6种标示:SYN(synchronous建立联机) ACK(acknowledgement 确认) PSH(push传送) FIN(finish结束) RST(reset重置) URG(urgent紧急)Sequence number(顺序号码) Acknowledge number(确认号码)

第一次握手:主机A发送位码为syn=1,随机产生seq number=1234567的数据包到服务器,主机B由SYN=1知道,A要求建立联机;

第二次握手:主机B收到请求后要确认联机信息,向A发送ack number=(主机A的seq+1),syn=1,ack=1,随机产生seq=7654321的包;
第三次握手:主机A收到后检查ack number是否正确,即第一次发送的seq number+1,以及位码ack是否为1,若正确,主机A会再发送ack number=(主机B的seq+1),ack=1,主机B收到后确认seq值与ack=1则连接建立成功。

基于 Java 的打包 jar、war、ear 包的作用与区别详解

JAR WAR EAR
英文 Java Archive file Web Archive file Enterprise Archive file
包含内容 class、properties 文件,是文件封装的最小单元;包含 Java 类的普通库、资源(resources)、辅助文件(auxiliary files)等 Servlet、JSP 页面、JSP 标记库、JAR 库文件、HTML/XML 文档和其他公用资源文件,如图片、音频文件等 除了包含 JAR、WAR 以外,还包括 EJB 组件
部署文件 application-client.xml web.xml application.xml
容器 应用服务器(application servers) 小型服务程序容器(servlet containers) EJB 容器(EJB containers)
级别

运行 jar 包

1
java -Dlogging.level.root=debug -D'file.encoding=utf-8' -jar -Dspring.profiles.active=master admin.jar

install nginx

1
sudo apt install nginx
1
2
3
4
5
# 启动Nginx
/etc/init.d/nginx start

# 如果nginx已经启动,我们修改配置之后,可以用
/etc/init.d/nginx reload

/etc/nginx/nginx.conf末尾有一句:include /etc/nginx/conf.d/*.conf;  推荐把用户自己的配置放到 conf.d/
下面把默认的 server 修改为一个简单的文件服务器,vi /etc/nginx/conf.d/default.conf,修改监听端口 listen 和文件目录

1
2
3
4
5
6
7
8
9
10
11
12
13
14
15
16
17
18
19
20
21
22
23
24
25
26
27
28
# /etc/nginx/conf.d/default.conf
autoindex on;# 显示目录
autoindex_exact_size on;# 显示文件大小
autoindex_localtime on;# 显示文件时间

server {
listen 8080 default_server;
listen [::]:8080 default_server;
server_name _;
#root /root/share/;
root /opt/share/;

# Load configuration files for the default server block.
include /etc/nginx/default.d/*.conf;

location / {
}

error_page 404 /404.html;
location = /40x.html {
}

error_page 500 502 503 504 /50x.html;
location = /50x.html {
}

}

1
2
3
4
# 修改/etc/nginx/nginx.conf
# 由于我们使用的是root用户进行的共享,需要修改nginx.conf的用户,否则会出现权限问题,导致访问的时候出现403 Forbidden的错误

user root;

nginx 配置(含 ssl)

取名为 bs.lyloou.com.conf,并放入文件夹: /etc/nginx/conf.d 中,因为 nginx.conf 中会加载此目录下的文件,可以可以得到注册。

1
2
3
4
5
6
7
8
9
10
11
12
13
14
15
16
17
18
19
20
21
22
23
24
25
26
27
28
29
30
31
32
33
34
35
36
37
38
39
40
41
server
{
listen 80;
listen 443 ssl http2;
server_name bs.lyloou.com;
#index index.php index.html index.htm default.php default.htm default.html;
#root /www/wwwroot/bs.lyloou.com;

include /etc/nginx/default.d/*.conf;

#SSL-START SSL相关配置,请勿删除或修改下一行带注释的404规则
#error_page 404/404.html;
#HTTP_TO_HTTPS_START
if ($server_port !~ 443){
rewrite ^(/.*)$ https://$host$1 permanent;
}
#HTTP_TO_HTTPS_END
ssl_certificate /root/c/nginx/33333_bs.lyloou.com.pem;
ssl_certificate_key /root/c/nginx/33333_bs.lyloou.com.key;
ssl_protocols TLSv1.1 TLSv1.2 TLSv1.3;
ssl_ciphers ECDHE-RSA-AES128-GCM-SHA256:HIGH:!aNULL:!MD5:!RC4:!DHE;
ssl_prefer_server_ciphers on;
ssl_session_cache shared:SSL:10m;
ssl_session_timeout 10m;
#error_page 497 https://$host$request_uri;

#SSL-END

location / {
proxy_pass http://127.0.0.1:8080;
}

error_page 404 /404.html;
location = /40x.html {
}

error_page 500 502 503 504 /50x.html;
location = /50x.html {
}
}

Nginx – proxy_pass 配置 - Bigberg - 博客园

在 proxy_pass 中的代理 url 后加上/,代理转发的 url 中就不会带上 location 中匹配路径;
nginx_2020-08-19-18-50-37
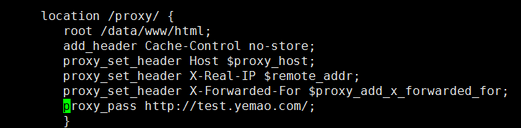
我们访问 http://my.yemao.com/proxy/index.html,其实是访问到了 http://test.yemao.com/index.html

在 proxy_pass 中的代理 url 后带 / (则不会加上 location 中的匹配路径)
在 proxy_pass 中的代理 url 中不带 / (则会加上 location 中的匹配路径)

upstream

Nginx 的 upstream 详解 - 简书

分配方式

Nginx 的 upstream 支持 5 种 分配方式,其中 轮询、权重、IP 散列这三种为 Nginx 原生支持的分配方式,fair 和 url_hash 为第三方支持的分配方式。

1,轮询

轮询是 upstream 的默认分配方式,即每个请求按照时间顺序轮流分配到不同的后端服务器,如果某个后端服务器 down 掉后,能自动剔除。

upstream zhang21(名称){

server 192.168.1.11:8888;

server 192.168.1.22:8888;

server 192.168.1.33:8888;

}

2,weight(权重)

轮询的加强版,既可以指定轮询比率,weight 和访问几率成正比,主要应用于后端服务器异质的场景下。

upstream zhang21 {

server 192.168.1.11 weight=1;

server 192.168.1.22 weight=2;

server 192.168.1.33 weight=3;

}

3,ip_hash

每个请求按照访问 Ip(即 Nginx 的前置服务器或客户端 IP)的 hash 结果分配,这样每个访客会固定访问一个后端服务器,可以解决 session 一致问题。

upstream zhang21 {

ip_hash;

server 192.168.1.11:7777;

server 192.168.1.22:8888;

server 192.168.1.33:9999;

}

4,fair

fair 顾名思义,公平地按照后端服务器的响应时间(rt)来分配请求,响应时间(rt)小的后端服务器优先分配请求。

upstream zhang21 {

server 192.168.1.11;

server 192.168.1.22;

server 192.168.1.33;

}

5,url_hash

与 ip_hash 类似,但是按照访问 url 的 hash 结果来分配请求,使得每个 url 定向到同一个后端服务器,主要应用于后端服务器为缓存的场景下。

upstream zhang21 {

server 192.168.1.11;

server 192.168.1.22;

server 192.168.1.33;

hash $request_uri;

hash_method crc32;

}

其中,hash_method 为使用的 hash 算法,需要注意,此时 server 语句中不能添加 weight 等参数。

作者:Zhang21
链接:https://www.jianshu.com/p/8671c40a5be8
来源:简书
著作权归作者所有。商业转载请联系作者获得授权,非商业转载请注明出处。

nginx 在一个服务器上配置两个项目,并通过两个不同的域名访问 - 半马 - 博客园

nginx 搭建文件服务器

1
2
3
4
5
6
7
8
9
10
11
12
server {
listen 80;
server_name file.lyloou.com; # 自己PC的ip或者服务器的域名 charset utf-8; # 避免中文乱码
root /home/xx/share; # 存放文件的目录
location / {
# download
autoindex on; # enable directory listing output
autoindex_exact_size off; # output file sizes rounded to kilobytes, megabytes, and gigabytes
autoindex_localtime on; # output local times in the directory
}
}

如何为 nginx 配置 https(免费证书) - 主啊~ - 博客园

注意

  • 如果用了 docker 要暴露 443 端口
  • 如果用了服务商服务器,要在安全组中配置 443 入方向

nginx 设置 websocket 连接

1
2
3
4
5
6
7
8
9
10
location /market {
index index.html;
client_max_body_size 5m;
proxy_pass http://172.21.90.214:6001;
proxy_set_header Host $host;
proxy_set_header X-Real-IP $remote_addr;
proxy_set_header Upgrade $http_upgrade;
proxy_set_header Connection "upgrade";
proxy_set_header X-Real-IP $remote_addr;
}

无法访问静态资源

1
2
3
4
5
6
7
8
9
10
11
12
13
14
15
server{
listen 80;
location / {
proxy_pass http://xd-project;

}
# 添加下面部分
location ~ .* {
proxy_pass http://xd-project;
proxy_set_header Host $http_host;
proxy_set_header X-Real-IP $remote_addr;
proxy_set_header X-Forwarded-For $proxy_add_x_forwarded_for;
}

}

或者使用下面部分:

1
2
3
location ~.*(js|css|png|gif|jpg|mp3|ogg)$ {
root /home/kzl/data/app/;
}

这个 location 说明如果你要访问 js,css,png…结尾的文件,你需要在你的访问路径前加上 root。
这个 root 实际上就是替换了网页上的 http:10.10.10.10:5000。如果加了这个 location,那么网页在访问 http:10.10.10.10:5000/static/css/morris.css.这个路径的时候,因为文件结尾是 css 匹配到了这个 location,然后网页就会访问

替代方案:Caddy

配置文本

一些 nginx 配置小技巧 | 石尧的博客

1
2
3
4
5
6
7
8
9
10
11
12
13
14
15
16
17
18
19
20
21
22
23
24
server {
listen 80;
server_name www.example.com;
access_log /var/log/nginx/www-example-com.log access;
root /etc/nginx/html;

......

# Aliyun ssl by txt
location = /.well-known/pki-validation/fileauth.txt
{
default_type text/plain;
return 200 '201708090000005cpmpl49g1psxj1r86w70mmpi27g61r4f7u2bthwedki0trwtx';
}

# robots.txt
location = /robots.txt {
default_type text/plain;
return 200 'User-agent: *\nDisallow: /\n';
}

......

}

生产环境之 Nginx 高可用方案 - 日落西风又在吹 - 博客园

keepalive+vip+双击主备来实现 nginx 高可用。

Keepalived 软件起初是专为 LVS 负载均衡软件设计的,用来管理并监控 LVS 集群系统中各个服务节点的状态,后来又加入了可以实现高可用的 VRRP 功能。因此,keepalived 除了能够管理 LVS 软件外,还可以作为其他服务的高可用解决方案软件。

keepalived 软件主要是通过 VRRP 协议实现高可用功能的。VRRP 是 Virtual  Router  Redundancy Protocol(虚拟路由冗余协议)的缩写,VRRP 出现的目的就是为了解决静态路由的单点故障问题的,它能保证当个别节点宕机时,整个网络可以不间断地运行。所以,keepalived 一方面具有配置管理 LVS 的功能,同时还具有对 LVS 下面节点进行健康检查的功能,另一方面也可以实现系统网络服务的高可用功能。

检测 nginx 是否存活:check_nginx_pid.sh

1
2
3
4
5
6
7
8
9
#!/bin/bash
#检测nginx是否启动了
A=`ps -C nginx --no-header |wc -l`
if [ $A -eq 0 ];then #如果nginx没有启动就启动nginx
systemctl start nginx #重启nginx
if [ `ps -C nginx --no-header |wc -l` -eq 0 ];then #nginx重启失败,则停掉keepalived服务,进行VIP转移
killall keepalived
fi
fi

Nginx+Keepalived 高可用集群_技术博客的技术博客_51CTO 博客_keepalived nginx

如何给集群设置 VIP(虚拟 IP)_沐瑾儿的博客-CSDN 博客_vip 地址 虚拟地址

使用 keepalived 设置虚拟 IP 环境_kongxx 的专栏-CSDN 博客_keepalived virtual_ipaddress

阿里云方案:
HaVip 结合 keepalived 实现主备双机高可用

科普一下公有云的网络 – 酷 壳 – CoolShell 3F

下载而不显示

当我们使用 Nginx 时,如果要让一些附件比如 txt,pdf,doc 等不直接在浏览器打开,而弹出另存为的对话框(也就是下载),则可以在 nginx 里添加如下配置:

1
2
3
4
5
6
location /
{
if ($request_filename ~* ^.*?\.(txt|doc|pdf|rar|gz|zip|docx|exe|xlsx|ppt|pptx)$){
add_header Content-Disposition: 'attachment;';
}
}

显示而不下载

1
2
3
4
5
6
7
//例如
location = /md/test.txt {
//匹配到这里,显示文件内容,而不是下载
root /home/wwwroot/default;
# 图片的显示不下载也可以用下面的方式
add_header Content-Type text/plain;
}

nginx 无权访问目录

nginx_20220528122340_2022-05-28-12-23-40

设置 nginx user 为 root;

mybatisplus

https://github.com/lyloou/spring-master/tree/master/spring-mybatisplus

  • 自动生成,包括 Controller、Mapper、Entity、Service、Mapper.xml

mybatis 自动生成工具

  • 下载mybatis-generator-core-1.3.7.jar
1
2
https://github.com/mybatis/generator/releases
https://github.com/mybatis/generator/releases/download/mybatis-generator-1.3.7/mybatis-generator-core-1.3.7.zip
  • 下载postgresql-42.2.2.jar
1
2
https://jdbc.postgresql.org/download.html
https://jdbc.postgresql.org/download/postgresql-42.2.2.jar
  • 配置generatorConfig.xml
1
2
3
4
5
6
7
8
9
10
11
12
13
14
15
16
17
18
19
20
21
22
23
24
25
26
27
28
29
30
31
32
33
34
35
36
37
38
39
40
41
42
43
44
45
46
47
48
49
50
51
52
53
<?xml version="1.0" encoding="UTF-8"?>
<!DOCTYPE generatorConfiguration
PUBLIC "-//mybatis.org//DTD MyBatis Generator Configuration 1.0//EN"
"http://mybatis.org/dtd/mybatis-generator-config_1_0.dtd">

<generatorConfiguration>
<classPathEntry
location="D:/c/mybatis/mybatis-generator-core-1.3.7/lib/postgresql-42.2.2.jar"/>

<context id="MysqlContext" targetRuntime="MyBatis3Simple">
<!-- 生成的pojo,将implements Serializable-->
<plugin type="org.mybatis.generator.plugins.SerializablePlugin"></plugin>

<jdbcConnection driverClass="org.postgresql.Driver"
connectionURL="jdbc:postgresql://192.168.1.123:5432/users?currentSchema=hello&amp;tcpKeepAlive=true"
userId="hello" password="hello"/>

<!--
默认false,把JDBC DECIMAL 和 NUMERIC 类型解析为 Integer
true,把JDBC DECIMAL 和 NUMERIC 类型解析为java.math.BigDecimal
-->
<javaTypeResolver>
<property name="forceBigDecimals" value="false" />
</javaTypeResolver>

<javaModelGenerator targetPackage="com.example.model.original"
targetProject="./src/main/java">
<property name="enableSubPackages" value="true"/>
<!-- 从数据库返回的值被清理前后的空格 -->
<property name="trimStrings" value="true" />
</javaModelGenerator>

<javaClientGenerator type="ANNOTATEDMAPPER"
targetPackage="com.example.repository.mapper"
targetProject="./src/main/java" >
<property name="rootInterface" value="com.example.repository.mark.IMarkMapper"/>
</javaClientGenerator>

<commentGenerator>
<!-- 阻止**生成的注释包含时间戳 true:是 : false:否 -->
<property name="suppressDate" value="true" />
<!-- 是否去除自动生成的注释 true:是 : false:否 -->
<property name="suppressAllComments" value="false" />
</commentGenerator>

<table schema="hello" tableName="app_verify_info" />
<table schema="hello" tableName="api_interface_info" />
<table schema="hello" tableName="api_interface_access" />
<table schema="hello" tableName="app_code" />

</context>

</generatorConfiguration>
  • 配置generatorConfig.bat
1
2
3
@echo off
java -jar mybatis-generator-core-1.3.2.jar -configfile generatorConfig.xml
pause

参考资料:

1
2
# mysql使用的是不同的连接库
mysql-connector-java-5.1.37.jar

根据数据库表生成对应实体类(Lombok 的注解实现)

记得 IDEA 安装好插件:Lombok Plugin

文件pom.xml

1
2
3
4
5
6
7
8
9
10
11
12
13
14
15
16
17
18
19
20
21
22
23
24
25
26
27
28
29
30
31
32
33
34
35
36
37
38
39
40
41
42
43
44
45
46
<properties>
<project.build.sourceEncoding>UTF-8</project.build.sourceEncoding>
<mybatis.generator.version>1.3.7</mybatis.generator.version>
<mysql.connector.java>5.1.46</mysql.connector.java>
<mybatis.generator.lombok.plugin>1.0</mybatis.generator.lombok.plugin>
</properties>
<dependencies>
<dependency>
<groupId>org.projectlombok</groupId>
<artifactId>lombok</artifactId>
<version>1.16.16</version>
<type>jar</type>
</dependency>
<dependency>
<groupId>mysql</groupId>
<artifactId>mysql-connector-java</artifactId>
<version>${mysql.connector.java}</version>
</dependency>
</dependencies>

<build>
<plugins>
<plugin>
<groupId>org.mybatis.generator</groupId>
<artifactId>mybatis-generator-maven-plugin</artifactId>
<version>${mybatis.generator.version}</version>
<configuration>
<overwrite>true</overwrite>
<configurationFile>src/main/resources/mybatis/generatorConfig.xml</configurationFile>
</configuration>

<dependencies>
<dependency>
<groupId>mysql</groupId>
<artifactId>mysql-connector-java</artifactId>
<version>${mysql.connector.java}</version>
</dependency>
<dependency>
<groupId>com.softwareloop</groupId>
<artifactId>mybatis-generator-lombok-plugin</artifactId>
<version>${mybatis.generator.lombok.plugin}</version>
</dependency>
</dependencies>
</plugin>
</plugins>
</build>

文件src/main/resources/mybatis/generatorConfig.xml

1
2
3
4
5
6
7
8
9
10
11
12
13
14
15
16
17
18
19
20
21
22
23
24
25
26
27
28
29
30
31
32
33
34
35
36
37
38
39
40
41
42
43
44
45
46
47
48
49
50
51
<?xml version="1.0" encoding="UTF-8"?>
<!DOCTYPE generatorConfiguration
PUBLIC "-//mybatis.org//DTD MyBatis Generator Configuration 1.0//EN"
"http://mybatis.org/dtd/mybatis-generator-config_1_0.dtd">

<generatorConfiguration>

<context id="context1" targetRuntime="MyBatis3Simple" defaultModelType="flat">
<!-- include the plugin -->
<plugin type="com.softwareloop.mybatis.generator.plugins.LombokPlugin">

<!-- enable annotations -->
<property name="builder" value="true"/>
<!-- annotation's option(boolean) -->
<property name="builder.fluent" value="true"/>
<!-- annotation's option(String) -->
<property name="builder.builderMethodName" value="myBuilder"/>

<property name="accessors" value="true"/>
<!-- annotation's option(array of String) -->
<property name="accessors.prefix" value="m_, _"/>

<!-- disable annotations -->
<property name="allArgsConstructor" value="false"/>
</plugin>

<commentGenerator>
<!-- 关闭自动生成的注释 -->
<property name="suppressAllComments" value="true"/>
</commentGenerator>

<jdbcConnection driverClass="com.mysql.jdbc.Driver"
connectionURL="jdbc:mysql://127.0.0.1/lyloou?useUnicode=true&amp;characterEncoding=utf8"
userId="root" password="root"/>


<javaModelGenerator
targetPackage="com.lyloou.orders.entity.task"
targetProject="src/main/java">
<property name="trimStrings" value="true"/>
</javaModelGenerator>

<!--<table tableName="tasks" domainObjectName="Tasks"/>-->
<table tableName="task_bonus" domainObjectName="TaskBonus"/>
<table tableName="task_bonus_coupon" domainObjectName="TaskBonusCoupon"/>
<table tableName="task_bonus_user" domainObjectName="TaskBonusUser"/>

</context>

</generatorConfiguration>

如下图所示点击生成 entity
点击生成 entity

如果数据库中的时间用的是 timestamp,为了不损失精度,做一个【在文件夹中替换】的操作。
选中刚才的 task 文件夹,键入 Ctrl + Shift + R
替换 private Dateprivate java.sql.Timestamp

安装软件

  • sougou
  • tim
  • wps
  • wechat
  • firefox
  • chrome
  • vscode

软件配置

  • 7-zip
  • pic
  • vim

环境变量

配置软链接

设置字体

DAO

在计算机软件中,数据访问对象(data access object,DAO)是为某种类型的数据库或其他持久性机制提供一个抽象接口的对象。通过映射应用程序对持久层的调用,DAO 提供一些特定的数据操作,而无需暴露数据库细节。这种隔离支持单一功能原则。它分离了应用程序需要访问哪些数据,就域特定对象和数据类型(DAO 的公共接口),而言,这些需求可以用数据库管理系统(DBMS)、数据库模式等满足(DAO 的实现)。

POJO & JavaBean

POJO
使用 POJO 名称是为了避免和 EJB 混淆起来, 而且简称比较直接. 其中有一些属性及其 getter setter 方法的类,没有业务逻辑,有时可以作为 VO(value -object)或 dto(Data Transform Object)来使用.
当然,如果你有一个简单的运算属性也是可以的,但不允许有业务方法,也不能携带有 connection 之类的方法。

下面是摘自 Martin Fowler 个人网站的一句话:
“We wondered why people were so against using regular objects in their systems and concluded that it was because simple objects lacked a fancy name. So we gave them one, and it’s caught on very nicely.”--Martin Fowler
我们疑惑为什么人们不喜欢在他们的系统中使用普通的对象,我们得到的结论是——普通的对象缺少一个响亮的名字,因此我们给它们起了一个,并且取得了很好的效果。——Martin Fowler

1
2
3
4
5
6
7
8
分层领域模型规约
- DO(Data Object):此对象与数据库表结构一一对应,通过 DAO 层向上传输数据源对象。
- DTO(Data Transfer Object):数据传输对象,Service 或 Manager 向外传输的对象。
- BO(Business Object):业务对象,由 Service 层输出的封装业务逻辑的对象。
- AO(Application Object):应用对象,在 Web 层与 Service 层之间抽象的复用对象模型,极为贴近展示层,复用度不高。
- VO(View Object):显示层对象,通常是 Web 向模板渲染引擎层传输的对象。
- Query:数据查询对象,各层接收上层的查询请求。注意超过 2 个参数的查询封装,禁止使用 Map 类来传输。
// 阿里巴巴Java开发手册1.4.0.pdf

JavaBean
JavaBeans 是 Java 中一种特殊的类,可以将多个对象封装到一个对象(bean)中。特点是可序列化,提供无参构造器,提供 getter 方法和 setter 方法访问对象的属性。名称中的“Bean”是用于 Java 的可重用软件组件的惯用叫法。

Java Bean 是可复用的组件,对 Java Bean 并没有严格的规范,理论上讲,任何一个 Java 类都可以是一个 Bean 。
但通常情况下,由于 Java Bean 是被容器所创建(如 Tomcat) 的,所以 Java Bean 应具有一个无参的构造器,另外,通常 Java Bean 还要实现 Serializable 接口用于实现 Bean 的持久性。 Java Bean 是不能被跨进程访问的。JavaBean 是一种组件技术,就好像你做了一个扳子,而这个扳子会在很多地方被拿去用,这个扳子也提供多种功能(你可以拿这个扳子扳、锤、撬等等),而这个扳子就是一个组件。

资料

nested exception is org.apache.ibatis.reflection.ReflectionException: There is no getter for property named

2020-01-02 19:01:21 [WARN] ExceptionHandlerExceptionResolver:194 - Resolved [org.mybatis.spring.MyBatisSystemException: nested exception is org.apache.ibatis.reflection.ReflectionException: There is no getter for property named ‘is_disabled’ in ‘class com.lyloou.flow.model.flow.Flow’]

1
2
3
4
5
6
7
8
9
// 错误的
@Update("insert into flow (day,item,is_disabled,is_archived) values (#{day},#{item},#{is_disabled},#{is_archived}) on duplicate key update" +
" item=values(item),is_disabled=values(is_disabled),is_archived=values(is_archived)")
int insertOrUpdateFlow(Flow flow);

// 正确的
@Update("insert into flow (day,item,is_disabled,is_archived) values (#{day},#{item},#{isDisabled},#{isArchived}) on duplicate key update" +
" item=values(item),is_disabled=values(is_disabled),is_archived=values(is_archived)")
int insertOrUpdateFlow(Flow flow);
1
2
3
4
5
6
7
8
9
10
11
12
13
14
15
16
17
18
19
20
@Data
@Builder
@AllArgsConstructor
@NoArgsConstructor
public class Flow {
private Long id;

private Date gmtCreate;

private Date gmtModified;

private String day;

private String item;

private Boolean isArchived;

private Boolean isDisabled;

}
1
2
3
2020-01-02 19:01:21 [WARN] ExceptionHandlerExceptionResolver:194 - Resolved [org.mybatis.spring.MyBatisSystemException: nested exception is org.apache.ibatis.reflection.ReflectionException: There is no getter for property named 'is_disabled' in 'class com.lyloou.flow.model.flow.Flow']

答案:因为解决的时候用到的是 `flow.isDisabled` 属性,因为传递的是 `flow.is_disabled` 所以不行

按照输入 id 顺序来返回数据

1
2
3
4
5
6
7
8
9
10
11
12
13
14
<select id="queryOrderedAuthorByauthorIds" resultMap="BaseResultMap">
select * from video_author a
where a.user_id in
<foreach collection="authorIds" item="item" index="index" separator="," open="(" close=")">
#{item}
</foreach>
and a.user_status=0
-- 按照输入的顺序来返回排序
order by field(a.user_id,
<foreach collection="authorIds" item="item" index="index" separator=",">
#{item}
</foreach>
)
</select>

自动填充字段

1
2
3
4
5
6
7
8
9
10
11
12
13
14
15
16
17
18
19
20
21
22
23
24
25
26
27
28
29
30
31
32
33
34
35
36
37
38
39
40
41
42
43
44
45
46
47
48
49
50
51
52
53
54
55
56
57
58
59
60
61
62
63
64
// Person.java
@Data
@Accessors(chain = true)
public class Person implements Serializable {
private static final long serialVersionUID = 1L;

@TableId(type = IdType.AUTO)
@ApiModelProperty(value = "实体ID")
private Integer id;

@ApiModelProperty(value = "创建时间")
@TableField(fill = FieldFill.INSERT)
private Date createdTime;

@ApiModelProperty(value = "更新时间")
@TableField(fill = FieldFill.INSERT_UPDATE)
private Date updatedTime;

@ApiModelProperty(value = "创建人")
@TableField(value = "creator", fill = FieldFill.INSERT)
private String creator;

@ApiModelProperty(value = "修改人")
@TableField(value = "modifier", fill = FieldFill.INSERT_UPDATE)
private String modifier;
}

// MybatisObjectHandler.java
// [自动填充功能 | MyBatis-Plus](https://baomidou.com/guide/auto-fill-metainfo.html)
@Component
public class MybatisObjectHandler implements MetaObjectHandler {
@Override
public void insertFill(MetaObject metaObject) {
Integer userId = AuthenticationService.getUserId();
if (userId != null) {
Stream.of("createdBy", "updatedBy", "modifier", "creator")
.forEach(s -> setFieldValIfNull(s, userId.toString(), metaObject));
}

Stream.of("createdTime", "updatedTime")
.forEach(s -> setFieldValIfNull(s, new Date(), metaObject));
}

private void setFieldValIfNull(String field, Object fieldVal, MetaObject metaObject) {
final Object value = getFieldValByName(field, metaObject);
if (value != null) {
setFieldValByName(field, fieldVal, metaObject);
}
}

@Override
public void updateFill(MetaObject metaObject) {
//更新时 需要填充字段
Stream.of("updatedTime")
.forEach(s -> setFieldValIfNull(s, new Date(), metaObject));
setFieldValByName("updatedTime", new Date(), metaObject);
Integer userId = AuthenticationService.getUserId();
if (userId != null) {
//更新时填充的字段
Stream.of("updatedBy", "modifier")
.forEach(s -> setFieldValIfNull(s, userId.toString(), metaObject));
}
}
}

mybatis 深入理解(一)之 # 与 $ 区别以及 sql 预编译 - SegmentFault 思否

mybatis 中使用 sqlMap 进行 sql 查询时,经常需要动态传递参数,例如我们需要根据用户的姓名来筛选用户时,sql 如下:

1
select * from user where name = "ruhua";

上述 sql 中,我们希望 name 后的参数 “ruhua” 是动态可变的,即不同的时刻根据不同的姓名来查询用户。在 sqlMap 的 xml 文件中使用如下的 sql 可以实现动态传递参数 name:

1
select * from user where name = #{name};

或者

1
select * from user where name = '${name}';

对于上述这种查询情况来说,使用 #{ } 和 ${ } 的结果是相同的,但是在某些情况下,我们只能使用二者其一。

‘#’ 与 ‘$’

区别

动态 SQL 是 mybatis 的强大特性之一,也是它优于其他 ORM 框架的一个重要原因。mybatis 在对 sql 语句进行预编译之前,会对 sql 进行动态解析,解析为一个 BoundSql 对象,也是在此处对动态 SQL 进行处理的。

在动态 SQL 解析阶段, #{ } 和 ${ } 会有不同的表现:

#{ } 解析为一个 JDBC 预编译语句(prepared statement)的参数标记符。

例如,sqlMap 中如下的 sql 语句

1
select * from user where name = #{name};

解析为:

1
select * from user where name = ?;

一个 #{ } 被解析为一个参数占位符 ?

而,

${ } 仅仅为一个纯碎的 string 替换,在动态 SQL 解析阶段将会进行变量替换

例如,sqlMap 中如下的 sql

1
select * from user where name = '${name}';

当我们传递的参数为 “ruhua” 时,上述 sql 的解析为:

1
select * from user where name = "ruhua";

预编译之前的 SQL 语句已经不包含变量 name 了。

综上所得, ${ } 的变量的替换阶段是在动态 SQL 解析阶段,而 #{ }的变量的替换是在 DBMS 中。

用法 tips

1、能使用 #{ } 的地方就用 #{ }

首先这是为了性能考虑的,相同的预编译 sql 可以重复利用。

其次,**${ } 在预编译之前已经被变量替换了,这会存在 sql 注入问题**。例如,如下的 sql,

1
select * from ${tableName} where name = #{name}

假如,我们的参数 tableName 为 user; delete user; --,那么 SQL 动态解析阶段之后,预编译之前的 sql 将变为

1
select * from user; delete user; -- where name = ?;

-- 之后的语句将作为注释,不起作用,因此本来的一条查询语句偷偷的包含了一个删除表数据的 SQL!

2、表名作为变量时,必须使用 ${ }

这是因为,表名是字符串,使用 sql 占位符替换字符串时会带上单引号 '',这会导致 sql 语法错误,例如:

1
select * from #{tableName} where name = #{name};

预编译之后的 sql 变为:

1
select * from ? where name = ?;

假设我们传入的参数为 tableName = “user” , name = “ruhua”,那么在占位符进行变量替换后,sql 语句变为

1
select * from 'user' where name='ruhua';

上述 sql 语句是存在语法错误的,表名不能加单引号 ''(注意,反引号 ``是可以的)。
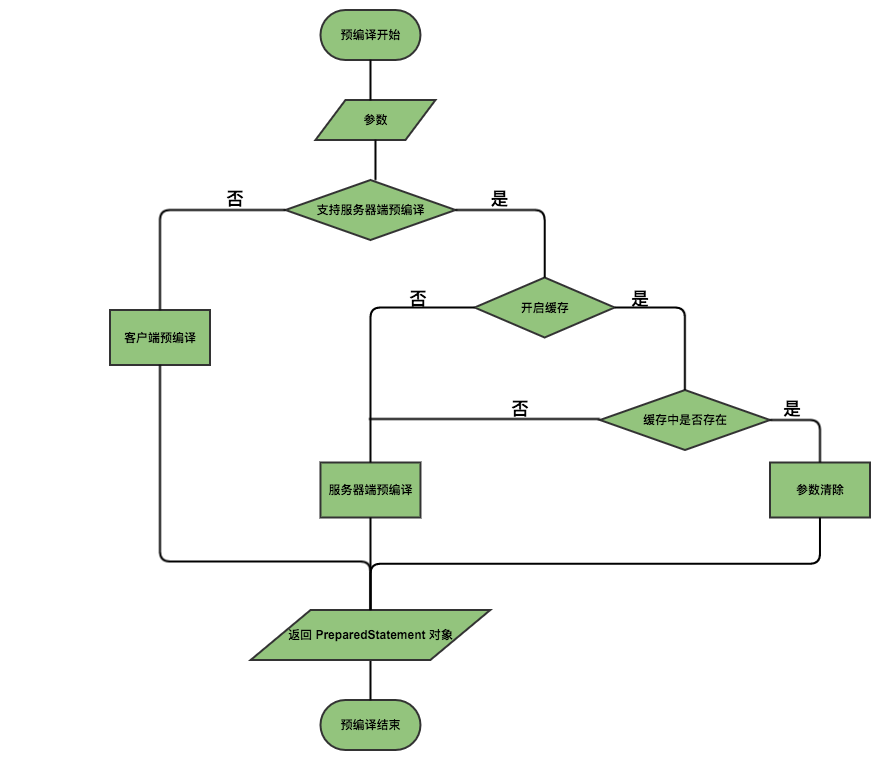
sql 预编译

定义

sql 预编译指的是数据库驱动在发送 sql 语句和参数给 DBMS 之前对 sql 语句进行编译,这样 DBMS 执行 sql 时,就不需要重新编译。

为什么需要预编译

JDBC 中使用对象 PreparedStatement 来抽象预编译语句,使用预编译

  1. 预编译阶段可以优化 sql 的执行
    预编译之后的 sql 多数情况下可以直接执行,DBMS 不需要再次编译,越复杂的 sql,编译的复杂度将越大,预编译阶段可以合并多次操作为一个操作。
  2. 预编译语句对象可以重复利用
    把一个 sql 预编译后产生的 PreparedStatement 对象缓存下来,下次对于同一个 sql,可以直接使用这个缓存的 PreparedState 对象。

mybatis 默认情况下,将对所有的 sql 进行预编译。

mysql 预编译源码解析

mysql 的预编译源码在 com.mysql.jdbc.ConnectionImpl 类中,如下:

1
2
3
4
5
6
7
8
9
10
11
12
13
14
15
16
17
18
19
20
21
22
23
24
25
26
27
28
29
30
31
32
33
34
35
36
37
38
39
40
41
42
43
44
45
46
47
48
49
50
51
52
53
54
55
56
57
58
59
60
61
62
63
64
65
66
67
68
69
70
71
72
73
74
75
76
77
78
79
80
81
82
83
84
85
86
87
public synchronized java.sql.PreparedStatement prepareStatement(String sql,
int resultSetType, int resultSetConcurrency) throws SQLException {
checkClosed();

//
// FIXME: Create warnings if can't create results of the given
// type or concurrency
//
PreparedStatement pStmt = null;

boolean canServerPrepare = true;

// 不同的数据库系统对sql进行语法转换
String nativeSql = getProcessEscapeCodesForPrepStmts() ? nativeSQL(sql): sql;

// 判断是否可以进行服务器端预编译
if (this.useServerPreparedStmts && getEmulateUnsupportedPstmts()) {
canServerPrepare = canHandleAsServerPreparedStatement(nativeSql);
}

// 如果可以进行服务器端预编译
if (this.useServerPreparedStmts && canServerPrepare) {

// 是否缓存了PreparedStatement对象
if (this.getCachePreparedStatements()) {
synchronized (this.serverSideStatementCache) {

// 从缓存中获取缓存的PreparedStatement对象
pStmt = (com.mysql.jdbc.ServerPreparedStatement)this.serverSideStatementCache.remove(sql);

if (pStmt != null) {
// 缓存中存在对象时对原 sqlStatement 进行参数清空等
((com.mysql.jdbc.ServerPreparedStatement)pStmt).setClosed(false);
pStmt.clearParameters();
}

if (pStmt == null) {
try {
// 如果缓存中不存在,则调用服务器端(数据库)进行预编译
pStmt = ServerPreparedStatement.getInstance(getLoadBalanceSafeProxy(), nativeSql,
this.database, resultSetType, resultSetConcurrency);
if (sql.length() < getPreparedStatementCacheSqlLimit()) {
((com.mysql.jdbc.ServerPreparedStatement)pStmt).isCached = true;
}

// 设置返回类型以及并发类型
pStmt.setResultSetType(resultSetType);
pStmt.setResultSetConcurrency(resultSetConcurrency);
} catch (SQLException sqlEx) {
// Punt, if necessary
if (getEmulateUnsupportedPstmts()) {
pStmt = (PreparedStatement) clientPrepareStatement(nativeSql, resultSetType, resultSetConcurrency, false);

if (sql.length() < getPreparedStatementCacheSqlLimit()) {
this.serverSideStatementCheckCache.put(sql, Boolean.FALSE);
}
} else {
throw sqlEx;
}
}
}
}
} else {

// 未启用缓存时,直接调用服务器端进行预编译
try {
pStmt = ServerPreparedStatement.getInstance(getLoadBalanceSafeProxy(), nativeSql,
this.database, resultSetType, resultSetConcurrency);

pStmt.setResultSetType(resultSetType);
pStmt.setResultSetConcurrency(resultSetConcurrency);
} catch (SQLException sqlEx) {
// Punt, if necessary
if (getEmulateUnsupportedPstmts()) {
pStmt = (PreparedStatement) clientPrepareStatement(nativeSql, resultSetType, resultSetConcurrency, false);
} else {
throw sqlEx;
}
}
}
} else {
// 不支持服务器端预编译时调用客户端预编译(不需要数据库 connection )
pStmt = (PreparedStatement) clientPrepareStatement(nativeSql, resultSetType, resultSetConcurrency, false);
}

return pStmt;
}

流程图如下所示:

图片描述

mybatis 之 sql 动态解析以及预编译源码

mybatis sql 动态解析

mybatis 在调用 connection 进行 sql 预编译之前,会对 sql 语句进行动态解析,动态解析主要包含如下的功能:

  • 占位符的处理
  • 动态 sql 的处理
  • 参数类型校验

mybatis 强大的动态 SQL 功能的具体实现就在此。动态解析涉及的东西太多,以后再讨论。

批量处理示例(修复歌手名称)

1
2
3
4
5
6
7
8
9
10
11
12
13
14
15
16
17
18
19
20
21
22
23
24
25
26
27
28
29
30
31
32
33
34
35
36
37
38
39
40
41
42
43
44
45
46
47
48
49
50
51
52
53
54
55
56
57
58
59
60
public void fixSongSingleName() {
// 从0开始
int id = 0;
// 每次查询100条
int limit = 100;
List<CcMusicInfoEntity> list;
do {
list = ccMusicInfoMapper.queryListByLastIdWithLimit(id, limit);
if (CollUtil.isEmpty(list)) {
break;
}

// 记录下一次的开始的id
id = list.get(list.size() - 1).getId();

// 找到需要更新的实体
final List<CcMusicInfoEntity> needUpdateList = list.stream()
.filter(Objects::nonNull)
.filter(it -> SingerNameUtil.isContainCombinedSeparator(it.getSingerName()))
.collect(Collectors.toList());

// 在db中更新实体
if (CollUtil.isNotEmpty(needUpdateList)) {
final List<String> originSingerNameList = needUpdateList.stream().map(CcMusicInfoEntity::getSingerName).collect(Collectors.toList());
updateSongSingerInfo(needUpdateList);

Map<Integer, String> map = new HashMap<>(needUpdateList.size());
for (int i = 0; i < needUpdateList.size(); i++) {
final CcMusicInfoEntity entity = needUpdateList.get(i);
final String originSingerName = originSingerNameList.get(i);
map.put(entity.getId(), StrUtil.format("更新前:{},更新后:{}", originSingerName, entity.getSingerName()));
}
logger.info(StrUtil.format("fixSongSingleName 本次更新数量,{},修改数据:{}", needUpdateList.size(), map));
}
logger.info("fixSongSingleName: 本次更新到ID," + id);
// break;
} while (CollUtil.isNotEmpty(list));
logger.info("fixSongSingleName: 本次更新完成");
}

private void updateSongSingerInfo(List<MusicInfoEntity> needUpdateList) {
List<MusicInfoEntity> list = new ArrayList<>(needUpdateList.size());
for (MusicInfoEntity entity : needUpdateList) {
final String originSingerName = entity.getSingerName();
final String calculateSingerName = SingerNameUtil.calculate(originSingerName);

// 一样的情况,不用处理
if (Objects.equals(originSingerName, calculateSingerName)) {
continue;
}
MusicInfoEntity newCcMusicInfoEntity = new MusicInfoEntity();
newCcMusicInfoEntity.setId(entity.getId());
newCcMusicInfoEntity.setLastUpdateDate(new Date());
newCcMusicInfoEntity.setSingerName(calculateSingerName);
list.add(newCcMusicInfoEntity);
}
if (CollUtil.isNotEmpty(list)) {
musicInfoMapper.updateByList(list);
}
}

批量查询:

1
2
3
// MusicInfoMapper.java
List<MusicInfoEntity> queryListByLastIdWithLimit(@Param("id") int id, @Param("limit") int limit);
void updateByList(List<MusicInfoEntity> list);
1
2
3
4
5
6
7
<!-- MusicInfoMapper.xml -->
<select id="queryListByLastIdWithLimit" resultMap="BaseResultMap">
SELECT
<include refid="Base_Column_List" />
FROM t_music_info a
where a.id > #{id} limit #{limit}
</select>

批量插入:

mysql 一条语句 update 多条记录_chijiaodaxie 的博客-CSDN 博客_mysql update 多条数据

1
2
3
4
5
6
7
8
9
10
11
12
13
14
15
16
17
18
19
20
21
<!--    原文链接:https://blog.csdn.net/u013506626/article/details/121229892 -->
<update id="updateByList" parameterType="object">
update music_info
<trim prefix="set" suffixOverrides=",">
<trim prefix="singer_name=case" suffix="end,">
<foreach collection="list" item="item" index="index">
WHEN id=#{item.id} THEN #{item.singerName}
</foreach>
</trim>
<trim prefix="last_update_date=case" suffix="end,">
<foreach collection="list" item="item" index="index">
WHEN id=#{item.id} THEN #{item.lastUpdateDate}
</foreach>
</trim>
</trim>

WHERE id IN
<foreach collection="list" item="item" open="(" close=")" separator=",">
#{item.id}
</foreach>
</update>

总结

本文主要深入探究了 mybatis 对 #{ } 和 ${ }的不同处理方式,并了解了 sql 预编译。

Mybatis Mapper.xml 继承机制 - SegmentFault 思否

mybatis 中大于等于小于等于的写法

1
2
3
4
5
6
7
8
9
10
11
12
13
14
第一种写法(1):

原符号 < <= > >= & ' "
替换符号 &lt; &lt;= &gt; &gt;= &amp; &apos; &quot;
例如:sql如下:
create_date_time &gt;= #{startTime} and create_date_time &lt;= #{endTime}

第二种写法(2):
大于等于
<![CDATA[ >= ]]>
小于等于
<![CDATA[ <= ]]>
例如:sql如下:
create_date_time <![CDATA[ >= ]]> #{startTime} and create_date_time <![CDATA[ <= ]]> #{endTime}
0%