流程

mvc 流程

处理器是如何 JSON 转换成 Java 对象

使用的是 HttpMessageConverter 机制
在这个接口里面有 5 个方法,canRead, canWrite, write, read, getSupportMediaTypes
在发起 http 请求的时候,先读取 HTTP 请求的请求体;
然后在 HttpMessageConverter 众多实例中(由 Spring MVC 组织成一条链存放)根据 canRead 方法来判断实例能否转换,
这样就找到了 MappingJackson2HttpMessageConverter 实例了,
接着执行 read 方法,将请求体转换成 Java 对象。
https://m.imooc.com/collector/read/62

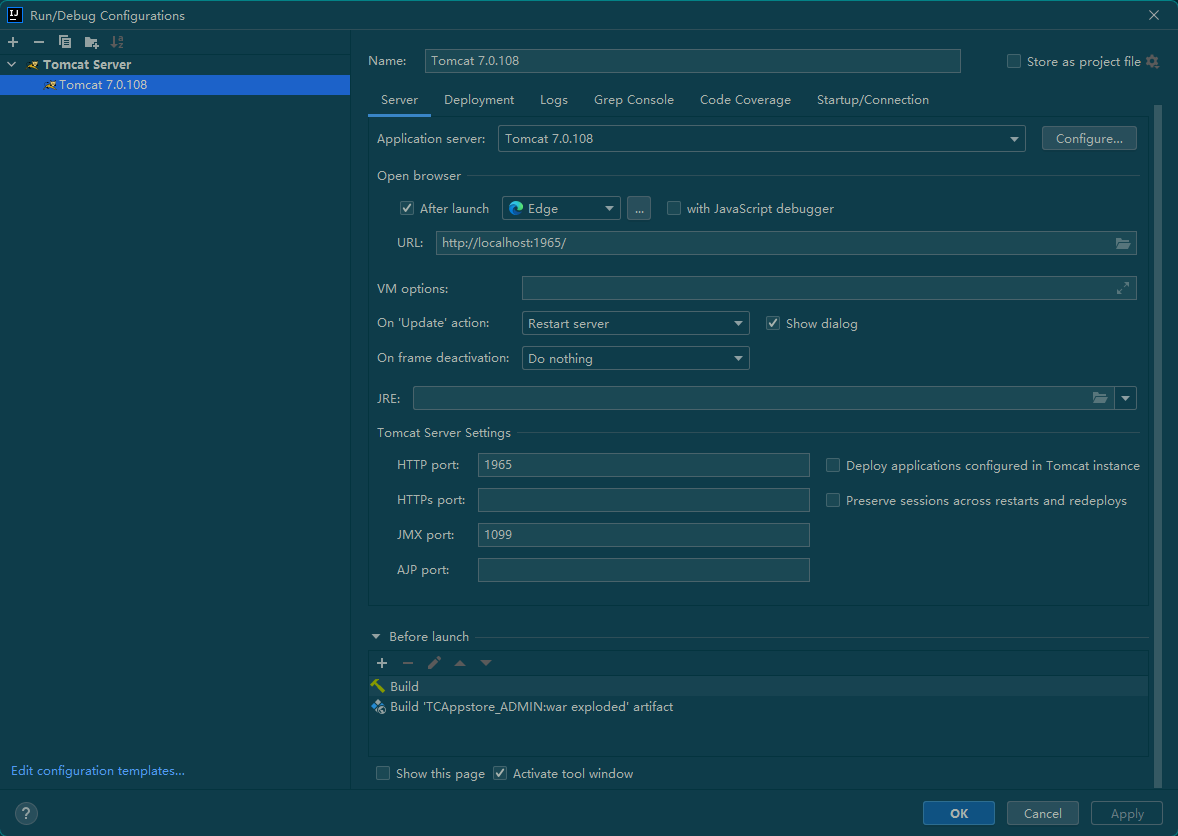
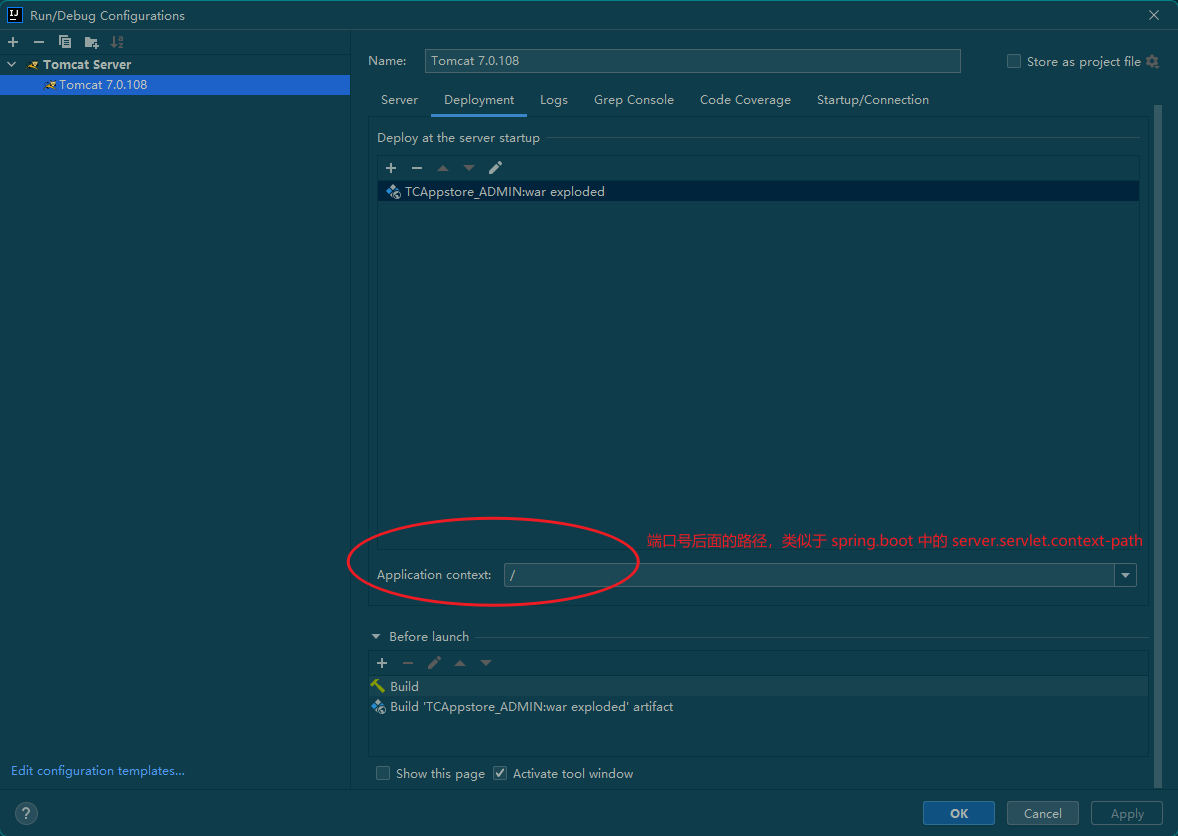
IDEA 配置 tomcat

202203021514358
202203021515228

参考资料

参考资料:Android 6.0 动态权限申请详解 - Android移动开发技术文章_手机开发 - 红黑联盟

1
2
3
4
5
6
7
8
9
10
11
12
13
14
15
16
17
18
19
20
21
22
23
24
25
26
27
28
29
30
31
32
33
34
35
 @TargetApi(Build.VERSION_CODES.M)
private void requestPermission() {
if (ContextCompat.checkSelfPermission(mContext, Manifest.permission.CAMERA)
== PackageManager.PERMISSION_GRANTED
&& ContextCompat.checkSelfPermission(mContext, Manifest.permission.WRITE_EXTERNAL_STORAGE)
== PackageManager.PERMISSION_GRANTED
&& ContextCompat.checkSelfPermission(mContext, Manifest.permission.READ_EXTERNAL_STORAGE)
== PackageManager.PERMISSION_GRANTED) {
// doSthHere();
} else {
//申请相机权限和STORAGE权限
ActivityCompat.requestPermissions(
mContext,
new String[]{Manifest.permission.CAMERA,
Manifest.permission.WRITE_EXTERNAL_STORAGE,
Manifest.permission.READ_EXTERNAL_STORAGE
},
CAMERA_REQUEST_CODE);
}
}

@Override
public void onRequestPermissionsResult(int requestCode, String[] permissions, int[] grantResults) {
super.onRequestPermissionsResult(requestCode, permissions, grantResults);
if (requestCode == CAMERA_REQUEST_CODE) {
if (grantResults[0] == PackageManager.PERMISSION_GRANTED
&& grantResults[1] == PackageManager.PERMISSION_GRANTED
&& grantResults[2] == PackageManager.PERMISSION_GRANTED) {
// doSthHere();
} else {
String msg = "没有相关运行权限";
Toast.makeText(mContext, msg, Toast.LENGTH_SHORT).show();
}
}
}

(3) Top 10 Linux Job Interview Questions - YouTube

Can you answer the 10 most popular Linux tech job interview questions?
0:00 Introduction
0:53 Tech Phone screens
1:50 How to check the kernel version of a Linux system?

1
2
3
4
man uname

uname -a # everything
uname -rsm

2:50 How to see the current IP address on Linux?

1
2
3
4
ifconfig

ip addr
ip addr show eth0

4:03 How to check for free disk space in Linux?

1
2
3
4
5
6
man df
df -ah

df -T -h
# ?????
du -sh * | grep G

6:33 How to check the size of a directory in Linux?

1
2
man du
du -sh directory_name/

4:55 How to see if a Linux service is running?

1
2
service udev status
systemctl status udev

7:02 How to check for open ports in Linux?

1
2
3
man netstat
netstat -tulpn
sudo !! # show PID/Program name

9:48 How to check Linux process information (CPU usage, memory, user information, etc.)?

1
2
3
ps -aux | grep ngrok
top
htop

11:49 How to deal with mounts in Linux

1
2
3
ls /mnt
mount /dev/sdb2 /mnt
less /etc/fstab

13:51 Man pages
15:04 Other resources

抓包工具

1
2
3
4
5
6
7
8
9
10
11
12
13
14
15
16
17
18
19
20
21
22
23
24
25
26
27
28
29
30
31
32
// https://stackoverflow.com/questions/17654631/android-webview-read-cookies/20241864
public String getCookie(String siteName, String cookieName) {
String cookieValue = null;

CookieManager cookieManager = CookieManager.getInstance();
String cookies = cookieManager.getCookie(siteName);
if (cookies != null) {
String[] temp = cookies.split(";");
for (String ar1 : temp) {
if (ar1.contains(cookieName)) {
String[] temp1 = ar1.split("=");
cookieValue = temp1[1];
}
}
}
return cookieValue;
}

// 使用
File file = new File(filePath);
RequestBody requestBody = new MultipartBody.Builder()
.setType(MultipartBody.FORM)
.addFormDataPart("file", file.getName(), RequestBody.create(MediaType.parse("image/*"), file))
.build();

Request request = new Request.Builder()
.url(callBack.getUrl())
.post(requestBody)
.addHeader("Accept", "*/*")
.addHeader("cookie", "ci_session=" + getCookie(APP_URL, "ci_session"))
.build();
client.newCall(request).enqueue(callBack);
1
2
3
4
5
6
7
// https://stackoverflow.com/questions/34881775/automatic-cookie-handling-with-okhttp-3/35346473
// https://github.com/franmontiel/PersistentCookieJar
CookieJar cookieJar = new PersistentCookieJar(new SetCookieCache(),
new SharedPrefsCookiePersistor(context));
OkHttpClient okHttpClient = new OkHttpClient.Builder()
.cookieJar(cookieJar)
.build();

获取网络时间

1
2
3
4
5
6
7
8
9
10
11
12
13
14
15
16
17
18
19
20
21
22
23
24
25
26
27
28
29
30
31
32
33
34
35
36
37
38
39
40
41
42

public class Utime {
private static final String URL_DEFAULT = "http://lyloou.com";
/**
*
* 获取时间戳(始终使用网络时间,如果获取网络时间失败,才使用本地时间)
* 注意该方法涉及网络操作,不要在主线程中调用
* 返回的是以秒为单位的时间字符串
*/
public static String getTimeStamp(String url) {

final String urlRrBase = getBaseUrl(url);
final long phoneTime = System.currentTimeMillis() / 1000;

try {
// 生成连接对象
URLConnection uc = new URL(urlRrBase).openConnection();
// 发出连接
uc.connect();
long webTimeMillis = uc.getDate();
// 读取网站日期时间
long webTime = webTimeMillis / 1000;
return String.valueOf(webTime);
} catch (Exception e) {
return String.valueOf(phoneTime);
}
}

private static String getBaseUrl(String url) {
if (TextUtils.isEmpty(url)) {
return URL_DEFAULT;
}

try {
URI uri = new URI(url);
return uri.getScheme() + "://" + uri.getHost();
} catch (Exception e) {
return URL_DEFAULT;
}

}
}

有些手机默认不开启通知权限,需要我们自己来检测和提示用户开启。

1
2
3
4
5
6
7
8
9
10
11
12
13
14
15
16
17
18
19
20
21
22
23
24
25
26
27
28
private void enableNotificationPermission(Context context) {
if (Build.VERSION.SDK_INT < Build.VERSION_CODES.KITKAT) {
return;
}
if (Uapp.isNotificationEnabled(context)) {
return;
}

final String KEY_SP_CLOSE_NOTIFICATION = "KEY_SP_CLOSE_NOTIFICATION";
if (Usp.init(context).getBoolean(KEY_SP_CLOSE_NOTIFICATION, false)) {
return;
}
new AlertDialog.Builder(context,
android.R.style.Theme_DeviceDefault_Light_Dialog)
.setTitle("友情提示").setMessage("为了给您提供更好的服务,请开启应用通知权限")
.setNegativeButton("不用了", (dialog, which) -> Usp.init(context)
.putBoolean(KEY_SP_CLOSE_NOTIFICATION, true)
.commit())
.setNeutralButton("下次再说", (dialog, which) -> {
// do nothing
})
.setPositiveButton("去开启", (dialog, which) -> {
Uapp.openAppDetailSettings(context);
})
.setCancelable(false)
.create()
.show();
}
1
2
3
4
5
6
7
8
9
10
11
12
13
14
15
16
17
18
19
20
21
22
23
24
25
26
27
28
29
30
31
32
33
34
35
36
37
38
39
40
41
42
43
44
45
46
47
48
49
50
51
52
53
54
public class Uapp {
/**
* 判断是否开启通知权限
* (https://blog.csdn.net/reglog/article/details/79863751)
*
* @param context
* @return
*/
@RequiresApi(api = Build.VERSION_CODES.KITKAT)
@SuppressWarnings("unchecked")
public static boolean isNotificationEnabled(Context context) {
String CHECK_OP_NO_THROW = "checkOpNoThrow";
String OP_POST_NOTIFICATION = "OP_POST_NOTIFICATION";

AppOpsManager mAppOps = (AppOpsManager) context.getSystemService(Context.APP_OPS_SERVICE);
ApplicationInfo appInfo = context.getApplicationInfo();
String pkg = context.getApplicationContext().getPackageName();
int uid = appInfo.uid;

/* Context.APP_OPS_MANAGER */
try {
Class appOpsClass = Class.forName(AppOpsManager.class.getName());

Method checkOpNoThrowMethod = appOpsClass.getMethod(CHECK_OP_NO_THROW, Integer.TYPE, Integer.TYPE,
String.class);
Field opPostNotificationValue = appOpsClass.getDeclaredField(OP_POST_NOTIFICATION);

int value = (Integer) opPostNotificationValue.get(Integer.class);
return ((Integer) checkOpNoThrowMethod.invoke(mAppOps, value, uid, pkg) == AppOpsManager.MODE_ALLOWED);

} catch (Exception e) {
e.printStackTrace();
}
return false;

}

// 跳转APP设置界面
public static void openAppDetailSettings(Context context) {
//跳转设置界面
Intent intent = new Intent();
intent.addFlags(Intent.FLAG_ACTIVITY_NEW_TASK);
if (Build.VERSION.SDK_INT >= 9) {
intent.setAction("android.settings.APPLICATION_DETAILS_SETTINGS");
intent.setData(Uri.fromParts("package", context.getPackageName(), null));
} else if (Build.VERSION.SDK_INT <= 8) {
intent.setAction(Intent.ACTION_VIEW);
intent.setClassName("com.android.settings", "com.android.setting.InstalledAppDetails");
intent.putExtra("com.android.settings.ApplicationPkgName", context.getPackageName());
}

context.startActivity(intent);
}
}

1
2
3
4
5
6
7
8
# c
# https://askubuntu.com/questions/194523/how-do-i-install-gnu-readline
sudo apt-get install libreadline6 libreadline6-dev

curl -R -O http://www.lua.org/ftp/lua-5.3.5.tar.gz
tar zxf lua-5.3.5.tar.gz
cd lua-5.3.5
make linux test

qq 需要添加 lib 库:open_sdk_r6008_lite.jar

1
2
3
4
5
6
// qq
implementation files('../libs/open_sdk_r6008_lite.jar')
// 微博
implementation "com.sina.weibo.sdk:core:$WEIBO_VERSION"
// wechat
implementation "com.tencent.mm.opensdk:wechat-sdk-android-without-mta:$WECHAT_VERSION"

方案 1

1
2
3
4
5
6
7
8
9
10
11
12
13
14
15
16
17
18
19
20
21
22
23
24
25
26
27
28
29
30
31
32
33
34
35
36
37
38
39
40
41
42
43
44
45
46
47
48
49
50
51
52
53
54
55
56
57
58
59
60
61
62
63
64
65
66
67
68
69
70
71
72
73
74
75
76
77
78
79
80
81
82
83
84
85
86
87
88
89
90
91

public class Uposter {

// [Android 分享功能之 微信 图片分享 - 陈三哥 - CSDN博客](https://blog.csdn.net/brokge/article/details/51851625)
public static void shareWeChatFriend(Activity context, String path) {
new Thread(() -> {
// [java - exposed beyond app through ClipData.Item.getUri - Stack Overflow](https://stackoverflow.com/questions/48117511/exposed-beyond-app-through-clipdata-item-geturi)
Uri uri = FileProvider.getUriForFile(context.getApplicationContext(), context.getPackageName() + ".provider", new File(path));

Intent shareIntent = new Intent();
//发送图片到朋友圈
//ComponentName comp = new ComponentName("com.tencent.mm", "com.tencent.mm.ui.tools.ShareToTimeLineUI");
//发送图片给好友。
ComponentName comp = new ComponentName("com.tencent.mm", "com.tencent.mm.ui.tools.ShareImgUI");
shareIntent.setComponent(comp);
shareIntent.setAction(Intent.ACTION_SEND);
shareIntent.putExtra(Intent.EXTRA_STREAM, uri);
shareIntent.setType("image/jpeg");
context.startActivity(Intent.createChooser(shareIntent, "分享图片"));
}).start();
}

// [QQ分享官方第三方接入(分享纯图片及截取view的bitmap图) - haibo_bear的博客 - CSDN博客](https://blog.csdn.net/haibo_bear/article/details/51321204)
public static void shareToQQFriend(Activity context, String path) {
new Thread(() -> {
Tencent tencent = Tencent.createInstance(QQ_APP_ID, context);
Bundle shareParams = new Bundle();
shareParams.putInt(QQShare.SHARE_TO_QQ_KEY_TYPE, QQShare.SHARE_TO_QQ_TYPE_IMAGE);
shareParams.putString(QQShare.SHARE_TO_QQ_IMAGE_LOCAL_URL, path);
shareParams.putString(QQShare.SHARE_TO_QQ_APP_NAME, context.getResources().getString(R.string.app_name));
shareParams.putInt(QQShare.SHARE_TO_QQ_EXT_INT, QQShare.SHARE_TO_QQ_FLAG_QZONE_ITEM_HIDE);
tencent.shareToQQ(context, shareParams, null);
}).start();
}

// [Android 调用系统分享文字、图片、文件,可直达微信、朋友圈、QQ、QQ空间、微博 - 她叫我小渝的个人空间 - OSCHINA](https://my.oschina.net/u/1462828/blog/2086000)
public static void shareToWeiboFriend(Activity context, String path) {

new Thread(() -> {
Intent intent = new Intent();
intent.setPackage("com.sina.weibo");
intent.setAction(Intent.ACTION_SEND);
intent.setFlags(Intent.FLAG_ACTIVITY_NEW_TASK);
Uri uri = FileProvider.getUriForFile(context.getApplicationContext(), context.getPackageName() + ".provider", new File(path));
intent.putExtra(Intent.EXTRA_STREAM, uri);
intent.setType("image/*"); //分享文件
context.startActivity(Intent.createChooser(intent, "分享"));
}).start();
}

public static void saveImage(Activity context, String path) {
// [How can I display images from a specific folder on android gallery - Stack Overflow](https://stackoverflow.com/questions/13418807/how-can-i-display-images-from-a-specific-folder-on-android-gallery)
class SingleMediaScanner implements MediaScannerConnection.MediaScannerConnectionClient {

private MediaScannerConnection mMs;
private File mFile;
private Context mContext;

private SingleMediaScanner(Context context, File f) {
mFile = f;
mContext = context;
mMs = new MediaScannerConnection(context, this);
mMs.connect();
}

public void onMediaScannerConnected() {
mMs.scanFile(mFile.getAbsolutePath(), null);
}

public void onScanCompleted(String path, Uri uri) {
Intent intent = new Intent(Intent.ACTION_VIEW);
intent.setData(uri);
mContext.startActivity(intent);
mMs.disconnect();
}

}
View v = context.findViewById(android.R.id.content);
Snackbar snackbar = Snackbar.make(v, "保存成功", Snackbar.LENGTH_LONG);
snackbar.setAction("点击查看", v1 -> {
// showGallery(context);
new SingleMediaScanner(context, new File(path));
});
snackbar.show();
}

private static void showGallery(Context context) {
context.startActivity(new Intent(Intent.ACTION_VIEW,
Uri.parse("content://media/internal/images/media")));
}
}

调用方式

1
Uposter.saveImage(mContext, "/sotrage/0/a.jpg")

方案 2

或者通过面向对象的方式来实现:

1
2
3
4
5
6
7
8
9
public interface Share {
void init(Activity context);

boolean isInstall();

void execute(String path);

String getNotInstallTip();
}

其他类实现上面的接口,如:

1
2
3
4
5
6
7
8
9
10
11
12
13
14
15
16
17
18
19
20
21
22
23
24
25
26
27
28
29
30
31
32
33
34
35
36
37
38
public class PosterShareWechat implements PosterShare {
private Activity context;

@Override
public void init(Activity context) {
this.context = context;
}


@Override
public boolean isInstall() {
return Uapp.isWechatAvilible(context);
}

@Override
public void execute(String path) {
// [Android 分享功能之 微信 图片分享 - 陈三哥 - CSDN博客](https://blog.csdn.net/brokge/article/details/51851625)
// [java - exposed beyond app through ClipData.Item.getUri - Stack Overflow](https://stackoverflow.com/questions/48117511/exposed-beyond-app-through-clipdata-item-geturi)
Uri uri = FileProvider.getUriForFile(context.getApplicationContext(), context.getPackageName() + ".provider", new File(path));

Intent shareIntent = new Intent();
//发送图片到朋友圈
//ComponentName comp = new ComponentName("com.tencent.mm", "com.tencent.mm.ui.tools.ShareToTimeLineUI");
//发送图片给好友。
ComponentName comp = new ComponentName("com.tencent.mm", "com.tencent.mm.ui.tools.ShareImgUI");
shareIntent.setComponent(comp);
shareIntent.setAction(Intent.ACTION_SEND);
shareIntent.putExtra(Intent.EXTRA_STREAM, uri);
shareIntent.setType("image/jpeg");
context.startActivity(Intent.createChooser(shareIntent, "分享图片"));
}

@Override
public String getNotInstallTip() {
return "您没有安装微信";
}
}

调用方式

1
2
3
4
5
6
7
posterShare = new PosterShareWechat();
posterShare.init(context);
if (!posterShare.isInstall()) {
Utoast.show(posterShare.getNotInstallTip());
return;
}
posterShare.execute(path);

https://www.youtube.com/watch?v=V8EUdia_kOE

  • sudo !!
  • ctrl-k, ctrl-u, ctrl-w, ctrl-y - cutting and pasting text in the command line
  • practical kill/yank example
  • use ‘less +F’ to view logfiles, instead of ‘tail’ (ctrl-c, shift-f, q to quit)
  • ctrl-x-e - continue editing your current shell line in a text editor (uses $EDITOR)
  • alt-. - paste previous command’s argument (useful for running multiple commands on the same resource)
  • reset - resets/unborks your terminal

linux kill 某个端口对应的进程

1
kill -9 $(lsof -i:端口号 -t)
1
kill [']netstat -nlp | grep :3306 | awk '{print $7}' | awk -F"/" '{ print $1 }'[']

根据启动的应用名称来杀死进程

获取所有该应用名称的进程
ps -aux | grep user-0.0.1.jar

1
2
lilou     2676  0.0  0.0  21536   980 pts/18   S+   09:49   0:00 grep --color=auto --exclude-dir=.bzr --exclude-dir=CVS --exclude-dir=.git --exclude-dir=.hg --exclude-dir=.svn user-0.0.1.jar
lilou 4353 0.0 2.0 8230288 339332 pts/21 Sl+ 528 0:43 java -jar user-0.0.1.jar

排除含有 grep 的行
ps -aux | grep user-0.0.1.jar | grep -v grep

1
lilou     4353  0.0  2.0 8230288 339332 pts/21 Sl+  528   0:43 java -jar user-0.0.1.jar

获取进程号
ps -aux | grep user-0.0.1.jar | grep -v grep | cut -c 9-15

1
4353

使用 kill 命令杀死进程
ps -aux | grep user-0.0.1.jar | grep -v grep | cut -c 9-15 | xargs kill -15

1
该进程已经被杀死

java 项目启动和停止脚本

1
2
3
4
5
6
7
8
9
10
11
12
13
cat env.sh
NAME="user-0.0.1.jar"
cat start.sh
. ./env.sh
nohup java -Duser.timezone=GMT+08 -Xmx1G -Xms1G -jar $NAME > /dev/null &
cat stop.sh
. ./env.sh
ps -aux | grep $NAME | grep -v grep | cut -c 9-15 | xargs kill -15
cat restart.sh
./stop.sh
sleep 8
./start.sh

ps -aux | grep python | grep 9090 | cut -c 9-15 | xargs kill -15
cd /www/smbshare && python -m SimpleHTTPServer 9090 > /dev/null 2>&1 &

根据端口来 kill 进程

1
2
3
#!/bin/sh
cd $(dirname $0)
lsof -i :21001 |grep "\(LISTEN\)"|awk -F ' ' '{print "kill -15 " $2}'|sh

具体参考: man lsof

递归删除文件和目录

1
2
3
4
5
6
7
8
9
10
11
12
13
#!/bin/bash

# 递归清除不必要的文件
# https://blog.csdn.net/skylin19840101/article/details/75099240

# 删除文件
find . -name .flattened-pom.xml | xargs rm -f
find . -name .project | xargs rm -f

# 删除目录
find . -name ".settings" | xargs rm -rf
find . -name "target" | xargs rm -rf

Android: Understanding Activity launch mode

  • ‘standard’ and ‘singleTop’ can instantiate multiple activity instances and the instance will stay in the same task.
  • For ‘singleTask’ or ‘singleInstance’, the activity class uses the singleton pattern, and that instance will be the root activity of a new task. Let’s examine each value:

the weird launch mode

1
2
3
4
5
6
7
8
9
10
11
12
13
14
https://stackoverflow.com/questions/9363200/android-singletask-singletop-and-home-button
The behaviour of activity back stack becomes quit weird when define main activity with singleTask at the same time:

<activity android:name=".MainActivity"
android:launchMode="singleTask">
<intent-filter>
<action android:name="android.intent.action.MAIN" />
<category android:name="android.intent.category.LAUNCHER" />
</intent-filter>
</activity>

What even worse is there is no clear explanation in the official dev guide regarding to this special use case. Some sections related to this topic are even self-contradictory.

Try using launchMode="standard" on your MainActivity A, and launchMode="singleTask" on your Activity B, which will give the expect behaviour you described.

自学笔记:Activity的启动模式:FLAG_ACTIVITY_CLEAR_TOP和FLAG_ACTIVITY_REORDER_TO_FRONT

1
2
3
4
5
6
7
// A, B, C 和 D ==> A, B
Intent intent = new Intent(this, B.class);
intent.setFlags(Intent.FLAG_ACTIVITY_CLEAR_TOP);
startActivity(intent);

// add below code , B will be reused.
intent.addFlags(Intent.FLAG_ACTIVITY_SINGLE_TOP);
1
2
3
4
// A,B,C和D ==> A,C,D,B,
Intent intent = new Intent(this, MainActivity.class);
intent.addFlags(Intent.FLAG_ACTIVITY_REORDER_TO_FRONT);
startActivity(intent);

深入讲解Android中Activity launchMode - 技术小黑屋

wps

http://wps-community.org/downloads

gvim

1
2
sudo apt update
sudo apt install vim-gnome

synpase(快速启动)

1
2
3
sudo add-apt-repository ppa:synapse-core/ppa
sudo apt-get update
sudo apt-get install synapse

fcitx 五笔输入法

  • 安装
    sudo apt-get install fcitx fcitx-table-wubi fcitx-tools -y

  • 启用自动调频
    修改配置文件 /usr/share/fcitx/table/wbx.conf

1
AdjustOrder=AdjustFreq
  • 不能正常打出中文标点
    修改配置文件
    /usr/share/fcitx/addon/fcitx-fullwidth-char.conf
1
Priority=80

git

1
2
sudo apt-get update
sudo apt-get install git

vlc(多媒体播放器)

1
2
sudo apt-get update
sudo apt install vlc

wiz

1
http://www.wiz.cn/wiznote-linux.html

firefox

1
2
3
4
5
6
7
8
9
#
# https://www.computernetworkingnotes.com/ubuntu-linux-tutorials/how-to-update-firefox-in-ubuntu-linux.html
# install
sudo apt-get update
sudo apt-get install firefox

# update
sudo apt-get update
sudo apt-get install --only-upgrade firefox

chrome

  • install
1
2
3
4
5
6
7
8
9
# https://askubuntu.com/questions/510056/how-to-install-google-chrome

# 1. add key
wget -q -O - https://dl-ssl.google.com/linux/linux_signing_key.pub | sudo apt-key add -
# 2. set repository
echo 'deb [arch=amd64] http://dl.google.com/linux/chrome/deb/ stable main' | sudo tee /etc/apt/sources.list.d/google-chrome.list
# 3. install package
sudo apt-get update
sudo apt-get install google-chrome-stable
  • config
1
2
3
https://github.com/FelisCatus/SwitchyOmega/releases/

https://raw.githubusercontent.com/gfwlist/gfwlist/master/gfwlist.txt

vscode

1
2
3
4
5
6
7
# https://code.visualstudio.com/docs/setup/linux

curl https://packages.microsoft.com/keys/microsoft.asc | gpg --dearmor > microsoft.gpg
sudo mv microsoft.gpg /etc/apt/trusted.gpg.d/microsoft.gpg
sudo sh -c 'echo "deb [arch=amd64] https://packages.microsoft.com/repos/vscode stable main" > /etc/apt/sources.list.d/vscode.list'
sudo apt-get update
sudo apt-get install code # or code-insiders

idea

1
2
# https://www.jetbrains.com/help/idea/install-and-set-up-product.html
sudo snap install intellij-idea-ultimate --classic

emacs

1
sudo apt-get install emacs

shadowsocks

  • install
1
2
3
# ubuntu
sudo apt-get install python-pip
pip install --upgrade pip
1
2
3
4
// sudo vim /usr/bin/pip
from pip import __main__
if __name__ == '__main__':
sys.exit(__main__._main())

sudo pip install shadowsocks

  • config
    sudo vi $HOME/p/shadowsocks.json
1
2
3
4
5
6
7
8
9
10
// 在shadowsocks.json中加入以下内容:
{
"server": "my_server_ip",
"local_address": "127.0.0.1",
"local_port": 1080,
"server_port": my_server_port,
"password": "my_password",
"timeout": 300,
"method": "aes-256-cfb"
}

sudo ln -s $HOME/p/shadowsocks.json /etc/shadowsocks.json

  • start
1
2
3
4
- 前端启动: sudo sslocal -c /etc/shadowsocks.json
- 后端启动: sudo sslocal -c /etc/shadowsocks.json -d start
- 后端停止: sudo sslocal -c /etc/shadowsocks.json -d stop
- 重启(修改配置要重启才生效): sudo sslocal -c /etc/shadowsocks.json -d restart
  • boot up
    sudo vim /etc/systemd/system/shadowsocks.service
1
2
3
4
5
6
7
8
9
10
11
[Unit]
Description=Shadowsocks Client Service
After=network.target

[Service]
Type=simple
User=root
ExecStart=/usr/bin/sslocal -c /etc/shadowsocks.json

[Install]
WantedBy=multi-user.target

systemctl enable /etc/systemd/system/shadowsocks.service

  • now you can reboot to check it~

proxychains

1
2
3
4
5
6
7
8
# https://askubuntu.com/questions/610333/how-to-set-socks5-proxy-in-the-terminal
# install proxychains
sudo apt install proxychains
sudo proxychains apt-get update

# now you can config your proxy in /etc/proxychains.conf
# sudo vim /etc/proxychains.conf
socks5 127.0.0.1 1080

privoxy

1
2
3
4
5
6
7
8
9
10
11
12
13
# https://linoxide.com/linux-how-to/install-use-privoxy-ubuntu-16-04/
# install
sudo apt-get install privoxy

# sudo vim /etc/privoxy/config
# 添加下面这一行
forward-socks5 / 0.0.0.0:1080 .

#启动
/etc/init.d/privoxy restart

# 测试
curl -x 127.0.0.1:8118 http://www.google.com

caja(文件管理器)

1
2
3
# https://www.devmanuals.net/install/ubuntu/ubuntu-16-04-LTS-Xenial-Xerus/how-to-install-caja.html
sudo apt-get update
sudo apt-get install caja

terminal

terminator

1
2
3
# http://www.ubuntugeek.com/terminator-multiple-gnome-terminals-in-one-window.html
# https://linux.cn/article-2978-1.html
sudo apt-get install terminator

PAC Manager

tmux

1
sudo apt-get install tmux
1
2
3
4
5
6
7
8
9
10
11
12
13
14
VERSION=2.8
wget https://github.com/tmux/tmux/releases/download/${VERSION}/tmux-${VERSION}.tar.gz
tar xf tmux-${VERSION}.tar.gz
rm -f tmux-${VERSION}.tar.gz
cd tmux-${VERSION}

sudo apt-get install libevent-dev
sudo apt-get install ncurses-dev
./configure
make
sudo make install
cd -
sudo rm -rf /usr/local/src/tmux-\*
sudo mv tmux-${VERSION} /usr/local/src

zsh

1
2
3
4
5
# install
sudo apt-get install zsh

# change default shell to zsh
chsh -s /bin/zsh
  • oh my zsh
1
2
3
# https://github.com/robbyrussell/oh-my-zsh
sh -c "$(curl -fsSL https://raw.githubusercontent.com/robbyrussell/oh-my-zsh/master/tools/install.sh)"
sh -c "$(curl -fsSL https://gitee.com/mirrors/oh-my-zsh/raw/master/tools/install.sh)"
  • autojump
1
2
3
4
5
sudo apt-get install autojump

vim .zshrc
#在最后一行加入,注意点后面是一个空格
plugins=( [plugins...] autojump)
  • zsh-syntax-highlighting
1
2
3
4
5
6
7
# https://github.com/zsh-users/zsh-syntax-highlighting/blob/master/INSTALL.md
# 1. Clone this repository in oh-my-zsh's plugins directory:
git clone https://github.com/zsh-users/zsh-syntax-highlighting.git ${ZSH_CUSTOM:-~/.oh-my-zsh/custom}/plugins/zsh-syntax-highlighting
# 2. Activate the plugin in ~/.zshrc:
plugins=( [plugins...] zsh-syntax-highlighting)
# 3. Source ~/.zshrc to take changes into account:
source ~/.zshrc
  • zsh-autosuggestions
1
2
git clone git://github.com/zsh-users/zsh-autosuggestions $ZSH_CUSTOM/plugins/zsh-autosuggestions
plugins=( [plugins...] zsh-autosuggestions)
  • theme:
1
2
3
4
$ git clone https://github.com/bhilburn/powerlevel9k.git ~/.oh-my-zsh/custom/themes/powerlevel9k

vi ~/.vimrc
ZSH_THEME="powerlevel9k/powerlevel9k"

https://travis.media/top-12-oh-my-zsh-themes-for-productive-developers/#20210921-eastwood

git-cola

1
apt-get install git-cola

variety 壁纸切换

1
2
sudo apt-get update
sudo apt-get install variety

catfish 文件搜索

calibre(电子书阅读器)

红移(色温调节工具)

workrave(定时提醒)

LibreOffice

Transmission (downloader)

diodon

截图软件 shutter

  1. sudo add-apt-repository ppa:shutter/ppa1
  2. sudo apt-get update
  3. sudo apt-get install shutter1
  4. 设置快捷键 keyboard -> shortcut -> shutter -s -> Ctrl+Alt+A -> ok

卸载软件

  1. 查找安装名称:dpkg -l | grep package_name
  2. 卸载sudo apt-get remove package_name, 具体输入apt-get命令查看

本地安装

以安装网易云音乐为例

  1. 从官网下载 deb 安装文件
  2. 执行下列命令
1
2
$ sudo dpkg -i netease*.dbg
$ sudo apt -f install

去除 chrome 的输入密码以解锁密码环提示

安装 WenQuanYi Zen Hei 字体

  1. download file: wqy-zenhei-0.9.45.deb
  2. install: dpkg -i wqy-zenhei-0.9.45.deb

sleep

1
2
#!/bin/bash
dbus-send --system --print-reply --dest=org.freedesktop.login1 /org/freedesktop/login1 "org.freedesktop.login1.Manager.Suspend" boolean:true

wine

https://wiki.winehq.org/Ubuntu

add C env

apt-get install build-essential

rg

https://github.com/BurntSushi/ripgrep

1
2
3
curl -LO https://github.com/BurntSushi/ripgrep/releases/download/0.10.0/ripgrep_0.10.0_amd64.deb

sudo dpkg -i ripgrep_0.10.0_amd64.deb

trash-cli

fzf

A command-line fuzzy finder

https://github.com/junegunn/fzf

v2ray

server

1
2
bash <(curl -s -L https://git.io/v2ray.sh)
bash <(curl -s -L https://git.io/v2ray-setup.sh)

client

1
bash <(curl -L -s https://install.direct/go.sh)
1
2
3
4
5
6
7
说明
此脚本会自动安装以下文件:
/usr/bin/v2ray/v2ray:V2Ray 程序;
/usr/bin/v2ray/v2ctl:V2Ray 工具;
/etc/v2ray/config.json:配置文件;
/usr/bin/v2ray/geoip.dat:IP 数据文件
/usr/bin/v2ray/geosite.dat:域名数据文件
  1. 修改配置
    vi /etc/v2ray/config.json

  2. 启动和状态查看

1
2
3
service v2ray start
service v2ray status
service v2ray restart

android 客户端:BifrostV

file server

How To Quickly Serve Files And Folders Over HTTP In Linux - OSTechNix

How do I modify or disable the HUD’s use of the Alt key?

  1. open System Settings
  2. Then go to Keyboard > Shortcuts > Launchers. You can redefine the HUD key with the Key to show the HUD option. Pressing Backspace will disable the HUD shortcut altogether.
  3. You can redefine the HUD key with the Key to show the HUD option. Pressing Backspace will disable the HUD shortcut altogether.

Install Fira in Ubuntu

1
2
3
4
wget https://github.com/mozilla/Fira/archive/master.zip
unzip master.zip
sudo mkdir -p /usr/share/fonts/truetype/fira
sudo cp Fira-master/ttf/* /usr/share/fonts/truetype/fira
0%