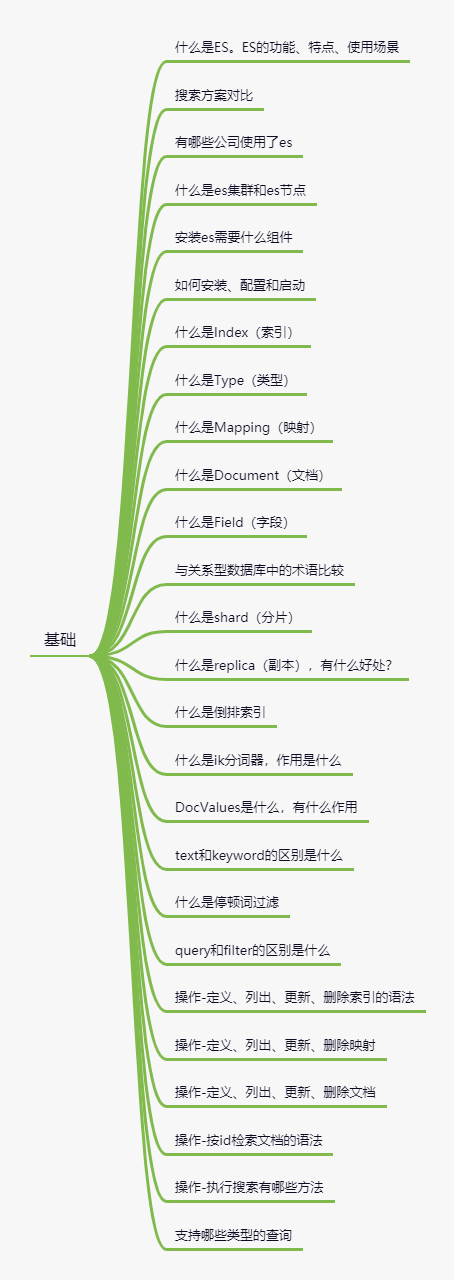
剑指 Offer 第 23 题-链表中环的入口结点

给一个长度为 n 链表,若其中包含环,请找出该链表的环的入口结点,否则,返回 null。
https://www.nowcoder.com/practice/253d2c59ec3e4bc68da16833f79a38e4

方法 1-快慢指针

思路:

  1. 确定是否有环:两个快慢指针相遇
  2. 确定环的个数:让指针从相遇的节点再回到这个节点,得到环个数 n
  3. 确定环入口节点:一个指针先走 n 步,接着和第二个指针同步向前,相遇的点就是入口节点
1
2
3
4
5
6
7
8
9
10
11
12
13
14
15
16
17
18
19
20
21
22
23
24
25
26
27
28
29
30
31
32
33
34
35
36
37
38
39
40
41
42
43
44
45
46
47
48
49
50
51
52
53
54
55
56
57
58
59
60
61
62
63
64
65
66
67
68
69
70
71
72
73
74
75
76
77
78
79
80
81
82
83
84
85
86
87
88
89
90
91
public class Jz23 {
public static void main(String[] args) {
final Jz23 jz23 = new Jz23();
final ListNode root = new ListNode(1);
final ListNode node3 = new ListNode(3);
root
.append(new ListNode(2))
.append(node3)
.append(new ListNode(4))
.append(new ListNode(5))
.append(node3)
;
System.out.println(jz23.EntryNodeOfLoop(root).val);
}


public ListNode EntryNodeOfLoop(ListNode pHead) {
// 确定是否有环:两个快慢指针相遇
ListNode meetNode = getMeetNode(pHead);
if (meetNode == null) {
return null;
}

// 确定环的个数:让指针从相遇的节点再回到这个节点,得到环个数n
int loopCount = getLoopCount(meetNode);

// 确定环入口节点:一个指针先走n步,接着和第二个指针同步向前,相遇的点就是入口节点
return getEntryNode(pHead, loopCount);
}

private ListNode getEntryNode(ListNode pHead, int loopCount) {
ListNode fast = pHead;
ListNode slow = pHead;

// 快指针先行loopCount步
while (loopCount-- > 0) {
fast = fast.next;
}
while (fast != slow) {
fast = fast.next;
slow = slow.next;
}

return fast;
}

private int getLoopCount(ListNode meetNode) {
ListNode moveNode = meetNode.next;
int count = 1;
while (moveNode != meetNode) {
moveNode = moveNode.next;
count++;
}
return count;
}

private ListNode getMeetNode(ListNode pHead) {
ListNode fast = pHead;
ListNode slow = pHead;

while (fast != null && slow != null) {

fast = fast.next;
if (fast != null) {
fast = fast.next;
}

slow = slow.next;
if (fast != null && fast == slow) {
return fast;
}
}
return null;
}

public static class ListNode {
int val;
ListNode next = null;

public ListNode(int val) {
this.val = val;
}

public ListNode append(ListNode next) {
this.next = next;
return this.next;
}
}

}

方法 2-hash 法

将值记录到 set 中,首次出现存在的值,对应的就是那个入口点

1
2
3
4
5
6
7
8
9
10
11
12
13

public ListNode EntryNodeOfLoop(ListNode pHead) {
// 将值记录到set中,首次出现存在的值,对应的就是那个入口点
Set<Integer> set = new HashSet<>();
while (pHead != null) {
if (set.contains(pHead.val)) {
return pHead;
}
set.add(pHead.val);
pHead = pHead.next;
}
return null;
}

剑指 Offer 第 22 题-链表中倒数最后 k 个结点

输入一个长度为 n 的链表,设链表中的元素的值为 ai ,返回该链表中倒数第 k 个节点。
如果该链表长度小于 k,请返回一个长度为 0 的链表。

https://www.nowcoder.com/practice/886370fe658f41b498d40fb34ae76ff9

方法 1

先找总个数,再取第 n-k+1 个节点

1
2
3
4
5
6
7
8
9
10
11
12
13
14
15
16
17
18
19
20
21
22
23
24
25
26
27
public ListNode FindKthToTail(ListNode pHead, int k) {
// 获取总个数n
// 假设从1开始计数,则取的是第n-k+1个

int count = 0;
ListNode loopNode = pHead;
while (loopNode != null) {
count++;
loopNode = loopNode.next;
}
if (k > count) {
return null;
}

int index = 0;
loopNode = pHead;
while (loopNode != null) {
index++;
if (count - k + 1 == index) {
break;
}
loopNode = loopNode.next;
}

// write code here
return loopNode;
}

方法 2

两个指针法

1
2
3
4
5
6
7
8
9
10
11
12
13
14
15
16
17
18
19
20
21
22
public ListNode FindKthToTail(ListNode pHead, int k) {
// 两个指针,一个指针先行,当移动个数大于k个后,另一个指针才开始移动,一直到结束
int right = 0;
ListNode firstNode = pHead;
ListNode secondNode = pHead;

while (firstNode != null) {
right++;
if (right > k) {
secondNode = secondNode.next;
}
firstNode = firstNode.next;
}

// 总数个数不足k的情况
if (right < k) {
return null;
}

// 第二个指针,即所要求的位置
return secondNode;
}

方法 3

栈,思路是:是入栈,再从栈中数 k 个数

1
2
3
4
5
6
7
8
9
10
11
12
13
14
15
16
17
18
19
20
public ListNode FindKthToTail(ListNode pHead, int k) {
// 先入栈
Stack<ListNode> stack = new Stack<>();
while (pHead != null) {
stack.push(pHead);
pHead = pHead.next;
}

// 再从栈中数k个数
if (stack.size() < k) {
return null;
}

// 从栈中找第k个数
ListNode result = null;
while (k-- > 0) {
result = stack.pop();
}
return result;
}

剑指 Offer 第 21 题-奇数位于偶数前面

https://www.nowcoder.com/practice/ef1f53ef31ca408cada5093c8780f44b

描述

输入一个长度为 n 整数数组,数组里面不含有相同的元素,实现一个函数来调整该数组中数字的顺序,使得所有的奇数位于数组的前面部分,所有的偶数位于数组的后面部分,并保证奇数和奇数,偶数和偶数之间的相对位置不变。

数据范围:0 <= n <= 50000,数组中每个数的值 0 <= val <= 100000

要求:时间复杂度 O(n)O(n),空间复杂度 O(n)O(n)

进阶:时间复杂度 O(n^2)O(n ),空间复杂度 O(1)O(1)

方法 1 - 枚举法

创建一个新的数组,分两次遍历数组并添加到新数组中。

1
2
3
4
5
6
7
8
9
10
11
12
13
14
15
16
17
18
19
20
21
22
23
24
25

public class Jz21_1 {
public static void main(String[] args) {
System.out.println(Arrays.toString(reOrderArray(new int[]{1, 2, 3, 4})));
System.out.println(Arrays.toString(reOrderArray(new int[]{2, 4, 6, 5, 7})));
}

public static int[] reOrderArray(int[] array) {
int[] result = new int[array.length];

int index = 0;
for (int odd : array) {
if (odd % 2 == 1) {
result[index++] = odd;
}
}
for (int even : array) {
if (even % 2 == 0) {
result[index++] = even;
}
}
return result;
}
}

方法 2 - 冒泡法

找到下一个奇数位置,冒泡到前面来

1
2
3
4
5
6
7
8
9
10
11
12
13
14
15
16
17
18
19
20
21
22
23
24
25
26
27
28
29
30
31
32
33
34
35
36
37
38
39
40
41
42
43
44
45
46
47
48
49
50
51
52
53
54
public class Jz21_2 {
public static void main(String[] args) {
System.out.println(Arrays.toString(reOrderArray(new int[]{2, 4, 6, 5, 7})));
}

public static int[] reOrderArray(int[] array) {

for (int i = 0; i < array.length; i++) {

// 当前位置是否是奇数
final boolean odd = array[i] % 2 == 1;

// 当前位置是奇数,进入下一轮
if (odd) {
continue;
}

// 下一个奇数位置
int nextOddIndex = -1;

// 当前是偶数
// 找到下一个奇数位置
for (int j = i + 1; j < array.length; j++) {
if (array[j] % 2 == 1) {
nextOddIndex = j;
break;
}
}
// 如果后面没有奇数了,可以直接退出了
if (nextOddIndex == -1) {
return array;
}

// 存在奇数,下一个奇数冒泡到当前偶数所在的位置
bubble(array, i, nextOddIndex);

}
return array;
}

private static void bubble(int[] array, int currentIndex, int nextOddIndex) {
while (currentIndex < nextOddIndex) {
swap(array, nextOddIndex - 1, nextOddIndex);
nextOddIndex = nextOddIndex - 1;
}
}

private static void swap(int[] array, int i, int j) {
int tmp = array[i];
array[i] = array[j];
array[j] = tmp;
}
}

策略化版本

输入一个长度为 n 整数数组,数组里面不含有相同的元素,实现一个函数来调整该数组中数字的顺序,使得所有的奇数位于数组的前面部分,所有的偶数位于数组的后面部分
(注意,区别于前面的版本,这里不需要保证奇数和奇数,偶数和偶数之间的相对位置不变。)

另外添加了其它的策略:偶数在前、能被 3 整除的在前。

这个做法,能够灵活适配新的类似的要求。

1
2
3
4
5
6
7
8
9
10
11
12
13
14
15
16
17
18
19
20
21
22
23
24
25
26
27
28
29
30
31
32
33
34
35
36
37
38
39
40
41
42
43
44
45
46
47
48
49
50
51
52
53
54
55
56
57
58
59
60
public class Jz21_3 {
public static void main(String[] args) {
System.out.println("奇数排在前面");
System.out.println(Arrays.toString(reOrderArray(new int[]{2, 4, 6, 5, 7}, Jz21_3::isOdd)));
System.out.println(Arrays.toString(reOrderArray(new int[]{1, 2, 3, 4, 5, 6, 7, 8, 9}, Jz21_3::isOdd)));

System.out.println("偶数排在前面");
System.out.println(Arrays.toString(reOrderArray(new int[]{2, 4, 6, 5, 7}, Jz21_3::isEven)));
System.out.println(Arrays.toString(reOrderArray(new int[]{1, 2, 3, 4, 5, 6, 7, 8, 9}, Jz21_3::isEven)));

System.out.println("能被3整除的在前面");
System.out.println(Arrays.toString(reOrderArray(new int[]{2, 4, 6, 5, 7}, Jz21_3::isThreeTime)));
System.out.println(Arrays.toString(reOrderArray(new int[]{1, 2, 3, 4, 5, 6, 7, 8, 9}, Jz21_3::isThreeTime)));
}

public static int[] reOrderArray(int[] array, Predicate<Integer> predicate) {

if (array == null || array.length == 0) {
return array;
}

int left = 0;
int right = array.length - 1;
while (left < right) {
while (left < right && predicate.test(array[left])) {
left++;
}

while (left < right && !predicate.test(array[right])) {
right--;
}
if (left < right) {
swap(array, left, right);
}
}
return array;
}

private static boolean isOdd(int i) {
return i % 2 == 1;
}

private static boolean isEven(int i) {
return i % 2 == 0;
}

private static boolean isThreeTime(int i) {
return i % 3 == 0;
}


private static void swap(int[] array, int i, int j) {
int tmp = array[i];
array[i] = array[j];

array[j] = tmp;
}
}


剑指 Offer 第 19 题-正则表达式匹配

请实现一个函数用来匹配包括’.’和’‘的正则表达式。模式中的字符’.’表示任意一个字符,而’‘表示它前面的字符可以出现任意次(包含 0 次)。 在本题中,匹配是指字符串的所有字符匹配整个模式。

例如,字符串”aaa”与模式”a.a”和”abaca”匹配,但是与”aa.a”和”ab*a”均不匹配

数据范围:

  • 1.str 可能为空,且只包含从 a-z 的小写字母。
  • 2.pattern 可能为空,且只包含从 a-z 的小写字母以及字符 . 和 ,无连续的 ‘‘。
  • 3.1 <= str.length <= 20
  • 4.1 <= pattern.length <= 30

要求:空间复杂度 O(1)O(1),时间复杂度 O(n)O(n)

方法 1

在原数组上,移动下标,合并边界

1
2
3
4
5
6
7
8
9
10
11
12
13
14
15
16
17
18
19
20
21
22
23
24
25
26
27
28
29
30
31
32
33
34
35
36
37
38
39
40
41
42
43
44
45
46
47
48
49
50
51
52
53
54
55
56
57
58
59
60
61
62
63
64
65
66
67
68
69
70
71
72
73
74
75
76
77
78
79
80
81
82
83
84
85
86
87
88
89
90
91
92
93
94
95
96
97
98
99
100
101
102
103
104
105
106
107
108
109
110
111
112
113
114
115
116
117
118
119

/**
* 描述
* 请实现一个函数用来匹配包括'.'和'*'的正则表达式。模式中的字符'.'表示任意一个字符,而'*'表示它前面的字符可以出现任意次(包含0次)。 在本题中,匹配是指字符串的所有字符匹配整个模式。例如,字符串"aaa"与模式"a.a"和"ab*ac*a"匹配,但是与"aa.a"和"ab*a"均不匹配
* <p>
* 数据范围:
* 1.str 可能为空,且只包含从 a-z 的小写字母。
* 2.pattern 可能为空,且只包含从 a-z 的小写字母以及字符 . 和 *,无连续的 '*'。
* 3.1 <= str.length <= 20
* 4.1 <= pattern.length <= 30
* 要求:空间复杂度 O(1)O(1),时间复杂度 O(n)O(n)
*
* @author lilou
*/
public class Jz19_1 {
public static void main(String[] args) {
final Jz19_1 jz19 = new Jz19_1();
jz19.test("Test22", "aaa", "ab*a", false);

jz19.test("Test01", "", "", true);
jz19.test("Test02", "", ".*", true);
jz19.test("Test03", "", ".", false);
jz19.test("Test04", "", "c*", true);
jz19.test("Test05", "a", ".*", true);
jz19.test("Test06", "a", "a.", false);
jz19.test("Test07", "a", "", false);
jz19.test("Test08", "a", ".", true);
jz19.test("Test09", "a", "ab*", true);
jz19.test("Test10", "a", "ab*a", false);
jz19.test("Test11", "aa", "aa", true);
jz19.test("Test12", "aa", "a*", true);
jz19.test("Test13", "aa", ".*", true);
jz19.test("Test14", "aa", ".", false);
jz19.test("Test15", "ab", ".*", true);
jz19.test("Test16", "ab", ".*", true);
jz19.test("Test17", "aaa", "aa*", true);
jz19.test("Test18", "aaa", "aa.a", false);
jz19.test("Test19", "aaa", "a.a", true);
jz19.test("Test20", "aaa", ".a", false);
jz19.test("Test21", "aaa", "a*a", true);
jz19.test("Test22", "aaa", "ab*a", false);
jz19.test("Test23", "aaa", "ab*ac*a", true);
jz19.test("Test24", "aaa", "ab*a*c*a", true);
jz19.test("Test25", "aaa", ".*", true);
jz19.test("Test26", "aab", "c*a*b", true);
jz19.test("Test27", "aaca", "ab*a*c*a", true);
jz19.test("Test28", "aaba", "ab*a*c*a", false);
jz19.test("Test29", "bbbba", ".*a*a", true);
jz19.test("Test30", "bcbbabab", ".*a*a", false);
}

private void test(String testName, String str, String pattern, boolean expired) {
if (match(str, pattern) == expired) {
return;
}
System.out.printf("%s 结果不对\n", testName);
}

public boolean match(String str, String pattern) {

// 串和模式为空的判断
if (str == null && pattern == null) {
return true;
}
if (str == null || pattern == null) {
return false;
}

// 转换为char数组
final char[] strArr = str.toCharArray();
final char[] patternArr = pattern.toCharArray();
int strIndex = 0;
int patternIndex = 0;
// 进入递归
return matchCore(strArr, strIndex, patternArr, patternIndex);
}


private boolean matchCore(char[] strArr, int strIndex, char[] patternArr, int patternIndex) {

// 模式匹配到最后了,就可以决定串是否匹配
if (isEnd(patternArr, patternIndex)) {
return isEnd(strArr, strIndex);
}

// 如果串的第一个字符不存在,
// 假如串是「aa」,模式是「aaa*」
// 可以向下进行,判断模式串是不是「.*」或「a*」

// 如果串的第一个字符存在
// 判断串的第一个字符是否和模式的第一个字符匹配
boolean firstMatch = !isEnd(strArr, strIndex) && (
patternArr[patternIndex] == '.' || patternArr[patternIndex] == strArr[strIndex]);

// 判断模式的第二个字符是不是「*」
if ((patternIndex + 1 < patternArr.length) && (patternArr[patternIndex + 1] == '*')) {
// 模式串右移2位 或 字符串移动1
return matchCore(strArr, strIndex, patternArr, patternIndex + 2) ||
(firstMatch && matchCore(strArr, strIndex + 1, patternArr, patternIndex));
} else {
return firstMatch && matchCore(strArr, strIndex + 1, patternArr, patternIndex + 1);
}
}

private final char END = '\0';

private boolean isEnd(char[] arr, int index) {
return END == indexArr(arr, index);
}

private char indexArr(char[] arr, int index) {
if (index < arr.length) {
return arr[index];
}
return END;
}

}

方法 2

在原数组上,移动下标,列出详细的边界

1
2
3
4
5
6
7
8
9
10
11
12
13
14
15
16
17
18
19
20
21
22
23
24
25
26
27
28
29
30
31
32
33
34
35
36
37
38
39
40
41
42
43
44
45
46
47
48
49
50
51
52
53
54
55
56
57
58
59
60
61
62
63
64
65
66
67
68
69
70
71
72
73
74
75
76
77
78
79
80
81
82
83
84
85
86
87
88
89
90
91
92
93
94
95
96
97
98
99
100
101
102
103
104
105
106
107
108
109
110
111
112
113
114
115
116
117
118
119
120
121
122
123
124
125
126
127
128
129
130
131
132
133
134
135
136
137
138
public class Jz19_2 {
public static void main(String[] args) {
final Jz19_2 jz19 = new Jz19_2();
jz19.test("Test22", "aaa", "ab*a", false);

jz19.test("Test01", "", "", true);
jz19.test("Test02", "", ".*", true);
jz19.test("Test03", "", ".", false);
jz19.test("Test04", "", "c*", true);
jz19.test("Test05", "a", ".*", true);
jz19.test("Test06", "a", "a.", false);
jz19.test("Test07", "a", "", false);
jz19.test("Test08", "a", ".", true);
jz19.test("Test09", "a", "ab*", true);
jz19.test("Test10", "a", "ab*a", false);
jz19.test("Test11", "aa", "aa", true);
jz19.test("Test12", "aa", "a*", true);
jz19.test("Test13", "aa", ".*", true);
jz19.test("Test14", "aa", ".", false);
jz19.test("Test15", "ab", ".*", true);
jz19.test("Test16", "ab", ".*", true);
jz19.test("Test17", "aaa", "aa*", true);
jz19.test("Test18", "aaa", "aa.a", false);
jz19.test("Test19", "aaa", "a.a", true);
jz19.test("Test20", "aaa", ".a", false);
jz19.test("Test21", "aaa", "a*a", true);
jz19.test("Test22", "aaa", "ab*a", false);
jz19.test("Test23", "aaa", "ab*ac*a", true);
jz19.test("Test24", "aaa", "ab*a*c*a", true);
jz19.test("Test25", "aaa", ".*", true);
jz19.test("Test26", "aab", "c*a*b", true);
jz19.test("Test27", "aaca", "ab*a*c*a", true);
jz19.test("Test28", "aaba", "ab*a*c*a", false);
jz19.test("Test29", "bbbba", ".*a*a", true);
jz19.test("Test30", "bcbbabab", ".*a*a", false);
}

private void test(String testName, String str, String pattern, boolean expired) {
if (match(str, pattern) == expired) {
return;
}
System.out.printf("%s 结果不对\n", testName);
}

public boolean match(String str, String pattern) {

// 串和模式为空的判断
if (str == null && pattern == null) {
return true;
}
if (str == null || pattern == null) {
return false;
}

// 转换为char数组
final char[] strArr = str.toCharArray();
final char[] patternArr = pattern.toCharArray();
int strIndex = 0;
int patternIndex = 0;
// 进入递归
return matchCore(strArr, strIndex, patternArr, patternIndex);
}


private boolean matchCore(char[] strArr, int strIndex, char[] patternArr, int patternIndex) {

// 1. 串或模式边界的判断
// 串和模式都匹配到最后了: ("", "")
if (isEnd(strArr, strIndex) && isEnd(patternArr, patternIndex)) {
return true;
}

// 2. 模式已经匹配到最后了,串还有: ("a", "")
if (!isEnd(strArr, strIndex) && isEnd(patternArr, patternIndex)) {
return false;
}

// 3. 串已经匹配到最后了,模式还有
if (isEnd(strArr, strIndex) && !isEnd(patternArr, patternIndex)) {
// 串已经匹配到最后了,模式还有情况1("", ".*")
if (!isEnd(patternArr, patternIndex + 1)) {
return matchCore(strArr, strIndex, patternArr, patternIndex + 2);
}
// 串已经匹配到最后了,情况2 ("", ".")、("", "a")、("", "..")
return false;
}

// 4. 模式和串都还有

// 提前校验一下 patternIndex+1
// 4.1 下一个模式字符没有了("a", ".")、("a", "a")、("aa", "a")
if (isEnd(patternArr, patternIndex + 1)) {
// 下一个串字符是否还有
if (!isEnd(strArr, strIndex + 1)) {
return false;
}

// 比较当前的串和模式字符
return patternArr[patternIndex] == '.' || patternArr[patternIndex] == strArr[strIndex];
}

// 4.2 pattern的第2个字符不为*
final char secondPatternChar = patternArr[patternIndex + 1];
if ((secondPatternChar != '*')) {
// 4.2.1 比较串和模式的第一个字符,第一个模式字符是「.」,或串和模式相等,则匹配下一个字符
if (patternArr[patternIndex] == '.' || patternArr[patternIndex] == strArr[strIndex]) {
return matchCore(strArr, strIndex + 1, patternArr, patternIndex + 1);
}
// 4.2.2 否则直接不匹配
return false;
}

if (patternArr[patternIndex] == '.' || patternArr[patternIndex] == strArr[strIndex]) {
// 4.3 pattern的第2个字符为「*」,如:(aa, a*)
// 模式串右移2位 或 字符串移动1
return matchCore(strArr, strIndex, patternArr, patternIndex + 2) ||
// matchCore(strArr, strIndex + 1, patternArr, patternIndex + 2) ||
matchCore(strArr, strIndex + 1, patternArr, patternIndex);
} else {
return matchCore(strArr, strIndex, patternArr, patternIndex + 2);
}
}

private final char END = '\0';

private boolean isEnd(char[] arr, int index) {
return END == indexArr(arr, index);
}

private char indexArr(char[] arr, int index) {
if (index < arr.length) {
return arr[index];
}
return END;
}

}

方法 3

拆出新数组,合并边界

1
2
3
4
5
6
7
8
9
10
11
12
13
14
15
16
17
18
19
20
21
22
23
24
25
26
27
28
29
30
31
32
33
34
35
36
37
38
39
40
41
42
43
44
45
46
47
48
49
50
51
52
53
54
55
56
57
58
59
60
61
62
63
64
65
66
67
68
69
70
71
72
73
74
75
76
77
78
79
80
81
82
83
84
85
86
87
88
89
90
91
92
93
94
95
public class Jz19_3 {
public static void main(String[] args) {
final Jz19_3 jz19 = new Jz19_3();
jz19.test("Test22", "aaa", "ab*a", false);

jz19.test("Test01", "", "", true);
jz19.test("Test02", "", ".*", true);
jz19.test("Test03", "", ".", false);
jz19.test("Test04", "", "c*", true);
jz19.test("Test05", "a", ".*", true);
jz19.test("Test06", "a", "a.", false);
jz19.test("Test07", "a", "", false);
jz19.test("Test08", "a", ".", true);
jz19.test("Test09", "a", "ab*", true);
jz19.test("Test10", "a", "ab*a", false);
jz19.test("Test11", "aa", "aa", true);
jz19.test("Test12", "aa", "a*", true);
jz19.test("Test13", "aa", ".*", true);
jz19.test("Test14", "aa", ".", false);
jz19.test("Test15", "ab", ".*", true);
jz19.test("Test16", "ab", ".*", true);
jz19.test("Test17", "aaa", "aa*", true);
jz19.test("Test18", "aaa", "aa.a", false);
jz19.test("Test19", "aaa", "a.a", true);
jz19.test("Test20", "aaa", ".a", false);
jz19.test("Test21", "aaa", "a*a", true);
jz19.test("Test22", "aaa", "ab*a", false);
jz19.test("Test23", "aaa", "ab*ac*a", true);
jz19.test("Test24", "aaa", "ab*a*c*a", true);
jz19.test("Test25", "aaa", ".*", true);
jz19.test("Test26", "aab", "c*a*b", true);
jz19.test("Test27", "aaca", "ab*a*c*a", true);
jz19.test("Test28", "aaba", "ab*a*c*a", false);
jz19.test("Test29", "bbbba", ".*a*a", true);
jz19.test("Test30", "bcbbabab", ".*a*a", false);
}

private void test(String testName, String str, String pattern, boolean expired) {
if (match(str, pattern) == expired) {
return;
}
System.out.printf("%s 结果不对\n", testName);
}

public boolean match(String str, String pattern) {

// 串和模式为空的判断
if (str == null && pattern == null) {
return true;
}
if (str == null || pattern == null) {
return false;
}

// 转换为char数组
final char[] strArr = str.toCharArray();
final char[] patternArr = pattern.toCharArray();
// 进入递归
return matchCore(strArr, patternArr);
}


private boolean matchCore(char[] strArr, char[] patternArr) {

// 模式到最后了,看串是否还有(没有则匹配,有则不匹配)
if (isEmptyArr(patternArr)) {
return isEmptyArr(strArr);
}

// 串的第一个字符存在,且模式的第一个字符匹配串的第一个字符
final boolean firstMatch = !isEmptyArr(strArr) &&
(patternArr[0] == '.' || patternArr[0] == strArr[0]);

// 模式串第2位为*
if (patternArr.length >= 2 && patternArr[1] == '*') {
// 不论第一个是否匹配,模式串后移2位
return matchCore(strArr, subArr(2, patternArr)) ||
// 或者,如果第一个匹配,串后移一位
(firstMatch && matchCore(subArr(1, strArr), patternArr));
}

// 其它情况,要求第一个匹配,且后面的也匹配
return firstMatch && matchCore(subArr(1, strArr), subArr(1, patternArr));
}

private boolean isEmptyArr(char[] arr) {
return arr == null || arr.length == 0;
}

private char[] subArr(int start, char[] arr) {
return Arrays.copyOfRange(arr, start, arr.length);
}

}

背景

在编码时经常会用到同名的属性名字符串,比如

  1. 用相同的属性名做为 map 中的键;
  2. 在 mybatis 中,根据属性名的下划线字符串来拼接 sql 查询条件。

需要修改属性名时,如果是用字符串硬编码的,引用的地方越多,修改越困难

但是如果用的是 java8 中的属性引用,操作起来就很方便了,修改一处即可修改全部相关引用。

属性工具类测试

参考下面测试类,怎样使用;

如果想要修改 articleNamearticleTitle

在 IDEA 中,修改类的属性名很方便,选中属性名 articleName,按下快捷键 <Shift + F6>,键入新的属性名称 articleTitle,确认即可替换所有关联的属性名称

1
2
3
4
5
6
7
8
9
10
11
12
13
14
15
16
17
18
19
20
21
22
23
24
25
26
27
28
29
30
31
32
33
34

import lombok.Getter;
import lombok.Setter;

/**
* 属性工具类测试
*
* @author lilou
*/
public class FieldUtilTest {

@Setter
@Getter
static class Article {
String articleName;
String articleContent;
}

public static void main(String[] args) {

// test getter
System.out.println(FieldUtil.noPrefix(Article::getArticleName));
System.out.println(FieldUtil.underline(Article::getArticleName));
System.out.println(FieldUtil.underlineUpper(Article::getArticleContent));
System.out.println(FieldUtil.toSymbolCase(Article::getArticleName, '$'));


// test setter
System.out.println(FieldUtil.noPrefix(Article::setArticleName));
System.out.println(FieldUtil.underline(Article::setArticleName));
System.out.println(FieldUtil.underlineUpper(Article::setArticleContent));
System.out.println(FieldUtil.toSymbolCase(Article::setArticleName, '$'));
}
}

属性工具类代码

关键逻辑是利用了 java8 中的 SerializedLambda 的 getImplMethodName 方法来获取属性名。

源码中引用了 hutool 第三方工具类的 StrUtil工具,方便操作字符串,当然也可自行开发。

参考资料:利用 Lambda 实现通过 getter/setter 方法引用拿到属性名 - SegmentFault 思否

1
2
3
4
5
6
7
8
9
10
11
12
13
14
15
16
17
18
19
20
21
22
23
24
25
26
27
28
29
30
31
32
33
34
35
36
37
38
39
40
41
42
43
44
45
46
47
48
49
50
51
52
53
54
55
56
57
58
59
60
61
62
63
64
65
66
67
68
69
70
71
72
73
74
75
76
77
78
79
80
81
82
83
84
85
86
87
88
89
90
91
92
93
94
95
96
97
98
99
100
101
102
103
104
105
106
107
108
109
110
111
112
113
114
115
116
117
118
119
120
121
122
123
124
125
126
127
128
129

import cn.hutool.core.util.StrUtil;

import java.io.Serializable;
import java.lang.invoke.SerializedLambda;
import java.lang.reflect.Method;

/**
* 属性工具类,用来获取 Getter 和 Setter 属性的名称。支持首字母小写样式,下划线的样式和自定义样式
* <p>
* 参考:[利用Lambda实现通过getter/setter方法引用拿到属性名 - SegmentFault 思否](https://segmentfault.com/a/1190000019389160)
*
* @author lilou
*/
public class FieldUtil {

/*
* ===========> getter 方法引用 <===========
*/

/**
* 下划线样式,小写
*/
public static <T> String underline(IGetter<T> fn) {
return toSymbolCase(fn, '_');
}

/**
* 下划线样式,大写
*/
public static <T> String underlineUpper(IGetter<T> fn) {
return underline(fn).toUpperCase();
}

/**
* 依据符号转换样式
*/
public static <T> String toSymbolCase(IGetter<T> fn, char symbol) {
return StrUtil.toSymbolCase(noPrefix(fn), symbol);
}

/***
* 转换getter方法引用为属性名,首字母小写
*/
public static <T> String noPrefix(IGetter<T> fn) {
return getGeneralField(fn);
}

/*
* ===========> setter 方法引用 <===========
*/

/**
* 下划线样式,小写
*/
public static <T, R> String underline(ISetter<T, R> fn) {
return toSymbolCase(fn, '_');
}

/**
* 下划线样式,大写
*/
public static <T, R> String underlineUpper(ISetter<T, R> fn) {
return underline(fn).toUpperCase();
}

/**
* 依据符号转换样式
*/
public static <T, R> String toSymbolCase(ISetter<T, R> fn, char symbol) {
return StrUtil.toSymbolCase(noPrefix(fn), symbol);
}

/**
* 转换setter方法引用为属性名,首字母小写
*/
public static <T, R> String noPrefix(ISetter<T, R> fn) {
return getGeneralField(fn);
}


/*
* ===========> 复用功能 <===========
*/

/**
* 获得set或get或is方法对应的标准属性名,其它前缀的方法名使用原名
*/
private static String getGeneralField(Serializable fn) {
SerializedLambda lambda = getSerializedLambda(fn);
String getOrSetMethodName = lambda.getImplMethodName();
final String generalField = StrUtil.getGeneralField(getOrSetMethodName);
return StrUtil.isEmpty(generalField) ? getOrSetMethodName : generalField;
}

/***
* 获取类对应的Lambda
*/
private static SerializedLambda getSerializedLambda(Serializable fn) {
//先检查缓存中是否已存在
SerializedLambda lambda;
try {

//提取SerializedLambda并缓存
Method method = fn.getClass().getDeclaredMethod("writeReplace");
method.setAccessible(Boolean.TRUE);
lambda = (SerializedLambda) method.invoke(fn);
} catch (Exception e) {
throw new IllegalArgumentException("获取SerializedLambda异常, class=" + fn.getClass().getSimpleName(), e);
}
return lambda;
}

/**
* getter方法接口定义
*/
@FunctionalInterface
public interface IGetter<T> extends Serializable {
Object apply(T source);
}

/**
* setter方法接口定义
*/
@FunctionalInterface
public interface ISetter<T, U> extends Serializable {
void accept(T t, U u);
}
}

剑指 Offer 第 13 题-机器人运动范围

地上有一个 rows 行和 cols 列的方格。坐标从 [0,0] 到 [rows-1,cols-1] 。一个机器人从坐标 [0,0] 的格子开始移动,每一次只能向左,右,上,下四个方向移动一格,但是不能进入行坐标和列坐标的数位之和大于 threshold 的格子。 例如,当 threshold 为 18 时,机器人能够进入方格 [35,37] ,因为 3+5+3+7 = 18。但是,它不能进入方格 [35,38] ,因为 3+5+3+8 = 19 。请问该机器人能够达到多少个格子?

错误案例

1
2
3
4
5
6
7
8
9
10
11
12
13
14
15
16
17
18
19
20
21
22
23
24
25
26
27
28
29
30
31
32
33
34
35
36
37
38
39
40
41
42
43
44
45
46
47
48
49
50
51
52
53
54
55
56
57
58
public class Jz13_1_wrong {
public static void main(String[] args) {
System.out.println(movingCount(1, 2, 3));
System.out.println(movingCount(0, 1, 3));
System.out.println(movingCount(10, 1, 100));
System.out.println(movingCount(5, 10, 10));
System.out.println(movingCount(15, 100, 100));
System.out.println(movingCount(18, 36, 38));
}


/**
* 错误的解法:题目要求,每次只能向左、右、上、下移动。下面的代码没考虑这个,导致跨越的格也存在,会多算
*/
private static int movingCount(int threshold, int rows, int cols) {
if (rows == 0 || cols == 0) {
return 0;
}

int count = 0;
for (int i = 0; i < rows; i++) {

// 如果i本身就不满足,就不用向后走了
if (!reachable(i, 0, threshold)) {
break;
}

for (int j = 0; j < cols; j++) {

// 如易j本身就不满足,就不用向后走了
if (!reachable(0, j, threshold)) {
break;
}

// 根据 threshold,判断 (i,j) 是否可达
if (reachable(i, j, threshold)) {
count++;
System.out.printf("(%d,%d)%n", i, j);
}
}
}
return count;
}

private static boolean reachable(int i, int j, int threshold) {
final int sum = getSum(i) + getSum(j);
return sum <= threshold;
}

private static int getSum(int a) {
int sum = 0;
while (a > 0) {
sum += a % 10;
a = a / 10;
}
return sum;
}
}

正确的 DFS 遍历

1
2
3
4
5
6
7
8
9
10
11
12
13
14
15
16
17
18
19
20
21
22
23
24
25
26
27
28
29
30
31
32
33
34
35
36
37
38
39
40
41
42
43
44
45
46
47
48
49
50
51
52
53
54
55
56
57
58
59
60
61
62
63
64
65
66
67
68
69
70
71
72
73
74
75
76
77
78
79
public class Jz13_2 {

public static void main(String[] args) {
System.out.println(new Jz13_2().movingCount(1, 2, 3));
System.out.println(new Jz13_2().movingCount(0, 1, 3));
System.out.println(new Jz13_2().movingCount(10, 1, 100));
System.out.println(new Jz13_2().movingCount(5, 10, 10));
System.out.println(new Jz13_2().movingCount(18, 36, 38));
System.out.println(new Jz13_2().movingCount(15, 100, 100));
}


int movingCount = 0;

/**
* DFS 遍历
*/
public int movingCount(int threshold, int rows, int cols) {
if (rows == 0 || cols == 0) {
return 0;
}

movingCount = 0;
boolean[][] arr = new boolean[rows][cols];
dfs(arr, rows, cols, 0, 0, threshold);
return movingCount;
}

/**
* 模板:
* <p>
* 检查下标
* 检查是否被访问过,或者是否满足当前匹配条件
* 检查是否满足返回结果条件
* 标记
* 进入下下一步递归
* 回溯
*/

private void dfs(boolean[][] arr, int rows, int cols, int i, int j, int threshold) {
// 检查下标
if (i < 0 || j < 0 || i >= rows || j >= cols) {
return;
}

// 检查是否被访问过
if (arr[i][j]) {
return;
}

// 检查是否满足条件
if (!reachable(i, j, threshold)) {
return;
}

arr[i][j] = true;
movingCount++;

// 下一个
dfs(arr, rows, cols, i + 1, j, threshold); // 右
dfs(arr, rows, cols, i, j + 1, threshold); // 下
dfs(arr, rows, cols, i - 1, j, threshold); // 左
dfs(arr, rows, cols, i, j - 1, threshold); // 上
}

private boolean reachable(int i, int j, int threshold) {
final int sum = getSum(i) + getSum(j);
return sum <= threshold;
}

private int getSum(int a) {
int sum = 0;
while (a > 0) {
sum += a % 10;
a = a / 10;
}
return sum;
}
}

正确的 BFS 遍历

1
2
3
4
5
6
7
8
9
10
11
12
13
14
15
16
17
18
19
20
21
22
23
24
25
26
27
28
29
30
31
32
33
34
35
36
37
38
39
40
41
42
43
44
45
46
47
48
49
50
51
52
53
54
55
56
57
58
59
60
61
62
63
64
65
66
67
68
69
70
71
72
73
74
75
76
77
78
79
80
81
82
83
84
85
86
87
88
89
90
91
92
93
94
95
96
97
98
99
100
101
102
103
104
105
public class Jz13_3 {

public static void main(String[] args) {
System.out.println(new Jz13_3().movingCount(1, 2, 3));
System.out.println(new Jz13_3().movingCount(0, 1, 3));
System.out.println(new Jz13_3().movingCount(10, 1, 100));
System.out.println(new Jz13_3().movingCount(5, 10, 10));
System.out.println(new Jz13_3().movingCount(18, 36, 38));
System.out.println(new Jz13_3().movingCount(15, 100, 100));
}


// 用栈来实现
public int movingCount(int threshold, int rows, int cols) {
if (rows == 0 || cols == 0) {
return 0;
}

int movingCount = 0;
boolean[][] arr = new boolean[rows][cols];

Stack<Pair<Integer, Integer>> stack = new Stack<>();
// 第一个入栈
stack.push(new Pair<>(0, 0));

while (!stack.isEmpty()) {
// 出栈,标记
final Pair<Integer, Integer> pop = stack.pop();
final Integer x = pop.getKey();
final Integer y = pop.getValue();
arr[x][y] = true;
movingCount++;

// 并将周围入栈(检测边界和条件)

// 右
if (border(x + 1, y, rows, cols) && reachable(x + 1, y, threshold) && !arr[x + 1][y]) {
stack.push(new Pair<>(x + 1, y));
arr[x + 1][y] = true;
}

// 下
if (border(x, y + 1, rows, cols) && reachable(x, y + 1, threshold) && !arr[x][y + 1]) {
stack.push(new Pair<>(x, y + 1));
arr[x][y + 1] = true;
}

// 左
if (border(x - 1, y, rows, cols) && reachable(x - 1, y, threshold) && !arr[x - 1][y]) {
stack.push(new Pair<>(x - 1, y));
arr[x - 1][y] = true;
}

// 上
if (border(x, y - 1, rows, cols) && reachable(x, y - 1, threshold) && !arr[x][y - 1]) {
stack.push(new Pair<>(x, y - 1));
arr[x][y - 1] = true;
}

}


return movingCount;
}

// 检查边界
private boolean border(int i, int j, int rows, int cols) {
return i >= 0 && i < rows && j >= 0 && j < cols;
}

// 检查是否可达
private boolean reachable(int i, int j, int threshold) {
final int sum = getSum(i) + getSum(j);
return sum <= threshold;
}

// 获取数字自身之和
private int getSum(int a) {
int sum = 0;
while (a > 0) {
sum += a % 10;
a = a / 10;
}
return sum;
}

public static class Pair<K, V> {

private final K key;
private final V value;

public K getKey() {
return key;
}

public V getValue() {
return value;
}

public Pair(K key, V value) {
this.key = key;
this.value = value;
}
}
}

正确的 BFS 遍历(优化)

1
2
3
4
5
6
7
8
9
10
11
12
13
14
15
16
17
18
19
20
21
22
23
24
25
26
27
28
29
30
31
32
33
34
35
36
37
38
39
40
41
42
43
44
45
46
47
48
49
50
51
52
53
54
55
56
57
58
59
60
61
62
63
64
65
66
67
68
69
70
71
72
73
74
75
76
77
78
79
80
81
82
83
84
85
86
87
88
89
90
91
92
93
public class Jz13_4 {

public static void main(String[] args) {
System.out.println(new Jz13_4().movingCount(1, 2, 3));
System.out.println(new Jz13_4().movingCount(0, 1, 3));
System.out.println(new Jz13_4().movingCount(10, 1, 100));
System.out.println(new Jz13_4().movingCount(5, 10, 10));
System.out.println(new Jz13_4().movingCount(18, 36, 38));
System.out.println(new Jz13_4().movingCount(15, 100, 100));
}


// BFS遍历:用栈来实现
public int movingCount(int threshold, int rows, int cols) {
if (rows == 0 || cols == 0) {
return 0;
}

int movingCount = 0;
boolean[][] arr = new boolean[rows][cols];

Stack<Pair<Integer, Integer>> stack = new Stack<>();
// 将第一个入栈
stack.push(new Pair<>(0, 0));

// 方向组合,newX=dirs[i], newY=dirs[i+1],分别对应【左(-1,0)、下(0,1)、右(1,0)、上(0,-1)】
int[] dirs = new int[]{-1, 0, 1, 0, -1};

while (!stack.isEmpty()) {
// 出栈,标记
final Pair<Integer, Integer> pop = stack.pop();
final Integer x = pop.getKey();
final Integer y = pop.getValue();

// 设置为true,表示访问过了,不可重复访问
arr[x][y] = true;
movingCount++;

// 并将周围入栈(检测边界和条件)
for (int i = 0; i < dirs.length; i++) {
int newX = dirs[i];
int newY = dirs[i + 1];
if (border(newX, newY, rows, cols) && reachable(newX, newY, threshold) && !arr[newX][newY]) {
stack.push(new Pair<>(newX, newY));
arr[newX][newY] = true;
}
}
}


return movingCount;
}

// 检查边界
private boolean border(int i, int j, int rows, int cols) {
return i >= 0 && i < rows && j >= 0 && j < cols;
}

// 检查是否可达
private boolean reachable(int i, int j, int threshold) {
final int sum = getSum(i) + getSum(j);
return sum <= threshold;
}

// 获取数字自身之和
private int getSum(int a) {
int sum = 0;
while (a > 0) {
sum += a % 10;
a = a / 10;
}
return sum;
}

public static class Pair<K, V> {

private final K key;
private final V value;

public K getKey() {
return key;
}

public V getValue() {
return value;
}

public Pair(K key, V value) {
this.key = key;
this.value = value;
}
}
}

基础篇

ElasticSearch-basic

什么是 ES。ES 的功能、特点、使用场景

简介:
全称 Elasticsearch,是一个分布式、RESTful 风格的搜索和数据分析引擎。
通过 Elasticsearch,可以轻松地存储、搜索和分析大量数据。
速度快,近乎实时的存储和检索数据。扩展性好,可扩展到上百台服务器,处理 PB 级别的数据。
易使用,ES 使用 Lucene 作为核心实现索引和搜索功能,通过 ResutfulAPI 和 JavaAPI 来隐藏 Lucene 的复杂性。

官网:
https://www.elastic.co/cn/elasticsearch/

起源:
2004 年,失业的工程师 Shay Banon,帮老婆写一个菜谱搜索引擎。
封装 Lucene 开源项目做成了 compass,找到工作后,又基于 compass 封装成了 elasticsearch。
现在是 Elastic 创始人兼 Elastic 首席执行官。

功能:

  • 分布式的搜索引擎,类似谷歌、百度,也可以做站内搜索。
  • 全文检索,具有模糊搜索,相关性排名,高亮等功能。
  • 数据分析引擎,电商网站中商品销量排名前 10 的商家、新闻网点 1 个月访问量排名前 3 的板块。
  • 海量数据的实时处理,分布式架构可以存储和检索大量数据,秒级的数据搜索和分析

特点:

  • 安装方便,除了 java,没有其它依赖;修改几个参数即可搭建一个集群;
  • JSON 格式,输入和输出都是 JSON,不需要另外定义 Schema,快捷方便;
  • RESTful:基本操作都可以通过 http 接口进行;
  • 分布式,每个节点都可做入口,加入的节点自动负载均衡;
  • 多租户,可以根据不同用途区分索引,可同时操作多个索引;
  • 支持超大数据,可以扩展到 PB 量级的数据。

使用场景:

  • 搜索类场景,如电商、招聘、新闻
  • 日志分析类场景,如经典的 ELK
  • 数据预警和数据分析,如电商中的价格预警,销售量 top10 的品牌
  • 商业 BI 系统,数据报表、预测热卖商品、推荐系统

使用案例:
百科、stack overflow、github,elk 等

搜索方案对比

Lucene
是由 Apache 基金会维护的信息搜索工具包,由 java 编写的。
包含索引结构,读写索引的工具,相关性工具,排序是一个框架,需要开发很多内容才能工作(数据获取、解析、分词等)

Solr
基于 Lucene 框架开发的查询服务器,封装了 Lucene 的细节,可以用 HTTP GET/POST 来查询、修改索引

Elasticsearch
基于 Lucene 核心开发的搜索引擎,采用了分布式实时文件存储的策略

三者共同点和区别

Solr 和 ES 是基于 Lucene 实现的。
Solr 利用 ZK 进行分布式管理,
ES 使用自带的分布式协调管理功能 Solr 实现更全面,功能多;
ES 注重核心功能,高级功能由扩展来实现

Solr 在传统搜索应用中表现好于 ES,ES 在实时搜索应用方面好于 Solr

有哪些公司使用了 es

https://elasticsearch.cn/explore/

从中文社区活动中可以看到有 华为、百度、腾讯、阿里、京东、美团、小米、今日头条、顺丰等

什么是 es 集群和 es 节点

节点:节点是 ES 的实例,是一个独立的进程,一般会将一个节点部署到一个服务器或虚拟机上。

按照角色分配为,master node(主节点)、data node(数据节点)、Coordinate node(协调节点)

主节点,主要职责是配置和管理集群中的节点。

数据节点,对数据的 CRUD 操作,还有搜索和聚合操作。

协调节点,将集群请求转发到主节点,将数据请求转发到数据节点
(每个节点都是自带协调节点功能的,也可以只作为协调节点。设置协调节点有益于降低主节点和数据节点负担,但过多会增加集群负担,因为需要同步状态)。

集群:ES 集群是一组连接在一起的 ES 节点实例。

集群规划策略:当前数据规模+适量增长规模。(后续可按需添加)

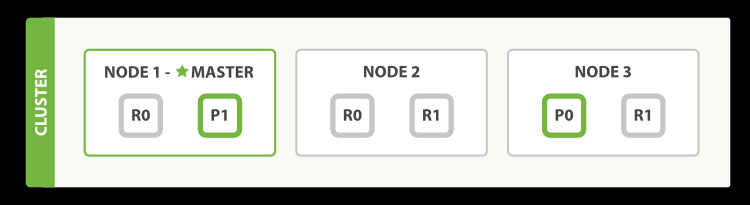
示例,三个节点和一个索引的集群(2 个主分片,4 个副本分片)
Elasticsearch-1基础_20211231161535_2021-12-31-16-15-35
我们发出的请求,可以被任何一个节点接收处理(首个处理的节点被称为协调节点),每个节点都知道集群中任一文档的位置,
可以将请求转发到需要的节点上。

安装 es 需要什么组件

只需要 java 环境即可(Lucene 是基于 java 编写的)

如何安装、配置和启动

下载 ES 和 kibana: https://www.elastic.co/cn/start

创建 OS 的新用户用于启动 es 和 kibana

1
2
3
4
5
6
7
8
9
10
11
# 添加用户
useradd estest
# 为用户添加密码
passwd estest

# 修改目录权限
chown -R estest /usr/elasticsearch
chown -R estest /usr/kibana

# 切换用户
su estest
  1. 先安装 jdk,配置环境变量
  2. 安装 es、修改配置,并启动(非 root 用户启动) 验证: http://node.com:9200
    启动:./bin/elasticsearch
  3. 再安装 kibana,修改配置、并启动(非 root 用户启动) 进入 kibana: http://node.com:5601,点击 dev_tools 项,测试。
    启动:./bin/kibana
  4. es 集成 IK 分词器,添加 analysis-ik 插件,ik 分词器分 ik_max_word 模式(将文本做最细粒度拆分) 和 ik_smart 模式(将文本做最粗粒度拆分)。
    扩展词典:自定义扩展词库、停用词库,远程扩展词库。
    同义词典「具体操作参考讲义」

启动报错的话,可能需要修改最大虚拟内存数量(在 root 下进行)
sysctl -a | grep vm.max_map_count

文件/etc/systel.conf

1
2
# 限制一个进程拥有的VMA(虚拟内存区域)数量
vm.max_map_count=655360

使修改生效:sysctl -p

修改 /etc/security/limits.conf,末尾追加(在 root 下进行,重新登录后生效)

1
2
3
4
*  soft  nofile   65536
* hard nofile 65536
* soft nproc 4096
* hard nproc 4096

Linux 修改文件句柄数及 vm.maxmap_count、stack size 的大小运维

测试

1
2
3
4
5
6
7
8
9
10
11
12
13
14
15
16
17
18
19
20
21
22
23
24
25
26
27
28
29
30
31
32
33
34
35
36
37
38
39
40
41
42
43
44
45
46
47
48
49
50
51
52
53
54
55
56
57
58
59
60
61
62
63
64
65
66
67
68
69
70
71
72
73
74
75
76
77
GET _search
{
"query": {
"match_all": {}
}
}

POST _analyze
{
"analyzer": "ik_max_word",
"text": ["南京市长江大桥"]
}

POST _analyze
{
"analyzer": "ik_smart",
"text": ["南京市长江大桥"]
}


POST _analyze
{
"analyzer": "ik_smart",
"text": ["南京市市长"]
}


PUT /lagou-es-synonym
{
"settings": {
"analysis": {
"filter": {
"word_sync": {
"type": "synonym",
"synonyms_path": "analysis-ik/synonym.txt"
}
},
"analyzer": {
"ik_sync_max_word": {
"filter": ["word_sync"],
"type": "custom",
"tokenizer": "ik_max_word"
},
"ik_sync_smart": {
"filter": ["word_sync"],
"type": "custom",
"tokenizer": "ik_smart"
}
}
}
},
"mappings": {
"properties": {
"name": {
"type": "text",
"analyzer": "ik_sync_smart",
"search_analyzer": "ik_sync_smart"
}
}
}
}


POST /lagou-es-synonym/_doc/1
{
"name": "拉勾是中国专业的互联网招聘平台"
}

POST /lagou-es-synonym/_doc/_search
{
"query": {
"match":{
"name": "china"
}
}
}

什么是 Index(索引)

一个索引可以理解成一个关系型的 Table(数据库表),相类似结构的数据放在一个索引,不类似的结构放在不同索引中。

什么是 Type(类型)

代表 documet 属于 index 中的哪个类别,类似于数据库中的表,在 7.x 中弃用了这个概念,8.x 中完全删除

什么是 Mapping(映射)

定义了每个字段的类型信息,相当于关系型数据库中的表结构(Schema)

什么是 Document(文档)

存储 json 文档,相当于关系型数据库中的 Row(一行记录)

什么是 Field(字段)

存储某一具体字段,相当于关系型数据库中的 Column(列)
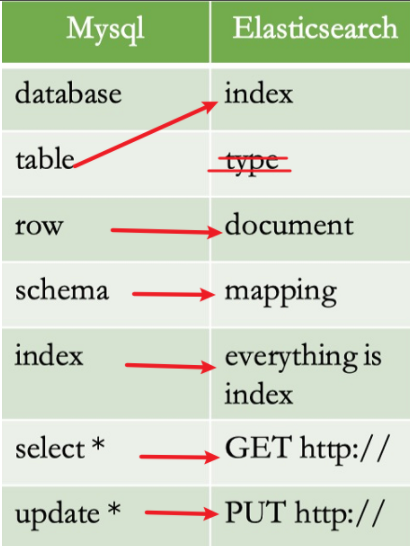
与关系型数据库中的术语比较

Elasticsearch_>_2021-12-29-14-46-52

什么是 shard(分片)

将索引数据分成若干小块的过程,称为分片。

分片的作用是:当文档数据量太多,磁盘和处理能力不足,对客户端的请求响应变慢时,使用分片可以改善这些问题(吞吐量、性能)。

单台服务器无法存储大量数据,es 通过分片将数据分散到多个服务器,(也就是说可以横向扩展)

什么是 replica(副本),有什么好处?

副本是对分片的拷贝,当在高负载下可以提高查询的吞吐量,也能用来实现高可用。

高可用:当主分片出现问题时,副本可以用来替换主分片,保证集群高可用。

默认情况下,每个索引有 10 个分片,5 个主分片,5 个副本分片

什么是倒排索引

倒排索引,即关键词到文档 ID 的映射,每个关键词都对应有一组文档(每个文档中都有这个关键词),有了倒排索引,就可以很方便用户搜索。

每个文档都有对应的文档 ID,文档就可以被表示为一系列的关键词。

这些文档是通过分词器,提取出出现次数和位置等内容得到关键词信息。

倒排索引中两个重要细节:

  1. 倒排索引中的所有词项对应一个或多个文档。
  2. 倒排索引中的词项,是根据字典序排列。

正向索引:从索引库中依次遍历所有文档,从文档中查找关键词,根据打分规则打分,然后排出名次,再返回。

相比正向索引对每个文档的关键字遍历过程,倒排索引是通过关键字找到文档的过程。

什么是 ik 分词器,作用是什么

ik 分词器,是基于 java 语言的中文分词工具包。

ik 分词器 3.0 特性

  1. 高处理能力。采用特有的“正向迭代最细粒度切分算法”,具有 60 万字/秒的处理能力
  2. 多子处理器分析模式。支持英文字母、数字、中文词汇等分词处理。
  3. 优化词典存储,更小的内存占用。支持扩展词典
  4. 提高了命中率。针对 Lucene 全文检索优化的查询分析器 KQueryParser,采用歧义分析算法优化查询关键字的搜索搜索排列组合。分享 IKAnalyzer 3.0 中文分词器

DocValues 是什么,有什么作用

DocValue 是一种列式存储结构,主要作用是解决字段值排序、聚合等问题(倒排索引对于检索性能好,但是对字段值排序却不理想)

搜索的时候,需要快速得到结果集

排序的时候,需要将正排索引(转置倒排索引,可以看作以文档为维度,实现根据指定字段的排序和聚合功能)

es 中的 DocValue 是默认激活的,在索引的时候创建,当字段索引时,为了快速检索,会把字段值加入到倒排索引中,同时他它也会存储字段的 DocValues。

应用场景:排序、聚合、过滤、脚本计算

当 docValues 远大于节点的可用内存时,OS 会将 doc values 放在内存中。

当 docValues 远小于节点的可用内存时,OS 会将 doc values 放在页缓存中,避免 jvm 堆内存溢出异常。

Doc Values 介绍 | Elasticsearch: 权威指南 | Elastic

倒排索引和 UN 倒排索引 | Doc Values | Elasticsearch: 权威指南 | Elastic

text 和 keyword 的区别是什么

keyword 和 text 类型的主要区别是「是否分词」.

keyword 是不会分词的,是直接根据字符串的内容来建立倒排索引(只能通过精确值搜索到)。

text 是会分词的,在存入 text 类型的值时,会先分词,然后再建立倒排索引。

什么是停顿词过滤

没有意义的一类词,可以过滤掉的词。如「的」、「而」等等

query 和 filter 的区别是什么

query: 不仅仅用于查询,还会计算分值,用于确定相关度。

filter: 仅查询,不会计算分值,也不会排序,结果可以缓存(提高性能)

操作-定义、列出、更新、删除索引的语法

索引,类似于关系型数据库中的 database,有了索引才可以创建其它内容。

1
2
3
4
5
6
7
8
9
10
11
12
13
14
15
16
17
18
19
20
21
22
23
24
25
26
27
28
29
30
31
32
33
34
35
36
37
38
39
40
41
42
43
# 创建-语法
PUT /索引名称
{
"settings": {
"属性名": "属性值"
}
}
# 创建-示例
PUT /lagou-company-index

# 判断索引是否存在-语法
HEAD /索引名称
# 判断索引是否存在-示例
HEAD /lagou-company-index

# 查看索引-语法
GET /索引名称
# 查看索引-示例
GET /lagou-company-index

# 批量查看索引(用英文逗号隔开)
GET /索引名称1,索引名称2

# 查看所有索引
# 方式1
GET _all
# 方式2,状态意义:绿色,分片都正常分配;黄色,至少有一个副本没有正确分配;红色,至少有一个主分片没有正确分配。
GET /_cat/indices?v

# 打开和关闭索引:一旦索引被关闭,这个索引就只能显示元数据信息,不能做读写操作。
# 打开索引-语法
POST /索引名称/_open
# 打开索引-示例
POST /lagou-company-index/_open
# 关闭索引-语法
POST /索引名称/_close
# 关闭索引-示例
POST /lagou-company-index/_close

# 删除索引-语法
DELETE /索引名称1,索引名称2,索引名称3
# 删除索引-示例
DELETE /lagou-company-index,lagou-employee-index

操作-定义、列出、更新、删除映射

索引创建后,就可以对字段设置约束信息,即字段映射(mapping)。

约束信息包括有:字段的数据类型、是否存储、是否索引、分词器

注意:

我们可以增加一个映射,但不能修改已存在的映射。
如易映射已经存在,那么数据可能已经被索引,意图修改这个映射,
索引的数据可能会出错,不能正常被索引。(即,除了新增操作,只能操作只能删除删除索引,新建映射)

1
2
3
4
5
6
7
8
9
10
11
12
13
14
15
16
17
18
19
20
21
22
23
24
25
26
27
28
29
30
31
32
33
34
35
36
37
38
39
40
41
42
43
44
45
46
47
48
49
50
51
52
53
54
# 创建映射-语法
PUT /索引库名/_mapping
{
"properties": {
"字段名": {
"type": "类型", # 可以是 text, long, short, date, integer, date等
"index": true, # 是否索引,默认truefalse时,不能搜索
"store": true, # 是否独立存储, 默认false;独立存储时解析速度快,会占用更多的内存
"analyzer": "分词器" # 指定分词器中文中会
}
}
}
# 创建映射-示例
PUT /lagou-company-index
PUT /lagou-company-index/_mapping
{
"properties": {
"name": { "type": "text", "analyzer": "ik_max_word" },
"job": { "type": "text", "analyzer": "ik_max_word" },
"logo": { "type": "keyword", "index": "false" },
"payment": { "type": "float" }
}
}

# 查看映射关系-语法
GET /索引名称/_mapping
# 查看映射关系-示例
GET /lagou-company-index/_mapping

# 查看所有索引映射关系
# 方式1
GET _mapping
# 方式2
GET _all/_mapping

# 修改索引映射关系-语法
PUT /索引名称/_mapping
{
"properties": {
"type": "类型",
"index": true,
"store": true,
"analyzer": "分词器"
}
}
# 修改索引映射关系-示例(新增一个age映射)
PUT /lagou-company-index/_mapping
{
"properties": {
"age": {
"type": "text"
}
}
}

操作-定义、列出、更新、删除文档

文档,类似于关系型数据库中的一行记录。

是索引库中的数据,这些数据会根据索引规则创建索引,将来用于搜索。

1
2
3
4
5
6
7
8
9
10
11
12
13
14
15
16
17
18
19
20
21
22
23
24
25
26
27
28
29
30
31
32
33
34
35
36
37
38
39
40
41
42
43
44
45
46
47
48
49
50
51
52
53
54
55
56
57
58
59
60
61
62
63
64
65
66
67
68
69
70
71
72
73
74
75
76
77
78
79
80
81
82
83
84
85
86
87
88
89
90
91
92
93
94
95
96
97
98
99
100
101
102
103
104
105
106
107
108
109
110
111
112
113
114
115
116
117
118
119
120
121
122
123
124
125
126
127
128
129
130
# 新增文档(可以手动指定id,也可以自动生成id)
# 新增文档,手动指定id-语法
POST /索引名称/_doc/{id}
{
"属性名": "值"
}
# 新增文档,手动指定id-示例
POST /lagou-company-index/_doc/1
{
"name": "百度",
"job": "小度用户运营经理",
"payment": "30000",
"logo": "https://www.baidu.com/img/PCfb_5bf082d29588c07f842ccde3f97243ea.png"
}

# 新增文档,自动生成id-语法
POST /索引名称/_doc
{
"属性名": "值"
}
# 新增文档,自动生成id-示例
POST /lagou-company-index/_doc
{
"name": "百度",
"job": "算法工程师",
"payment": "50000",
"logo": "https://www.baidu.com/img/PCfb_5bf082d29588c07f842ccde3f97243ea.png"
}

# 查看单个文档-语法
GET /索引名称/_doc/{id}
# 查看单个文档-示例
GET /lagou-company-index/_doc/1

# 查看所有文档-语法
POST /索引名称/_search
{
"query": {
"match_all": {
}
}
}
# 查看所有文档-示例
POST /lagou-company-index/_search
{
"query": {
"match_all": {
}
}
}

# 查看文档-通过_source定制返回结果(指定source中的返回字段,多个字段之间用逗号隔开)
GET /lagou-company-index/_doc/1?_source=name,job

# 更新文档分全部更新和局部更新。全部更新,是把之前的文档删除了(先标记删除,后台随后清理),然后再添加;局部更新,是指修改某个字段。
# 更新文档之全部更新,同添加文档一样,只是将POST换成了PUT,并带上了id值,存在则更新,不存在则添加
PUT /lagou-company-index/_doc/1
{
"name": "百度1",
"job": "小度用户运营经理",
"payment": "30000",
"logo": "https://www.baidu.com/img/PCfb_5bf082d29588c07f842ccde3f97243ea.png"
}
# 更新文档之局部更新-语法
POST /索引名称/_update/{id}
{
"doc": {
"field": "value"
}
}
# 更新文档之局部更新-示例
POST /lagou-company-index/_update/1
{
"doc": {
"payment": "60000"
}
}

# 删除文档-语法
DELETE /索引名称/_doc/{id}
# 删除文档-示例
DELETE /lagou-company-index/_doc/1

# 根据查询条件删除-语法
POST /索引名称/_delete_by_query
{
"query": {
"match": {
"字段名": "搜索关键字"
}
}
}
# 根据查询条件删除-示例
POST /lagou-company-index/_delete_by_query
{
"query": {
"match": {
"name": "百度1"
}
}
}
# 删除所有文档-语法
POST /索引名/_delete_by_query
{
"query": {
"match_all":{}
}
}
# 删除所有文档-示例
POST /lagou-company-index/_delete_by_query
{
"query": {
"match_all": {}
}
}

# 全量替换文档,同「更新文档之全部更新」
PUT /lagou-company-index/_doc/1
{
"name": "百度1",
"job": "小度用户运营经理",
"payment": "30000",
"logo": "https://www.baidu.com/img/PCfb_5bf082d29588c07f842ccde3f97243ea.png"
}
# 强制创建,如果存在时不想替换,不存在时才创建
PUT /lagou-company-index/_doc/1/_create
# 或者 PUT /lagou-company-index/_doc/1?op_type=create
{
"payment": "30000",
}

操作-执行搜索有哪些方法

方式 1(最常用):基于 DSL 检索 Elasticsearch provides a full Query DSL (Domain Specific Language) based on JSON to define queries
示例:

1
2
3
4
5
6
7
8
9
10
GET /lagou-company-index/_search
{
"query": {
"bool": {
"filter": [
{"match": {"name": "百度1"}}
]
}
}
}

方式 2: 基于 URL 检索

1
GET /lagou-company-index/_search?q=name:百度2

方式 3(不推荐):类 SQL 检索

1
2
3
4
POST /_sql?format=txt
{
"query": "SELECT * FROM lagou-compony-index"
}

Query DSL 支持哪些类型的查询

ES 提供了基于 JSON 的完整查询 DSL 来定义查询。

将 DSL 视为查询的 AST(抽象语法树),由叶子查询子句和复合查询子句组成。

叶子查询子句

叶子查询,在特定域中寻找特定的值,如 match, termrange

「精确匹配」包括:term, exists, term set, range, prefix, ids, wildcard, regexp, fuzzy 等等

「全文检索」匹配:match, match_phrase, multi_match, match_phrase_prefix, query_string 等等

复合查询子句

复合查询子句,包装了其它的叶子查询或复合查询,并用逻辑方式组合多个查询(如 bool 和 dis_max 查询),或更改行为(如,constant_score 查询)

  1. Constant score query

包装一个查询,并且返回所有与相关分值等于 boost 参数的结果。

Wraps a filter query and returns every matching document with a relevance score equal to the boost parameter value.

1
2
3
4
5
6
7
8
9
10
11
GET /_search
{
"query": {
"constant_score": {
"filter": {
"term": { "user.id": "kimchy" }
},
"boost": 1.2
}
}
}
  1. Boolean query
    bool 查询用 bool 操作来组合多个查询子句为一个查询

bool 的 occurrence types 有: must, filter, should, must_not

1
2
3
4
5
6
7
8
9
10
11
12
13
14
15
16
17
18
19
20
21
22
23
24
POST _search
{
"query": {
"bool" : {
"must" : {
"term" : { "user.id" : "kimchy" }
},
"filter": {
"term" : { "tags" : "production" }
},
"must_not" : {
"range" : {
"age" : { "gte" : 10, "lte" : 20 }
}
},
"should" : [
{ "term" : { "tags" : "env1" } },
{ "term" : { "tags" : "deployed" } }
],
"minimum_should_match" : 1,
"boost" : 1.0
}
}
}

带排序的查询

相关性排序、字段值排序、组合排序

示例:

1
2
3
4
5
6
7
8
9
10
11
POST /book/_search
{
"query": {
"match_all": {}
},
"sort": [
{"_score": { "order": "asc" }}
{"price": { "order": "desc" }},
{"timestamp": {"order:": "desc" }}
]
}

带分页的查询

1
2
3
4
5
6
7
8
9
10
11
POST /book/_search
{
"query": {
"match_all": {}
},
"size": 2,
"from": 0
}

# size: 每页显示多少页
# from: 从当前页的起始索引位置。 from = (pageNum - 1) * size

带高亮的查询

1
2
3
4
5
6
7
8
9
10
11
12
13
POST /lagou-company-index/_search
{
"query": {
"match": {
"name": "百"
}
},
"highlight": {
"pre_tags": "<font color='red'>",
"post_tags": "</font>",
"fields": [{"name":{}}]
}
}

批量查询

批量操作可以减少网络开销

1
2
3
4
5
6
7
8
9
10
11
12
13
14
15
16
17
18
19
20
21
22
23
24
25
26
27
28
29
30
31
32
33
34
35
# 不同索引下
GET /_mget
{
"docs": [
{
"_index": "lagou-company-index",
"_id": 1
},
{
"_index": "lagou-exployee-index",
"_id": 3
}
]
}

# 同一索引下
GET /lagou-company-index/_mget
{
"docs": [
{
"_id": 1
},
{
"_id": 3
}
]
}
# 或
POST /lagou-company-index/_search
{
"query": {
"ids": {"values": ["1","3"]}
}
}

批量增删改

将一系列的增删改操作,通过一条请求完成,减少网络开销。

语法:

1
2
3
POST /_bulk
{"action": {"metadata"}}
{"data"}

detete 不需要请求体

格式,每个 json 不能换行;相邻 json 必须换行。

示例

1
2
3
4
5
6
POST /_bulk
{ "delete": { "_index": "book", "_id": "1" }}
{ "create": { "_index": "book", "_id": "5" }}
{ "name": "test14","price":100.99 }
{ "update": { "_index": "book", "_id": "2"}}
{ "doc" : {"name" : "test"} }

资料

【金山文档】 ElasticSearch https://kdocs.cn/l/cpGSu8K35cQk
Elasticsearch: 权威指南 | Elastic

抽奖算法理论

在一组奖品中,每个奖品有自己的概率,总概率为 1.0,也就是说在库存充足的情况下,必然能抽中其中的一个。

通过「谢谢参与」来作为无奖的奖品(也是一种奖品)。

需要注意的是:如果一组中所有的奖品,总概率之和不为 1.0,那么数值代表的概率就不是真实概率了,需要用所占比例来作为新的概率:新概率值=奖品概率/总概率

举个例子:只有 A 和 B 两个奖品,A 概率是 0.1,B 概率是 0.3,那么总概率就是 0.4,A 的真实概率就是0.1/0.4=0.25,B 的真实概率是0.3/0.4=0.75,真实的总概率依然为1

所以如果想要配置的奖品概率正好是抽奖时的概率值,那么就需要为这一组奖品列表的总概率配置成1.0

实现

首先定义一个有概率的奖品基类,所有继承这个基类的子类,都可以用调用 LotteryTool.draw 算法(draw 中的参数类型使用了java泛型)

1
2
3
4
5
6
7
8
9
10
11
12
13
14
15
16
import lombok.Getter;
import lombok.Setter;

/**
* 奖品基类
*
*/
@Setter
@Getter
public class BaseAward {
/**
* 抽中这个奖品的概率
*/
private Double probability;
}

接着是具体的奖品类

1
2
3
4
5
6
7
8
9
10
11
12
13
14
15
16
17
18
19
20
21
22
23
24
25
import lombok.Getter;
import lombok.Setter;
import lombok.ToString;

/**
* 奖品实现类
*/
@Setter
@Getter
@ToString
public class Award extends BaseAward {
private Integer id;
private String name;
private Double price;
private Integer stock;

public Award(Integer id, String name, Double price, Double probability, Integer stock) {
super();
this.id = id;
this.name = name;
this.price = price;
this.stock = stock;
setProbability(probability);
}
}

看看抽奖的工具类

1
2
3
4
5
6
7
8
9
10
11
12
13
14
15
16
17
18
19
20
21
22
23
24
25
26
27
28
29
30
31
32
33
34
35
36
37
38
39
40
41
42
import cn.hutool.core.collection.CollUtil;
import cn.hutool.core.util.RandomUtil;

import java.util.List;

/**
* 抽奖工具类
*/
public class LotteryTool {

/**
* 抽奖方法
*
* @param awardList 奖品列表,这些是备选的奖品(一定有库存的)
* @param <T> 具体奖品类型
* @return 返回一个抽中的奖品
*/
public static <T extends BaseAward> T draw(List<T> awardList) {
if (CollUtil.isEmpty(awardList)) {
return null;
}

// 获取总概率,当奖品总概率正好为1时,奖品的 probability 就是真实的概率,否则会按新的比例作为概率
double sumProbability = awardList.stream()
.map(BaseAward::getProbability)
.reduce(0.0, Double::sum);

// 一共会尝试 awardList.size() 次,确保能返回一个奖品
for (T t : awardList) {

// 使用随机值,左闭右开(包含0,不包含1)
if (t.getProbability() > RandomUtil.randomDouble(0.0, 1.0) * sumProbability) {
return t;
}
sumProbability = sumProbability - t.getProbability();
}

// 其它情况,会到这里(理论上,一定到不了这里的。)
return null;
}
}

最后来个测试

1
2
3
4
5
6
7
8
9
10
11
12
13
14
15
16
17
18
19
20
21
22
23
24
25
26
27
28
29
30
31
32
33
34
35
36
37
38
39
40
41
42
43
44
45
46
47
48
49
50
51
52
53
54
55
56
57
58
59
60
61
62
63
64
65
66
67
68
69
70
71
72
73
74
75
76
77
78
79
80
81
82
83
84
85
86
87
88
89
90
91
92
93
94
95

import cn.hutool.core.util.StrUtil;

import java.util.ArrayList;
import java.util.List;
/**
* 测试
*/
public class Main {
public static void main(String[] args) {
// 奖品列表,库存一共36
final List<Award> awardList = new ArrayList<>(4);
awardList.add(new Award(1, "苹果手机", 7000.0, 0.05, 1));
awardList.add(new Award(2, "5元金币", 5.0, 0.1, 5));
awardList.add(new Award(3, "15元天堂雨伞", 15.0, 0.25, 10));
awardList.add(new Award(4, "谢谢参与", 0.0, 0.6, 20));

System.out.println("开始抽奖:");
// 抽奖50次
for (int i = 0; i < 50; i++) {
String msg;
final Award draw = LotteryTool.draw(awardList);
if (draw == null) {
msg = "奖品抽完了,下次早点来吧~";
} else {
msg = StrUtil.format("抽到了价值「{}」的奖品「{}」", draw.getPrice(), draw.getName());

// 抽到奖品了,需要减库存,库存不足了,要从列表中剔除
draw.setStock(draw.getStock() - 1);
if (draw.getStock() <= 0) {
awardList.remove(draw);
}
}

System.out.println(StrUtil.format("第{}次抽奖,结果为:{}", i+1, msg));
}
System.out.println("抽奖结束.");
}
}
/*output~
开始抽奖:
第1次抽奖,结果为:抽到了价值「0.0」的奖品「谢谢参与」
第2次抽奖,结果为:抽到了价值「5.0」的奖品「5元金币」
第3次抽奖,结果为:抽到了价值「0.0」的奖品「谢谢参与」
第4次抽奖,结果为:抽到了价值「0.0」的奖品「谢谢参与」
第5次抽奖,结果为:抽到了价值「0.0」的奖品「谢谢参与」
第6次抽奖,结果为:抽到了价值「0.0」的奖品「谢谢参与」
第7次抽奖,结果为:抽到了价值「15.0」的奖品「15元天堂雨伞」
第8次抽奖,结果为:抽到了价值「0.0」的奖品「谢谢参与」
第9次抽奖,结果为:抽到了价值「15.0」的奖品「15元天堂雨伞」
第10次抽奖,结果为:抽到了价值「5.0」的奖品「5元金币」
第11次抽奖,结果为:抽到了价值「0.0」的奖品「谢谢参与」
第12次抽奖,结果为:抽到了价值「0.0」的奖品「谢谢参与」
第13次抽奖,结果为:抽到了价值「0.0」的奖品「谢谢参与」
第14次抽奖,结果为:抽到了价值「15.0」的奖品「15元天堂雨伞」
第15次抽奖,结果为:抽到了价值「0.0」的奖品「谢谢参与」
第16次抽奖,结果为:抽到了价值「0.0」的奖品「谢谢参与」
第17次抽奖,结果为:抽到了价值「0.0」的奖品「谢谢参与」
第18次抽奖,结果为:抽到了价值「0.0」的奖品「谢谢参与」
第19次抽奖,结果为:抽到了价值「0.0」的奖品「谢谢参与」
第20次抽奖,结果为:抽到了价值「0.0」的奖品「谢谢参与」
第21次抽奖,结果为:抽到了价值「0.0」的奖品「谢谢参与」
第22次抽奖,结果为:抽到了价值「0.0」的奖品「谢谢参与」
第23次抽奖,结果为:抽到了价值「0.0」的奖品「谢谢参与」
第24次抽奖,结果为:抽到了价值「15.0」的奖品「15元天堂雨伞」
第25次抽奖,结果为:抽到了价值「15.0」的奖品「15元天堂雨伞」
第26次抽奖,结果为:抽到了价值「0.0」的奖品「谢谢参与」
第27次抽奖,结果为:抽到了价值「0.0」的奖品「谢谢参与」
第28次抽奖,结果为:抽到了价值「15.0」的奖品「15元天堂雨伞」
第29次抽奖,结果为:抽到了价值「15.0」的奖品「15元天堂雨伞」
第30次抽奖,结果为:抽到了价值「5.0」的奖品「5元金币」
第31次抽奖,结果为:抽到了价值「15.0」的奖品「15元天堂雨伞」
第32次抽奖,结果为:抽到了价值「15.0」的奖品「15元天堂雨伞」
第33次抽奖,结果为:抽到了价值「5.0」的奖品「5元金币」
第34次抽奖,结果为:抽到了价值「15.0」的奖品「15元天堂雨伞」
第35次抽奖,结果为:抽到了价值「5.0」的奖品「5元金币」
第36次抽奖,结果为:抽到了价值「7000.0」的奖品「苹果手机」
第37次抽奖,结果为:奖品抽完了,下次早点来吧~
第38次抽奖,结果为:奖品抽完了,下次早点来吧~
第39次抽奖,结果为:奖品抽完了,下次早点来吧~
第40次抽奖,结果为:奖品抽完了,下次早点来吧~
第41次抽奖,结果为:奖品抽完了,下次早点来吧~
第42次抽奖,结果为:奖品抽完了,下次早点来吧~
第43次抽奖,结果为:奖品抽完了,下次早点来吧~
第44次抽奖,结果为:奖品抽完了,下次早点来吧~
第45次抽奖,结果为:奖品抽完了,下次早点来吧~
第46次抽奖,结果为:奖品抽完了,下次早点来吧~
第47次抽奖,结果为:奖品抽完了,下次早点来吧~
第48次抽奖,结果为:奖品抽完了,下次早点来吧~
第49次抽奖,结果为:奖品抽完了,下次早点来吧~
第50次抽奖,结果为:奖品抽完了,下次早点来吧~
抽奖结束.

Process finished with exit code 0
*/

参考资料

阅读原文

MD5(MD5 Message-Digest Algorithm)

消息摘要算法

特点

  • 不可逆
  • 输入不室长,输出定长的128-bits(用32个16进制字符表示)

算法

img

使用场合

用于各种程序语言中,以确保资料传递无误(摘要)。

参考资料

SHA(Secure Hash Algorithm)

安全散列算法

SHA-3:2015年正式发布,由于对MD5出现成功的破解,以及对SHA-0和SHA-1出现理论上破解的方法,NIST感觉需要一个与之前算法不同的,可替换的加密散列算法,也就是现在的SHA-3。

特点

  • 输出定长(具体模式长度不一样,SHA3-512、SHA3-256)
  • SHA2和SHA3目前还未被破解。

参考资料

Base64(基底64,一种编码方式,非算法)

概念

是一种基于64个可打印字符来表示二进制数据的表示方法。
字符有:[0-9、A-Z、a-z、+/]
还有类似其它的编码方式,如Base32。对比Base32,Base64有更多的字符用于编码,其编码后的长度要更短。还有Base58,用于比特币中,不使用易混淆的字符[不使用数字”0”,字母大写”O”,字母大写”I”,和字母小写”l”,以及”+”和”/“符号]
目的是:
img

可以编码,也可以解码。
是一种编码方式,切记不要误用于加密、解密的场合(有DES、IDEA等对称加密算法)。

使用场合

常用于在处理文本数据的场合,表示、传输、存储一些二进制数据,包括MIME的电子邮件及XML的一些复杂数据。
如:Base64编码图片、MIME内容、URL(用于传递参数)。
img
img

参考资料

DES(Data Encryptioin Standard)

数据加密标准,是一种对称加密算法。是由IBM公司研制的对称密码体制加密算法,密钥长64位,实事上是56位参与DES运算(其它的是校验位,8、16、24、32、60、48、56、64)

特点

分组比较短、密钥太短、运算速度慢
有极高的安全性(并非不可破解。用穷举的时间特别长。特殊的硬件并行计算几个小时)
加强版本:3DES_百度百科,即Triple Data Encryption Algorithm。相当于对每个数据块应用三次DES加密算法。

参考资料

IDEA(International Data Encryption Algorithm)

国际数据加密算法,是从DES算法的基础上发展出来的。密钥长度为128位。

特点

  • 对比DES而言,更安全
  • 是一种数据块加密算法
  • 在美国之外发展(避开了美国法律上对加密技术的限制)

应用

  • PGP使用IDEA作为其分组加密算法;
  • SSL也将IDEA包含在SSLRef中;

参考资料

AES(Advanced Encryption Standard)

高级加密标准,用来替代原先的DES,目前被广泛应用。
密钥长度可以是128位、192位或256位。

应用场合

SSL、IpSec、ATM、路由器、网络保密系统、卫星通信、移动通信。

参考链接

RSA非对称加密算法

RSA是由三个人名的首字母缩写而来。

优缺点

优点是,相对于对称加密,对称密钥需要协商密钥,非对称加密不需要协商,可以将公钥完全地公开。
缺点是,运算速度慢。

与对称加密结合使用

在实际应用中,将对称和非对称结合使用。

  1. A和B先交换公钥;
  2. A生成一个随机AES口令,通过B的公钥加密,并发送给B;
  3. B接收信息后,通过自己的私钥解密得到AES口令;
  4. 双方用这个AES口令进行加密通信。

应用场合

  • https 加密链接
  • socket程序,结合运用 rsa + aes

参考资料

背景

通常的合并项目的做法是,将所有项目移动到一个新目录中,并重新生成纳入 git 管理(去掉了.git 文件夹),这样做的弊端是之前的历史提交记录都没有了,想要看之前的记录,还需要再回到旧项目中查看。
在本文中,我会介绍怎样完整地保留历史提交记录。

为什么保留提交记录?

  1. 可以追踪文件修改历史,方便对比和还原历史。
  2. 可以追责,知道之前是谁写的,什么时候写的。

拆分

怎样完整地保留提交记录?

假设有三个项目

1
2
3
A:远程地址为:git@github.com:lyloou/merge_a.git ,分支为master
B:远程地址为:git@github.com:lyloou/merge_b.git ,分支为master
C:远程地址为:git@github.com:lyloou/merge_c.git ,分支为master

合并结果为:git@github.com:lyloou/merge_all.git ,分支为 master

1
2
3
4
merge_all
-- merge_a
-- merge_b
-- merge_c

操作步骤

  1. 在本地新建 merge_all 目录,并初始化
1
2
3
cd merge_all
# 将当前目录初始化为git版本管理的目录
git init
  1. 在 merge_all 中添加 merge_a,merge_b,merge_c 的远程分支。
1
2
3
git remote add origin_merge_a git@github.com:lyloou/merge_a.git
git remote add origin_merge_b git@github.com:lyloou/merge_b.git
git remote add origin_merge_c git@github.com:lyloou/merge_c.git
  1. 可以验证是否添加成功git remote -v
  2. 在 merge_all 目录下,获取 merge_a, merge_b,merge_c 的 master 分支数据
1
2
3
git fetch origin_merge_a master
git fetch origin_merge_b master
git fetch origin_merge_c master
  1. 开始合并了,并移动到子目录中
1
2
3
4
5
6
7
8
9
10
11
12
13
14
15
16
17
18
19
# 合并,并保留历史
git merge origin_merge_a/master --allow-unrelated-histories
# 新建子文件夹,并移动到此文件中(排除需要忽略的文件夹)
mkdir merge_a
mv !(.|..|.git|merge_a) merge_a
# 生成一条commit日志
git add . && git commit -m "merge merge_a_master and mv to merge_a"

git merge origin_merge_b/master --allow-unrelated-histories
mkdir merge_b
mv !(.|..|.git|merge_b) merge_b
git add . && git commit -m "merge merge_b_master and mv to merge_b"

git merge origin_merge_c/master --allow-unrelated-histories
mkdir merge_c
mv !(.|..|.git|merge_c) merge_c
git add . && git commit -m "merge merge_c_master and mv to merge_c"
# 注意 1: `--allow-unrelated-histories` 的意思是,允许合并不相关历史
# 注意 2:执行 `mv !(.|..|.git|merge_a) merge_a` 的过程中可能会报错误 `-bash: !: event not`,执行一下命令 `shopt -s extglob`
  1. 推送 merge_all 的 master 分支到远程
1
2
git remote add origin git@github.com:lyloou/merge_all.git
git push -u origin master

至此合并多项目操作就完成了。

参考资料

As you can guess, it stands for extended globbing. This option allows for more advanced pattern matching.

一键合并多个项目 shell 脚本

1
2
3
4
5
6
7
8
9
10
11
12
13
14
15
16
17
18
19
20
21
22
23
24
25
26
27
28
29
30
31
32
33
34
35
36
37
38
39
40
41
42
43
44
45
#!/usr/bin/env sh

#1. 在本地新建 merge_all 目录,并初始化
mkdir merge_all
cd merge_all
# 将当前目录初始化为git版本管理的目录
git init

#2. 在 merge_all 中添加 merge_a,merge_b,merge_c 的远程分支。
git remote add origin_a git@github.com:lyloou/merge_a.git
git remote add origin_b git@github.com:lyloou/merge_b.git
git remote add origin_c git@github.com:lyloou/merge_c.git

#3. 可以验证是否添加成功`git remote -v`
git remote -v

#4. 在 merge_all 目录下,获取 merge_a, merge_b,merge_c 的 master 分支数据
git fetch origin_a master
git fetch origin_b master
git fetch origin_c master

#5. 开始合并了,并移动到子目录中

# 注意 执行 `mv !(.|..|.git|merge_a) merge_a` 的过程中可能会报错误 `-bash: !: event not`,执行一下命令 `shopt -s extglob`
shopt -s extglob

# 合并,并保留历史
git merge origin_a/master --allow-unrelated-histories
# 新建子文件夹,并移动到此文件中(排除需要忽略的文件夹)
mkdir merge_a && mv !(.|..|.git|merge_a) merge_a
# 生成一条commit日志
git add . && git commit -m "merge and mv to merge_a"

git merge origin_b/master --allow-unrelated-histories
mkdir merge_b && mv !(.|..|.git|merge_a|merge_b) merge_b
git add . && git commit -m "merge and mv to merge_b"

git merge origin_c/master --allow-unrelated-histories
mkdir merge_c && mv !(.|..|.git|merge_a|merge_b|merge_c) merge_c
git add . && git commit -m "merge and mv to merge_c"

#6. 推送 merge_all 的 master 分支到远程
git remote add origin git@github.com:lyloou/merge_all.git
git push -u origin master

阅读原文

0%