Spring 的生命周期

  1. 实例化(Instanctiation)
  2. 属性填充(Populate)
  3. 初始化(Initialization)
  4. 销毁(Destruction)

org.springframework.beans.factory.support.AbstractAutowireCapableBeanFactory#doCreateBean
img
img

1. 实例化

判断是否存在方法覆盖,如果有,使用 JDK 的反射机制来实例化。
如果没有,使用 CGLib 技术实例化。
img

2.属性填充

分为:按名称填充、和按类型填充
img

3.初始化
  1. Aware 相关回调
  2. 初始化前置处理
  3. 初始化
  4. 初始化后置处理

org.springframework.beans.factory.support.AbstractAutowireCapableBeanFactory#initializeBean
img

销毁

从容器中,移除 beanName
调用 DesposableBean.distroy 接口
img

参考资料

问题

假设一个活动中,有 n 个(n的范围是 1<n<10)场次,场次按时间顺序依次进行。
其中每个场次有三种状态:「未开始」、「进行中」、「已结束」
要求:以当前时间点为参考点,从场次列表中获取最多 4 个场次。
场次具体要求如下:

  1. 不满足 4 场次或正好 4 场次的全部返回。
  2. 大于 4 场次时,获取的四个场次有下面这些情况(场次充足的情况下,只有一个【已结束】的场次):
    【未开始、未开始、未开始、未开始】
    【已结束、未开始、未开始、未开始】
    【已结束、进行中、未开始、未开始】

解决文案:

突破点

找到【已结束】的下标,并以此下标为中心来推断其它几个场次。

具体解决步骤

  1. 少于 4 场次,全部返回;
  2. 多余 4 场次,按以下规则取
    设:index 为最后一个已结束的场次下标,size 为场次列表数量,hasNext 为是否有下一个场次
    <1. 如果:index=-1 时,表示都没结束,取前 4 个;hasNext=true
    <2. 如果:size-index<=4 时,表示未结束的不多了,取后 4 个;hasNext=false
    <3. 否则:取 index、index+1、index+2、index+3;hasNext=true

示例代码

1
2
3
4
5
6
7
8
9
10
11
12
13
14
15
16
17
18
19
20
21
22
23
24
25
26
27
28
29
30
31
32
33
34
35
36
37
38
39
40
41
42
43
44
45
46
public class Test {
/**
* 最多展示 4 个场次
*/
private static final int MAX_SCENE_SIZE = 4;

private Result getResult(List<SceneModel> candidateSceneList) {
Result result = new Result();
final int size = candidateSceneList.size();

// 不足4场次全部返回
if (size <= MAX_SCENE_SIZE) {
result.setHasNext(false);
result.setSceneList(candidateSceneList);
return result;
}

// 多余4场次,按以下规则取
List<SceneModel> resultList;

// 获取最后一个已结束的场次下标
int index = getLastFinishedSceneIndex(candidateSceneList);

// 1. 如果:index=-1 时,表示都没结束,取前4个;hasNext=true
if (index == -1) {
resultList = candidateSceneList.subList(0, MAX_SCENE_SIZE);
result.setSceneList(resultList);
result.setHasNext(true);
return result;
}

// 2. 如果:size-index<=4 时,表示未结束的不多了,取后4个;hasNext=false
if (size - index <= MAX_SCENE_SIZE) {
resultList = candidateSceneList.subList(size - MAX_SCENE_SIZE, size);
result.setSceneList(resultList);
result.setHasNext(false);
return result;
}

// 3. 否则:取index、index+1、index+2、index+3;hasNext=true
resultList = candidateSceneList.subList(index, index + MAX_SCENE_SIZE);
result.setSceneList(resultList);
result.setHasNext(true);
return result;
}
}

  1. 需求分析的时候,逐个看需求文档,
    将需求点罗列到思维导图上(便于统筹帷幄),标记关键点、风险点和注意事项
    (有助记效果,与产品或其他同事交流沟通时,有的放矢)。

  2. 概要设计、详细设计(技术选型、)

  3. 分析现在代码和数据库对需求的已有支持(不要重新造轮子)。

  4. 设计数据库表和字段,设计包结构、类结构和主要方法(类似于列大纲)。

  5. 编写接口文档(不是一个人在作战)。

  6. 修改配置、开发具体代码,适应新需求。

  7. 设计和开发过程中,将数据库、配置等的变动以及上线时的注意事项列一个运维清单(以防上线过程出问题)。

  8. 自测,编写单元测试、Postman 测试。

  9. 代码优化,魔法数字、命名、结构、注释、算法、设计模式等。

  10. 联调。

  11. 提测和 bug 修复。

  12. 打勾运维清单上线。

  13. 项目沉淀、后期优化。

参考资料

设置 Header 中的 token

1
2
3
4
5
6
7
8
9
10
11
12
pm.test("Status code is 200", function () {
pm.response.to.have.status(200);
});

var r = JSON.parse(responseBody);

var token = r.data.token;
console.log(token);

pm.globals.unset("LoginToken");

pm.globals.set("LoginToken", "Bearer:" + token);

如何使用 Postman 对接口参数进行签名

Pre-request Script 选项卡中添加

1
2
3
4
5
6
7
8
9
10
11
12
13
// 获取当前的请求路径
var url = pm.request.url;

// 获取环境变量
const client = pm.environment.get("client");
const reqVersion = pm.environment.get("reqVersion");
const sign = pm.environment.get("reqVersion");

// 将必填参数拼接到路径上
url = url + "&client=" + client + "&reqVersion=" + reqVersion + "&sign=" + sign;

// 重写url
pm.request.url = url;

SHA256 签名示例

1
2
3
4
5
6
7
8
9
10
11
12
13
14
15
16
17
18
19
20
21
22
23
// 获取当前的请求路径
var url = pm.request.url;

// 配置参数
let activeId = "2197";
let awardId = 10266;
let cOpenId = "aaaa";
let MAC = "001a9a000000";
let cUDID = "23320005";
let accessToken = "bbb";
let cChip = "ccc";
let cEmmcCID = "ddd";
let cModel = "eee";

// 签名
let signStr = `MAC=${MAC}&accessToken=${accessToken}&cChip=${cChip}&cEmmcCID=${cEmmcCID}&cModel=${cModel}&cOpenId=${cOpenId}&cUDID=${cUDID}&id=${activeId}&source=wechat`;
var sign = CryptoJS.SHA256(signStr).toString();

// 将必填参数拼接到路径上
url = `${url}?activeId=${activeId}&awardId=${awardId}&cOpenId=${cOpenId}&MAC=${MAC}&cUDID=${cUDID}&accessToken=${accessToken}&&token=${sign}`;

// 重写url
pm.request.url = url;

二分查找

1
2
3
4
5
6
7
8
9
10
11
12
13
14
15
16
17
18
19
20
21
22
23
24
25
26
27
28
29
30
31
32
33
34
35
36
37
38
39
40
41
42
43
44
45
46
47
48
49
50
51
52
53
54
55
56
57
58
59
60
61
62
63
64
65
66

/**
* 二分查找,从有序的数组中找到目标值
*
*/
public class BinarySearch {
public static void main(String[] args) {
int[] arr = new int[]{1, 2, 3, 4, 5, 6, 7, 8, 9};

System.out.println("找-1的下标:" + bSearch(arr, -1));
System.out.println("找1的下标:" + bSearch(arr, 1));
System.out.println("找2的下标:" + bSearch(arr, 2));
System.out.println("找3的下标:" + bSearch(arr, 3));
System.out.println("找4的下标:" + bSearch(arr, 4));
System.out.println("找5的下标:" + bSearch(arr, 5));
System.out.println("找6的下标:" + bSearch(arr, 6));
System.out.println("找7的下标:" + bSearch(arr, 7));
System.out.println("找8的下标:" + bSearch(arr, 8));
System.out.println("找9的下标:" + bSearch(arr, 9));
System.out.println("找10的下标:" + bSearch(arr, 10));

System.out.println("从null中找1的下标:" + bSearch(null, 1));
System.out.println("从{}中找1的下标:" + bSearch(new int[]{}, 1));
System.out.println("从{1}找1的下标:" + bSearch(new int[]{1}, 1));
System.out.println("从{1}找2的下标:" + bSearch(new int[]{1}, 2));
}

private static int bSearch(int[] arr, int target) {
if (arr == null || arr.length < 1) {
return -1;
}
int first = 0;
int last = arr.length - 1;
while (first <= last) {

// 取中间值
int mid = (first + last) >> 1;

if (arr[mid] == target) { // 中间值正好是要找的目标值
return mid;
} else if (arr[mid] > target) { // 中间值大于目标值,在左边找
last = mid - 1;
} else { // 中间值小于目标值,在右边找
first = mid + 1;
}
}

return -1;
}
}/* 输出:
找-1的下标:-1
找1的下标:0
找2的下标:1
找3的下标:2
找4的下标:3
找5的下标:4
找6的下标:5
找7的下标:6
找8的下标:7
找9的下标:8
找10的下标:-1
从null中找1的下标:-1
从{}中找1的下标:-1
从{1}找1的下标:0
从{1}找2的下标:-1
*/

旋转数组的最小数字

1
2
3
4
5
6
7
8
9
10
11
12
13
14
15
16
17
18
19
20
21
22
23
24
25
26
27
28
29
30
31
32
33
34
35
36
37
38
39
40
41
42
43
44
45
46
47
48
49
50
51
52
53
54
55
56
57
58
59
60

/**
* 有一个长度为 n 的非降序数组,比如[1,2,3,4,5],将它进行旋转,即把一个数组最开始的若干个元素搬到数组的末尾,变成一个旋转数组,比如变成了[3,4,5,1,2],或者[4,5,1,2,3],
* 这样的。请问,给定这样一个旋转数组,求数组中的最小值。
*
*/
public class BinaryExtendSearch {
public static void main(String[] args) {
System.out.println("{5, 6, 7, 8, 9, 1, 2, 3, 4} 找最小值,应该是1:" + bExtendSearch(new int[]{5, 6, 7, 8, 9, 1, 2, 3, 4}));
System.out.println("{1, 2, 3, 4}找最小值,应该是1:" + bExtendSearch(new int[]{1, 2, 3, 4}));
System.out.println("{1, 0, 1, 1, 1}找最小值,应该是0:" + bExtendSearch(new int[]{1, 0, 1, 1, 1}));
System.out.println("{1, 1, 1, 1, 1}找最小值,应该是1:" + bExtendSearch(new int[]{1, 1, 1, 1, 1}));

}

private static int bExtendSearch(int[] arr) {
if (arr == null || arr.length < 1) {
return -1;
}

// 取最右端数据为目标值
int target = arr[arr.length - 1];

int first = 0;
int last = arr.length - 1;
while (first < last) {
// 提前结束
if (arr[first] < arr[last]) {
return arr[first];
}

// 取中值
int mid = (first + last) >> 1;

// 如果中间值大于目标值,最小值在右边
if (arr[mid] > target) {
first = mid + 1;
continue;
}

// 如果中间值小于目标值,最小值在左边,目标值成为中间值
if (arr[mid] < target) {
last = mid;
target = arr[mid];
continue;
}

// 其它情况,中间值==目标值
last--;
}

return arr[first];
}
}/*输出
{5, 6, 7, 8, 9, 1, 2, 3, 4} 找最小值,应该是1:1
{1, 2, 3, 4}找最小值,应该是1:1
{1, 0, 1, 1, 1}找最小值,应该是0:0
{1, 1, 1, 1, 1}找最小值,应该是1:1
*/

三范式

第一范式:消除属性值可再分(非原子的);
第二范式:消除非主属性对候选键的部分依赖。
第三范式:消除非主属性对候选键的传递依赖。
BC 范式:消除主属性对候选键的部分依赖和传递依赖。

数据库理论-2021-09-09-14-08-58

分析

假设有属性集:{A、B、C、D、E、J}
依赖集 {A->B, A->C, C->D, AJ->E}

  • 候选键:AJ
  • 主属性:A、J
  • 非主属性:B、C、D、E
  • AJ是主属性,B 可以通过A确定,存在非主属性对候选键的部分依赖AJ->E这个关系拆分后,可满足第二范式
  • A->C,C->D,存在非主属性对候选键的传递依赖C-D 拆分后满足第三范式

对于 BC 范式,可以从下面图来理解
数据库理论-2021-09-09-14-19-18

例题(答案:C、A):
数据库理论-2021-09-09-14-20-23

多版本控制(MVCC)

读取优化策略,不使用锁,而是使用多个版本共存的思想,根据隔离级别确定使用哪个版本号。

版本号的创建规则是:

插入数据时:CREATE_VERSION 记录下当前的事务ID(事务 ID 是一个全局严格递增的数值),DELETE_VERSION 为空;

删除数据时:CREATE_VERSION 为空,DELETE_VERSION 为当前事务ID;

更新数据时:相当于“删除旧数据,插入新数据”,拷贝一份原始数据,将原始数据的 CREATE_VERSION 设为空,DELETE_VERSION 设为当前事务ID;再将拷贝后数据的 CREATE_VERSION 设为当前事务ID,DELETE_VERSION 设为空;

根据隔离级别确定使用哪个版本号:

如果隔离级别是可重复读:总是取 CREATE_VERSION 小于当前事务ID的记录,如果还存在多个版本,逆序取最新的一个;

如果隔离级别是读已提交:总是取最新commit了的版本;
参考资料:本地事务 | 凤凰架构 (icyfenix.cn)

原理

基于 AOP 面向切面编程,在执行前后插入身份认证的逻辑。

原理细节:

  • 登录过程:这个过程比较简单,将用户 id、用户名、过期时间等属性结合 jwt 工具生成 token,并将用户的信息存入到缓存中,以供后期使用。

  • 验证过程:前端通过 Header 头信息的 Authorization 属性得到 Token,先进行 token 验证,再结合缓存验证,验证成功的话,将用户 id 和用户名等信息存入 ThreadLocal 中,这样在执行切面逻辑的时候。就可以从 ThreadLocal 中获取数据了,如UserManager.getUserId();执行完成后需要清除 ThreadLocal 中的数据;代码如下

1
2
3
4
5
6
7
8
9
10
11
12
13
14
15
class ValidateLoginAspect {

@Around("pointCutMethod()")
public Object preHandle(ProceedingJoinPoint pjp) {
// ......
UserContextHolder.getInstance().setContext(userMap);
final Object proceed;
try {
proceed = pjp.proceed();
} finally {
UserContextHolder.getInstance().clear();
}
return proceed;
}
}
  • 认证接口的范围:给 BaseTokenController这个基类添加 @ValidateLogin
    可以实现一个效果,只要自己的 Controller 继承了BaseTokenController,那么就不用再声明@ValidateLogin注解,自定义Controller中的 mapping 都需要身份认证。
    (这样就免去了繁琐配置:在拦截器中通过通配符的方式配置哪些接口需要拦截,哪些接口需要放行)

服务端使用方式

添加依赖

1
2
3
4
5
6

<dependency>
<groupId>com.lyloou</groupId>
<artifactId>component-security-loginvalidator-starter</artifactId>
<version>${lyloou.component.version}</version>
</dependency>
  1. 继承BaseTokenController类。 因为这个类被@ValidateLogin标记,所以其下的所有子类都需要身份认证(具体实现细节,查看ValidateLoginAspect)。
1
2
3
4
5
6
7
8
9
10
11
12
13

@RestController
public class UserController extends BaseTokenController {

// 从父类继承了ValidateLogin,需要身份验证
@GetMapping("/ping")
public String ping() {
final Integer userId = currentUserId();
System.out.println(userId);
return "pong";
}

}
  1. 如果继承了 BaseTokenController 类,又希望其中的某个方法不要被拦截,可以在方法上标记 @IgnoreValidateLogin
1
2
3
4
5
6
7
8
9
10
11
12
13
14
15
16
17
18
19
20
21

@RestController
public class UserController extends BaseTokenController {

@Autowired
TokenService tokenService;

// 手动忽略身份验证
@IgnoreValidateLogin
@GetMapping("/login")
public String login(String userId, String username) {

Map<String, String> map = new HashMap<>();
map.put("userId", userId);
map.put("userName", username);
map.put("userAvatar", "http://cdn.lyloou.com/a.jpg");

final String token = tokenService.createToken(userId, username, JSONUtil.toJsonStr(map));
return token;
}
}
  1. 如果没有继承 BaseTokenController,又希望在其中某个方法中做身份认证,获取用户 id,可以在方法上标记@ValidateLogin
1
2
3
4
5
6
7
8
9
10
11
12
13
14
15
16
17

@RestController
public class UserController {


// 手动添加身份验证
@ValidateLogin
@GetMapping("userinfo")
public Map<String, String> userInfo() {
Map<String, String> map = new HashMap<>();
map.put(UserManager.X_USER_ID, UserManager.getUserId() + "");
map.put(UserManager.X_USER_IP, UserManager.getUserIP());
map.put(UserManager.X_USER_NAME, UserManager.getUserName());
map.put(UserManager.X_USER_INFO, UserManager.getUserInfo());
return map;
}
}

使用自定义的缓存

默认使用了内存缓存ConcurrentHashMap(单机版本的)

也可以自定义缓存

1
2
3
4
5
6
7
8
9
10
11
12
13
14
15
16
17
18
19
20
21
22
23
24
25
26
27
28
29
30
31
32
33
34
35
36
37
/**
* @author lilou
* @since 2021/7/14
*/
@Service
public class RedisCodeCache implements DataCache {

@Autowired
private RedisService redisService;
@Autowired
private TokenProperties tokenProperties

@Override
public void set(String key, String value) {
set(key, value, tokenProperties.getExpireSecond());
}

@Override
public void set(String key, String value, long timeout) {
redisService.set(key, value, (int) timeout);
}

@Override
public String get(String key) {
return redisService.get(key);
}

@Override
public void remove(String key) {
redisService.del(key);
}

@Override
public boolean containsKey(String key) {
return redisService.exists(key);
}
}

客户端使用

在 Header 中配置身份认证 Token 的信息:
如:Authorization: Bearer eyJ0eXAiOiJKV1QiLCJhbGciOiJIUzI1NiJ9.eyJpYXQiOjE2Mjg4MzQ3MjQsImV4cCI6MTYyOTQzOTUyNCwieC11c2VyLW5hbWUiOiJhYmNkZSIsIngtdXNlci1pZCI6IjEifQ.x0nIhSUPfxC5FlnzJ-MmJvLnJv7w5ZvFzGlNphdSByE

测试

登录接口:

image-20210813155138945

获取用户信息接口:

image-20210813155327715

源码实现

component/component-security-loginvalidator-starter at master · lyloou/component

签名目的

  • 防篡改
  • 防抓包
  • 防刷
  • 更安全

签名的主要防御措施:

一、 验证签名

将有效的参数按字典排序,并 md5 或 sha 加密(可以自定义加密算法)得到 param_sign,服务端依据同样的算法得到 server_sign,对比传递过来的 param_sign,不相等断定签名无效。
如果请求是 RequestBody ,当作 key 为 “body” ,value 为 json 字符串值传入校验。

二、 请求的时间是否在限制的时间内(如:1 分钟内)

判断请求的时间戳是否在允许的范围内

三、 请求方是否被接口服务注册登记

判断 clientId 是否有效

四、 是否重复请求

通过缓存验证 key (由 clientId+nonce 组成)是否已经存在,nonce 是随机生成的字符串
默认开启此功能,并由本地来缓存,可以自定义缓存实现微服务的场景(如 redis 等等)。

WIKI 文档

实现原理

实现机制:通过拦截器,在真正 handler 之前,对请求拦截后统一处理。

我们可以继承 HandlerInterceptorAdapter 类,然后注册给 WebMvcConfigure,这样我们的拦截器就可以生效了

1
2
3
4
5
6
public class SignAutoConfiguration implements WebMvcConfigurer {
@Override
public void addInterceptors(InterceptorRegistry registry) {
registry.addInterceptor(new SignInterceptor());
}
}

签名的原理是:

  • 客户端将所有有效参数,将 key 按字典排序,加上密钥,然后 md5 加密得到 sign
  • 服务端用同样的方式得到 sign,比较参数中的 sign 和自己生成的 sign

特性

  • 支持上面提到的所有防御措施
  • 支持多客户端
  • 支持自定义缓存
  • 支持自定义验证器
  • 支持全局和局部的开关控制

客户端工具

Java 客户端工具

SimpleHttpUtil
具体见 1.2 客户端基本使用

Js 客户端工具

参考资料

示例源码

https://github.com/lyloou/component-parent-test/tree/master/component-security-signvalidator-starter-test

JustAuth 简介

🏆Gitee 最有价值开源项目 🚀💯 小而全而美的第三方登录开源组件。目前已支持 Github、Gitee、微博、钉钉、百度、Coding、腾讯云开发者平台、OSChina、支付宝、QQ、微信、淘宝、Google、Facebook、抖音、领英、小米、微软、今日头条、Teambition、StackOverflow、Pinterest、人人、华为、企业微信、酷家乐、Gitlab、美团、饿了么、推特、飞书、京东、阿里云、喜马拉雅、Amazon、Slack 和 Line 等第三方平台的授权登录。 Login, so easy!
网址:justauth/JustAuth

1
2
3
4
5
6
7
8
9
10
11
12
13
14
15
16
17
18
19
20
21
22
23
24
25
26
27
28
29
30
31
32
33
34
35
36
37
38
39
40
41
42
43
44
45
46
47
48
49
50
51
52
53
54
55
56
57
58
59
60
61
62
63
64
65
66
67
68
69
70
71
72
73
74
75
76
77
78
79
80
81
82
83
1.1.  Roles

OAuth defines four roles:

resource owner
An entity capable of granting access to a protected resource.
When the resource owner is a person, it is referred to as an
end-user.

resource server
The server hosting the protected resources, capable of accepting
and responding to protected resource requests using access tokens.

client
An application making protected resource requests on behalf of the
resource owner and with its authorization. The term "client" does
not imply any particular implementation characteristics (e.g.,
whether the application executes on a server, a desktop, or other
devices).

authorization server
The server issuing access tokens to the client after successfully
authenticating the resource owner and obtaining authorization.

The interaction between the authorization server and resource server
is beyond the scope of this specification. The authorization server
may be the same server as the resource server or a separate entity.
A single authorization server may issue access tokens accepted by
multiple resource servers.

1.2. Protocol Flow

+--------+ +---------------+
| |--(A)- Authorization Request ->| Resource |
| | | Owner |
| |<-(B)-- Authorization Grant ---| |
| | +---------------+
| |
| | +---------------+
| |--(C)-- Authorization Grant -->| Authorization |
| Client | | Server |
| |<-(D)----- Access Token -------| |
| | +---------------+
| |
| | +---------------+
| |--(E)----- Access Token ------>| Resource |
| | | Server |
| |<-(F)--- Protected Resource ---| |
+--------+ +---------------+

Figure 1: Abstract Protocol Flow

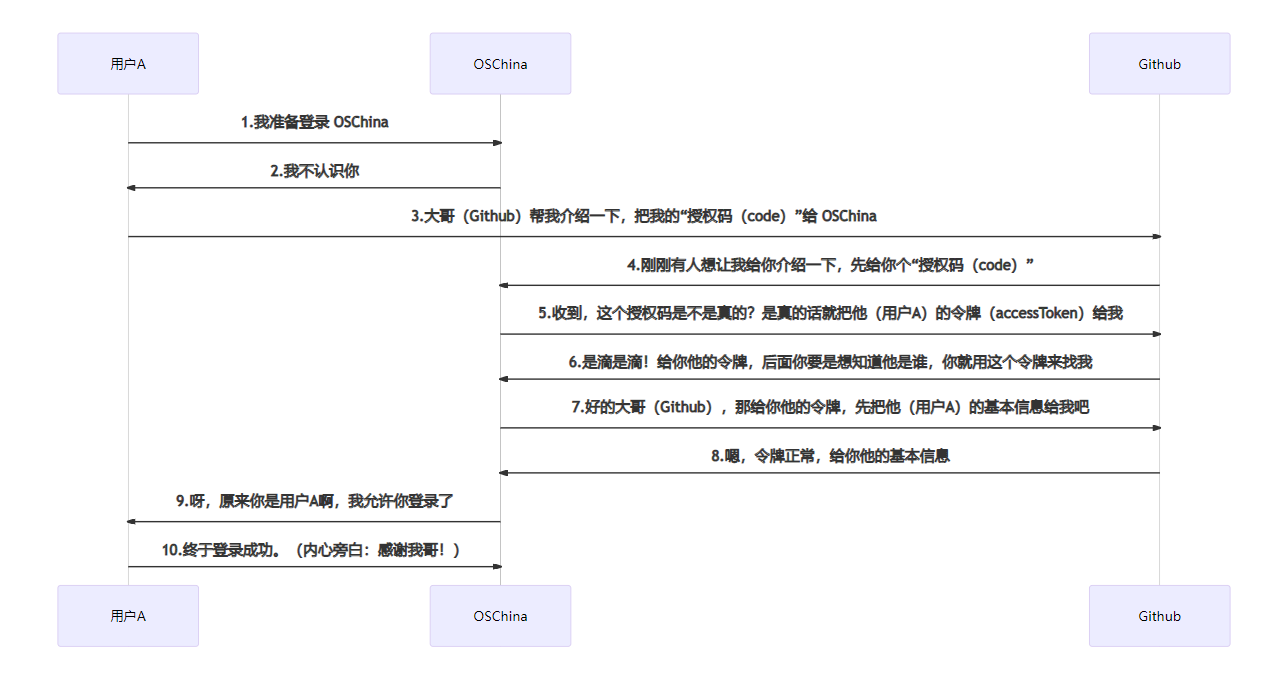
The abstract OAuth 2.0 flow illustrated in Figure 1 describes the
interaction between the four roles and includes the following steps:

(A) The client requests authorization from the resource owner. The
authorization request can be made directly to the resource owner
(as shown), or preferably indirectly via the authorization
server as an intermediary.
用户打开客户端以后,客户端要求用户给予授权。
(B) The client receives an authorization grant, which is a
credential representing the resource owner's authorization,
expressed using one of four grant types defined in this
specification or using an extension grant type. The
authorization grant type depends on the method used by the
client to request authorization and the types supported by the
authorization server.
用户同意给予客户端授权。

(C) The client requests an access token by authenticating with the
authorization server and presenting the authorization grant.
客户端使用上一步获得的授权,向认证服务器申请令牌。
(D) The authorization server authenticates the client and validates
the authorization grant, and if valid, issues an access token.
认证服务器对客户端进行认证以后,确认无误,同意发放令牌

(E) The client requests the protected resource from the resource
server and authenticates by presenting the access token.
客户端使用令牌,向资源服务器申请获取资源。
(F) The resource server validates the access token, and if valid,
serves the request.
资源服务器确认令牌无误,同意向客户端开放资源。
https://datatracker.ietf.org/doc/html/rfc6749#section-1.2

justauth源码学习-2021-06-29-17-22-17

从以下几个问题来看代码

Q: 如何集成多家的?

这一块,主要是工厂模式和模板模式的应用。

工厂模式

1
AuthRequestFactory#get(String source)

模板模式

1
2
3
4
5
6
7
public abstract class AuthDefaultRequest implements AuthRequest{
// ...
protected abstract AuthToken getAccessToken(AuthCallback var1);

protected abstract AuthUser getUserInfo(AuthToken var1);
// ...
}

justauth源码学习-2021-06-29-17-10-59

针对授权、获取用户信息等操作,由具体的 source 类来实现
因为都是基于 OAuth2 来实现的,所以都有 authorize 地址、accessToken 地址、userInfo 地址 等概念

1
2
3
4
5
6
7
8
9
10
11
12
13
14
15
16
17
18
19
20
21
22
23
24
25
26
27
28
29
30
31
32
33
34
35
36
37
38
39
40
41
42
43
44
45
46
47
48
49
50
51
52
public interface AuthSource {
String authorize();

String accessToken();

String userInfo();

default String revoke() {
throw new AuthException(AuthResponseStatus.UNSUPPORTED);
}

default String refresh() {
throw new AuthException(AuthResponseStatus.UNSUPPORTED);
}

default String getName() {
return this instanceof Enum ? String.valueOf(this) : this.getClass().getSimpleName();
}
}
public enum AuthDefaultSource implements AuthSource {
GITHUB {
public String authorize() {
return "https://github.com/login/oauth/authorize";
}

public String accessToken() {
return "https://github.com/login/oauth/access_token";
}

public String userInfo() {
return "https://api.github.com/user";
}
},
WEIBO {
public String authorize() {
return "https://api.weibo.com/oauth2/authorize";
}

public String accessToken() {
return "https://api.weibo.com/oauth2/access_token";
}

public String userInfo() {
return "https://api.weibo.com/2/users/show.json";
}

public String revoke() {
return "https://api.weibo.com/oauth2/revokeoauth2";
}
}
// ...
}

多家配置
JustAuthProperties,其 type 是 map 类型的,可以自定义任意多个的 source。

1
2
3
4
5
6
7
8
9
10
11
12
justauth:
enabled: true
type:
QQ:
client-id: 10**********6
client-secret: 1f7d08**********5b7**********29e
redirect-uri: http://x.lyloou.com/oauth/qq/callback
union-id: false
WEIBO:
client-id: 10**********6
client-secret: 1f7d08**********5b7**********29e
redirect-uri: http://x.lyloou.com/oauth/weibo/callback

Q: State 缓存如何实现?

state 是 用来保持授权会话流程完整性,防止 CSRF 攻击的安全的随机的参数,由开发者生成

自动配置

1
2
3
4
5
6
7
8
9
10
11
12
13
14
15
16
17
18
19
20
// justauth-spring-boot-starter JustAuthStateCacheConfiguration
@ConditionalOnMissingBean({AuthStateCache.class})
@ConditionalOnProperty(
name = {"justauth.cache.type"},
havingValue = "default",
matchIfMissing = true // 默认
)
static class Default {
Default() {
}

@Bean
public AuthStateCache authStateCache() {
return AuthDefaultStateCache.INSTANCE;
}

static {
JustAuthStateCacheConfiguration.log.debug("JustAuth 使用 默认缓存存储 state 数据");
}
}

配置

1
2
3
4
5
6
7
8
9
10
11
12
13
14
15
16
17
18
19
20
21
22
23
24
25
26
27
28
29
30
31
32
33
34
35
36
37
38
39
40
41
42
43
44
justauth:
cache:
type: default
```

**实现**

**清理**

通过 ScheduledThreadPoolExecutor 每隔 AuthCacheConfig.timeout 来定时清理 CacheState

```java
public void schedulePrune(long delay) {
AuthCacheScheduler.INSTANCE.schedule(this::pruneCache, delay);
}

public enum AuthCacheScheduler {
INSTANCE;

private AtomicInteger cacheTaskNumber = new AtomicInteger(1);
private ScheduledExecutorService scheduler;

private AuthCacheScheduler() {
this.create();
}

private void create() {
this.shutdown();
this.scheduler = new ScheduledThreadPoolExecutor(10, (r) -> {
return new Thread(r, String.format("JustAuth-Task-%s", this.cacheTaskNumber.getAndIncrement()));
});
}

public void shutdown() {
if (null != this.scheduler) {
this.scheduler.shutdown();
}

}

public void schedule(Runnable task, long delay) {
this.scheduler.scheduleAtFixedRate(task, delay, delay, TimeUnit.MILLISECONDS);
}
}

Q: 如何做到适配自有的 OAuth 服务?

和上面其他平台的一样,可以自定义来适配新的平台。

  1. 继承 AuthSource,加入 authorize、accessToken、userInfo 地址

  2. 实现 AuthDefaultRequest,重写几个基本的 oauth 服务接口:getAccessToken、getUserInfo、authorize。

  3. 测试

    1
    2
    3
    4
    5
    AuthRequest authRequest = new AuthMyGitlabRequest(AuthConfig.builder()
    .clientId("63398e403231d4aa7e856cf5413620d536a876cb94e8d10ced0d3191b5d1d246")
    .clientSecret("65b0eba68fff019e682e6755882a24dfdbf0a61be55de119cb8970320186c8eb")
    .redirectUri("http://127.0.0.1:8443/oauth/callback/mygitlab")
    .build())

Q: 如何支持自定义 Scope?

自定义-scope-接入-google-平台

scope 简单来说,就是申请得到某个(某些)范围的资源,超过此范围的资源限制访问。

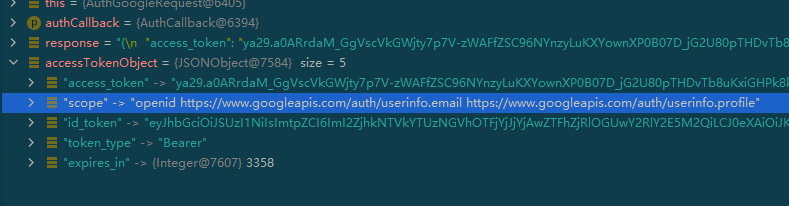
Scope is a mechanism in OAuth 2.0 to limit an application’s access to a user’s account. An application can request one or more scopes, this information is then presented to the user in the consent screen, and the access token issued to the application will be limited to the scopes granted.

—— 以上内容节选自oauth.net (opens new window)

提供 AuthScope 统一接口

1
2
3
4
5
6
7
8
9
10
11
12
13
14
15
16
17
18
19
20
21
22
23
/**
* 各个平台 scope 类的统一接口
*
* @author yadong.zhang (yadong.zhang0415(a)gmail.com)
* @version 1.0.0
* @since 1.15.7
*/
public interface AuthScope {

/**
* 获取字符串 {@code scope},对应为各平台实际使用的 {@code scope}
*
* @return String
*/
String getScope();

/**
* 判断当前 {@code scope} 是否为各平台默认启用的
*
* @return boolean
*/
boolean isDefault();
}

各个平台实现此接口,如 google

1
2
3
4
5
6
7
8
9
10
11
12
13
14
15
16
17
18
19
20
21
22
23
24
25
26

/**
* Google 平台 OAuth 授权范围
*
* @author yadong.zhang (yadong.zhang0415(a)gmail.com)
* @version 1.0.0
* @since 1.0.0
*/
@Getter
@AllArgsConstructor
public enum AuthGoogleScope implements AuthScope {

/**
* {@code scope} 含义,以{@code description} 为准
*/
USER_OPENID("openid", "Associate you with your personal info on Google", true),
USER_EMAIL("email", "View your email address", true),
USER_PROFILE("profile", "View your basic profile info", true),
USER_PHONENUMBERS_READ("https://www.googleapis.com/auth/user.phonenumbers.read", "View your phone numbers", false),
USER_ORGANIZATION_READ("https://www.googleapis.com/auth/user.organization.read", "See your education, work history and org info", false),
USER_GENDER_READ("https://www.googleapis.com/auth/user.gender.read", "See your gender", false),
USER_EMAILS_READ("https://www.googleapis.com/auth/user.emails.read", "View your email addresses", false),

USER_BIRTHDAY_READ("https://www.googleapis.com/auth/user.birthday.read", "View your complete date of birth", false)
// ...
}

结合流程图来说,(A)这里需要将 scope 带过去,进入授权页面。

1
2
3
4
5
6
7
8
9
10
11
12
13
14
15
16
17
+--------+                               +---------------+
| |--(A)- Authorization Request ->| Resource |
| | | Owner |
| |<-(B)-- Authorization Grant ---| |
| | +---------------+
| |
| | +---------------+
| |--(C)-- Authorization Grant -->| Authorization |
| Client | | Server |
| |<-(D)----- Access Token -------| |
| | +---------------+
| |
| | +---------------+
| |--(E)----- Access Token ------>| Resource |
| | | Server |
| |<-(F)--- Protected Resource ---| |
+--------+
1
https://accounts.google.com/o/oauth2/v2/auth?response_type=code&client_id=553817080137-d1pe3asc115tfgo74l8me92dhg4ro9k1.apps.googleusercontent.com&redirect_uri=http://x.lyloou.com/oauth/google/callback&state=e829a5725ce69cf1ed7918337caba839&access_type=offline&scope=openid email profile&prompt=select_account

授权页面的链接是通过 AuthDefaultRequest.authorize 来拼接得到的。

1
2
3
4
5
6
7
8
9
10
11
12
13
14
15
16
17
18
19
20
21
22
23
24
25
26
27
28
29
30
31
32
33
34
35
36
37
38
39
40
// AuthDefaultRequest.java
/**
* 返回带{@code state}参数的授权url,授权回调时会带上这个{@code state}
*
* @param state state 验证授权流程的参数,可以防止csrf
* @return 返回授权地址
* @since 1.9.3
*/
@Override
public String authorize(String state) {
return UrlBuilder.fromBaseUrl(super.authorize(state))
.queryParam("access_type", "offline")
.queryParam("scope", this.getScopes(" ", false, AuthScopeUtils.getDefaultScopes(AuthGoogleScope.values())))
.queryParam("prompt","select_account")
.build();
}
/**
* 获取以 {@code separator}分割过后的 scope 信息
*
* @param separator 多个 {@code scope} 间的分隔符
* @param encode 是否 encode 编码
* @param defaultScopes 默认的 scope, 当客户端没有配置 {@code scopes} 时启用
* @return String
* @since 1.16.7
*/
protected String getScopes(String separator, boolean encode, List<String> defaultScopes) {
List<String> scopes = config.getScopes();
if (null == scopes || scopes.isEmpty()) {
if (null == defaultScopes || defaultScopes.isEmpty()) {
return "";
}
scopes = defaultScopes;
}
if (null == separator) {
// 默认为空格
separator = " ";
}
String scopeStr = String.join(separator, scopes);
return encode ? UrlUtil.urlEncode(scopeStr) : scopeStr;
}

getScopes 这里的逻辑是,如果没有传入 scope 参数,那么就使用默认的 scope 参数,即openid email profile

1
2
3
USER_OPENID("openid", "Associate you with your personal info on Google", true),
USER_EMAIL("email", "View your email address", true),
USER_PROFILE("profile", "View your basic profile info", true),

插曲:如果你把 email 和 profile 取消掉,获取到用户信息时会发现少了 email,profile 这些信息

1
2
3
4
5
6
7
8
9
10
11
12
13
14
15
16
17
18
19
20
21
22
23
24
25
26
27
28
29
30
31
32
33
34
35
36
37
38
39
40
41
42
43
// scope=openid
{
"code": 2000,
"msg": null,
"data": {
"uuid": "113911973270419053931",
"username": null,
"nickname": null,
"avatar": "https://lh3.googleusercontent.com/a-/AOh14GgncI8eYK_uG119BDclub5LNGDn57G_GI4OLZeOBA=s96-c",
"blog": null,
"company": null,
"location": null,
"email": null,
"remark": null,
"gender": "UNKNOWN",
"source": "GOOGLE",
"token": {
"accessToken": "ya29.a0ARrdaM-dddddd-MPjpVj6xJAJP0zZFb396tpmi6BkS_Uom1G7DGTvSaWdJwwOzCXC5Bus-xQjq9JdGfNKWylhl029LMtuyZVT7lKzquGvUFePmellmRoY2Or6RgjS-TwKHzSviQoqEFBcYlQ",
"expireIn": 3592,
"refreshToken": null,
"refreshTokenExpireIn": 0,
"uid": null,
"openId": null,
"accessCode": null,
"unionId": null,
"scope": "openid",
"tokenType": "Bearer",
"idToken": "eyJhbGciOiJSUzI1NiIsImtpZCI6ImI2ZjhkNTVkYTUzNGVhOTFjYjJjYjAwZTFhZjRlOGUwY2RlY2E5M2QiLCJ0eXAiOiJKV1QifQ.dddddd.yYUcU9VMwrF3vGXfmR4bsJDeQSjl_msow9eCARiV8HYIyjWDyZUM0ihOqxQzunWUT0W3nRVWxFw4oeN9bhZxIU9jBpW600eJRyDZ6BgJs0QEmC4sjJ4rWPp_P6OFo6b4HEM9Cl5i4ix-cJV18-4BxWhM6WbuC09F3a5RVvp7YGzYhMDRK4fecDpy-7q5wFZws3oYOrjCK5rVu4lioLMTJHCV-THbWImZTrEiuiLxw6onvKwhDa2FfLGbO3tei0EoVTvxJJwi18K-5TzcNySb8yBA-NYTXmlLZ9iWb7NNa7IXqKI1qt0VYm7xUUY4r3G14tZKU6JKkuz07RVx-4zxMw",
"macAlgorithm": null,
"macKey": null,
"code": null,
"oauthToken": null,
"oauthTokenSecret": null,
"userId": null,
"screenName": null,
"oauthCallbackConfirmed": null
},
"rawUserInfo": {
"sub": "ddd",
"picture": "https://lh3.googleusercontent.com/a-/AOh14GgncI8eYK_uG119BDclub5LNGDn57G_GI4OLZeOBA=s96-c"
}
}
}
1
2
3
4
5
6
7
8
9
10
11
12
13
14
15
16
17
18
19
20
21
22
23
24
25
26
27
28
29
30
31
32
33
34
35
36
37
38
39
40
41
42
43
44
45
46
47
48
// scope=openid email profile
{
"code": 2000,
"msg": null,
"data": {
"uuid": "113911973270419053931",
"username": "lyloou6@gmail.com",
"nickname": "Lou",
"avatar": "https://lh3.googleusercontent.com/a-/AOh14GgncI8eYK_uG119BDclub5LNGDn57G_GI4OLZeOBA=s96-c",
"blog": null,
"company": null,
"location": "zh-CN",
"email": "lyloou6@gmail.com",
"remark": null,
"gender": "UNKNOWN",
"source": "GOOGLE",
"token": {
"accessToken": "ya29.dd-dddd-eplbTCCWb55DHRZeAGDqDvk5RADufWREONGgKhdtCLa3yWKp4TxTJsyPi2EXYhgmMqV4yVV-NX6swbc38hMXKKGzsTnW4UVaiSOklQ-C1B_af",
"expireIn": 3599,
"refreshToken": null,
"refreshTokenExpireIn": 0,
"uid": null,
"openId": null,
"accessCode": null,
"unionId": null,
"scope": "openid https://www.googleapis.com/auth/userinfo.profile https://www.googleapis.com/auth/userinfo.email",
"tokenType": "Bearer",
"idToken": "dddddddddd",
"macAlgorithm": null,
"macKey": null,
"code": null,
"oauthToken": null,
"oauthTokenSecret": null,
"userId": null,
"screenName": null,
"oauthCallbackConfirmed": null
},
"rawUserInfo": {
"sub": "113911973270419053931",
"email_verified": true,
"name": "Lou",
"given_name": "Lou",
"locale": "zh-CN",
"picture": "https://lh3.googleusercontent.com/a-/AOh14GgncI8eYK_uG119BDclub5LNGDn57G_GI4OLZeOBA=s96-c",
"email": "lyloou6@gmail.com"
}
}
}

justauth源码学习-2021-07-02-10-50-48
后面获取用户信息,带上 accessToken 来就可以获取了。

Q: http 工具如何解耦,可以将选择权交给开发者?

作者引入了自己实现的 simple-http 工具包 xkcoding/simple-http: 抽取一个简单 HTTP 的通用接口,底层实现根据具体引入依赖指定。

AuthGithubRequest#getUserInfo 开始

1
2
3
4
5
6
7
8
protected AuthUser getUserInfo(AuthToken authToken) {
HttpHeader header = new HttpHeader();
header.add("Authorization", "token " + authToken.getAccessToken());
String response = (new HttpUtils(this.config.getHttpConfig())).get(UrlBuilder.fromBaseUrl(this.source.userInfo()).build(), (Map)null, header, false);
JSONObject object = JSONObject.parseObject(response);
this.checkResponse(object.containsKey("error"), object.getString("error_description"));
return AuthUser.builder().rawUserInfo(object).uuid(object.getString("id")).username(object.getString("login")).avatar(object.getString("avatar_url")).blog(object.getString("blog")).nickname(object.getString("name")).company(object.getString("company")).location(object.getString("location")).email(object.getString("email")).remark(object.getString("bio")).gender(AuthUserGender.UNKNOWN).token(authToken).source(this.source.toString()).build();
}

这里实例化了一个 HttpUtils 工具类 new HttpUtils(this.config.getHttpConfig())

1
2
3
4
5
6
public class HttpUtils {
public HttpUtils(HttpConfig config) {
HttpUtil.setConfig(config);
}
// ...
}
1
2
3
4
5
6
7
8
9
10
11
12
13
14
15
public class HttpUtil{
public void setConfig(HttpConfig httpConfig) {
checkHttpNotNull(proxy);
if (null == httpConfig) {
httpConfig = HttpConfig.builder().timeout(Constants.DEFAULT_TIMEOUT).build();
}
proxy.setHttpConfig(httpConfig);
}
private void checkHttpNotNull(Http proxy) {
if (null == proxy) {
selectHttpProxy();
}
}
}

可以看到 selectHttpProxy()这里是关键,通过 ClassUtil.isPresent的方式(即Class.forName)来确定 class 是否可以被加载,从上到下,如果可以被加载,就作为 http 的具体代理。(所以引入了相关的 http 依赖,HttpUtils 就可以直接拿来使用了)

1
2
3
4
5
6
7
8
9
10
11
12
13
14
15
16
17
18
19
20
21
22
23
24
25
26
27
28
29
30
public class HttpUtil {
private static AbstractHttp proxy;

private void selectHttpProxy() {
AbstractHttp defaultProxy = null;
ClassLoader classLoader = HttpUtil.class.getClassLoader();
// 基于 java 11 HttpClient
if (ClassUtil.isPresent("java.net.http.HttpClient", classLoader)) {
defaultProxy = getHttpProxy(com.xkcoding.http.support.java11.HttpClientImpl.class);
}
// 基于 okhttp3
if (null == defaultProxy && ClassUtil.isPresent("okhttp3.OkHttpClient", classLoader)) {
defaultProxy = getHttpProxy(com.xkcoding.http.support.okhttp3.OkHttp3Impl.class);
}
// 基于 httpclient
if (null == defaultProxy && ClassUtil.isPresent("org.apache.http.impl.client.HttpClients", classLoader)) {
defaultProxy = getHttpProxy(com.xkcoding.http.support.httpclient.HttpClientImpl.class);
}
// 基于 hutool
if (null == defaultProxy && ClassUtil.isPresent("cn.hutool.http.HttpRequest", classLoader)) {
defaultProxy = getHttpProxy(com.xkcoding.http.support.hutool.HutoolImpl.class);
}

if (defaultProxy == null) {
throw new SimpleHttpException("Has no HttpImpl defined in environment!");
}

proxy = defaultProxy;
}
}

如下图,是 simpleHttp 默认支持的 Http 工具。

image-20210625112056585

也可以自己继承 AbstractHttp,然后调用 HttpUtil#setHttp(AbstractHttp http) 方法来接入自己实现的 http 工具。

所有实现 AbstractHttp 和 Http 的类,需要自己实现 一系列的getpost 方法(即封装)。运行时通过面向对象中的多态来决定具体的实现者。

0%